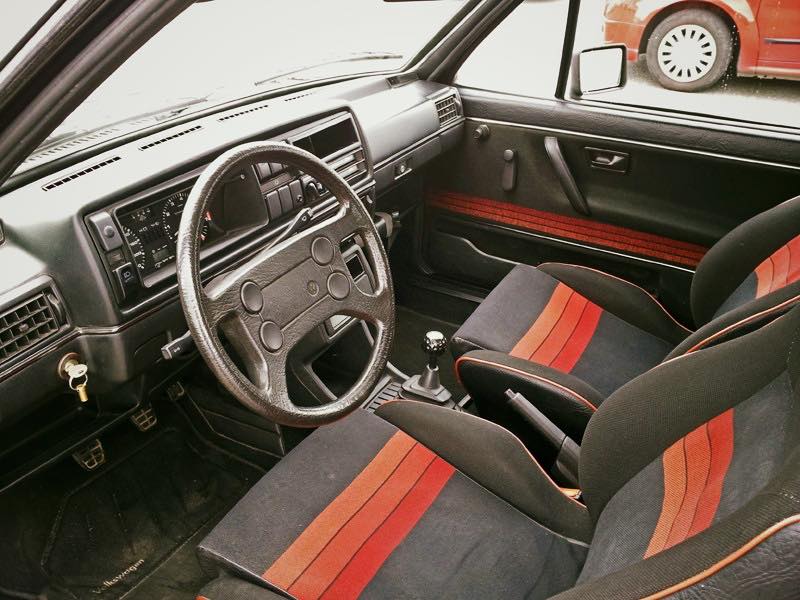
So with a heavy heart I decided to let my GTI Engineering Golf go prior to Christmas and thought that I might consider looking again in the new year or spring time for something to possibly replace it with. As the calls started to come in and it sold I then spotted what I had in my head as the car I wanted, an early 3 door GTI. Originally I wanted an 87-89 car to try to get an early Digifant but ended up with a KJet. So well ahead of when I'd planned to buy another, I picked this up sight unseen and had it delivered.
I bought this particular one after seeing a few because of the colour, but also the service history of which there is an awful lot and the bodywork. Its had paint and a lot of resto work done over the years, and seems to be in similar fettle to my previous car so I had a good idea of what I was taking on, but like any of them, it needed some mechanical work.
I've already got stuck into a few things, many of which I don't have photos of, but so far it's had new belts, service, new radiator, new clutch, adjusting a few things here and there, and fixing the leak into the boot which turned out to be the screen wash pipe to the rear window.
Beetle, meet Golf;
The first of the jobs needing sorted. The gears are like stirring cement, 1st can't be got the rest are full of lots of slop. All in all it makes changing gear a challenge so new linkages, bushes etc were all bought and this was one of the main culprits I think, what should be the selector ball bit was actually the bush that belongs on the main shaft. All swapped out with new parts and the metal brackets etc all treated to Por15 to keep the surface rust off.
Next are the leaking door cards, the water just seems to pour in. Upon removing the door cards it seems the door membranes aren't great, and in fact, didn't exist.
The door cards where left in garage for a week or so to dry out as they were very wet. Once dried out they got treated with a few layers of yacht varnish until they stopped soaking up the layers. This gave them a nice sheen on inside but also made the bottoms of the them more rigid than before adding strength. Below is a before and after;
My next job was a stereo. There were four speakers in the car, two in the dash and two in the front doors. The dash speakers, it turns out, weren't connected, and the door speakers were done so incorrectly, so there was no sound. The stereo was a ministry of sound unit from years ago and really looked out of place. After ordering up a load of the correctly marked wire, running it through the car and soldering it all together with a modern ISO plug on the end, with a proper ignition live etc the loom was done. Speaker wise, it now has new door speakers and rear parcel shelf speakers, something which I don't think its ever had fitted. The dash speakers have been left unconnected but the wiring is in place for them, I'll hook them up once I get new speakers bought and fitted.
It also meant that I could not use my retro Blaupunkt complete with tape deck. Tapes sound awful, forgot how poor they were
Got tagged on the Facebook after speaking to a mate about wheels, so I'm going from these Wolfrace specials ...
To these P Slots once I get them refurbished. To be honest they could go on as they sit but I'd rather wait until I get them painted as I'm in no rush.
The job I'm currently getting into is trying to tidy the engine bay, its got lots of surface rust over what should be black powder coat, so in the coming week the two cross members, engine cowling, slam panel and rocker cover are all going off with the wheels to get freshened up.
I know there’s various resources and tools available for these but I thought I’d create my own list and gather all I can together in one place.
001 - 003 - 020 - MPH Speedometer 085 - Increase of the standard equipment fuel delivery 0A1 - Two doors 0A2 - Four doors 0AA - Without front stabilizer 0B0 - Wheelbase 0BA - Without rear stabilizer 0C0 - Standard 0DC - Installation differentiation for build status of vehicle class A2 (VW Golf/ Jetta), unit components 0G1 - Gearshift lever 0KA - Without stickers and badges 0MA - Without label for starting an automatic 0N1 - Standard rear axle 0NB - Nameplate set in base trim 0ND - Nameplate set "TDI" 0NH - Nameplate set "GTI" 0PF - Nameplate set "Sports" 0Q0 - Without label for brake-proportioning values 0W2 - Label for central electric English-speaking countries 0Y1 - Standard climatic zones 184 - three-point seat belt for seat, front 197 - 45 Amp Battery 1AB - Power brake 1AC - Anti-lock brake system (ABS) 1AF - Power brake 1AH - Power brake + rear discs 1BA - Standard suspension/shock absorption 1C1 - Antifreeze up to -25 degree celsius tolerance up to -30 degree C 1D0 - Without trailer hitch 1E0 - Without activated charcoal canister 1EE - Special identification plate 1F1 - One towing eye each side, front and rear 1G2 - Steel spare wheel with original equipment tires 1G4 - Space-saving spare wheel, same size (same rolling circumference) as original equipment tires 1G6 - Space-saving spare wheel 1H0 - Without proportioning valve 1H1 - Load-sensitive proportioning valve 1HG - Labels for country group 4/B 1K1 - Mechanical clutch actuation 1KA - Drum brakes, rear 1LA - Disc brakes, front 1M8 - Trailer hitch mechanically swiveling and electrically detachable (with bicycle carrier) (?) 1MA - Steering wheel 1MB - Sports steering wheel Non-PAS (hollow rim) 1ME - Sport steering wheel PAS, 370mm 1MG - Leather trimmed sports steering wheel with reduced diameter for power steering (hollow rim) 1N0 - Standard steering 1N1 - Power steering 1NB - Covers for wheel hubs/wheel bolts? 1NE - Wheel center cover 1SA - Without additional front underbody guard 1TB - Fuel tank vent line with gravity valve and PVC breather hose 1V0 - Without duty-free and cost-free tires 1W0 - Without refrigerator/glove compartment cooling system 1WA - Transmission shafts w/ 90 mm in diameter 1X0 - Front wheel drive 1Z2 - Increase in initial standard fuel filling 23D - 258 - Adjustible head restraint for front seat 261 - Exterior mirror (flat) (passenger side) 268 - Heated washer jet spray nozzle 2B0 - Without additional exterior noise suppression 2C0 - Standard steering column 2G0 - Without insert for the filling up of fuel 2J1 - Impact bar in doors 2JB - Standard bumpers 2JD - Sports bumpers (GTI red stripe Small Bumper) 2JE - Partially painted bumpers 2M0 - Without water trap 2P0 - Without trunk sill protection 2V0 - Fresh air intake without air cleaner 35D - 3AF - Outer right rear view mirror: convex, powered, heated 3AU - Right exterior mirror: aspherical, adjustable from inside 3AV - Outer right rear view mirror: non-spherical, powered, heated 3B0 - Without additional child seat anchor 3BE - Outer left rear view mirror: flat, powered, heated 3BD - Left exterior mirror: adjustable from inside, convex 3BF - Outer left rear view mirror: convex, powered, heated 3C0 - Without center rear seat belts 3CA - Without partition 3D1 - Center console 3D3 - Center console 3D4 - Center console 3FB - Steel sliding roof, manual control 3GA - Without cargo area 3H0 - Without backrest release for front seats 3H3 - With backrest release mechanism, right and left front seats 3J1 - Height-adjustable headrests for front seats 3L1 - Manual height adjustment for left front seat 3L2 - Manual height adjustment for right front seat 3KZ - left and right sports front seat type 2 3M0 - Without special measures 3MA - Flat needle-punched floor covering 3NB - Rear seat bench/backrest, not split 3NC - Rear seat bench/backrest, split folding 3P1 - Bracket for first aid kit and warning triangle 3Q0 - Without rear headrests 3QC - 3-point seat belts, front 3U1 - Foldable trunk cover 3XA - Without top carriers for luggage rack system 3YB - Door pockets, front 3ZA - Without outer rear seat belts 403 - Steel rim, 6Jx14H2 ET38 - Golf GTI/Jetta GT 409 - Sports Seats 476 - Spare wheel with driving tire (fullsize) 4A0 - Without seat heater 4B1 - Protective side molding 4F0 - Mechanical locking system 4GD - Clear glass windshield 4GF - Tint glass windshield 4KA - Side and rear windows in clear (non-tinted) glass 4KC - Side and rear windows in tint glass 4N1 - Padded dashboard 4Q0 - No flame retardent materials 4R0 - Mechanical window regulator 4SB - Vanity mirror left 4TA - Without right vanity mirror 4TC - With make-up mirror right, with cover 4W0 - Without cassette and CD storage unit 4XA - Without pillar lining 4Z4 - Glove compartment door without light 560 - Steel sliding roof, manual control 565 - Sport steering wheel 52k - 5C0 - Without special body measures 5CH - Roof interior trim, comfort molded headlining in cab and passenger compart. 5J0 - Without rear spoiler 5J1 - Rear Spolier for tailgate/boot lid 5K1 - Paint preservative (wax) 5L1 - Front spoiler 5TA - Tamo wood trim 5UA - Without cross panel 5VA - Without cargo area front 643 - Tray position in the doors (door bins) 656 - Front seat with height adjustment, driver side 69A - 6CA - Without rear heating/ventilation duct 6EA - Without additional side body covers (stone guard) 6FA - Components without special surface appearance 6HA - Without sticker/body cover 6JC - Black door handle inlay 6KA - Radiator grille 6N0 - Without mud flaps 6NA - Unsplit molding roof liner 6NW - Unsplit molding roof liner 6PA - Plastic hand brake lever handle 6Q1 - Plastic gearshift knob/handle 6R3 - Rubber gearshift boot 6R3 - Rubber gearshift boot 6SD - Tufted trunk floor covering (dimensionally stable) 6U0 - Without additional seals outside 6Y0 - Without cruise control warning system 731 - 776 - Without trim strip 791 - 8A0 - Park distance control, front and rear with rear view camera 8AA - Without radio 8BF - Halogen headlight for driving on the left 8BK - Twin headlight for driving on the left, with integrated high beam 8C0 - Without front fog light circuit 8CA - Speedometer cable without seal 8D4 - 4 speakers (passive) 8D7 - 6 speakers (passive) 8E2 - Local interference suppression for FM/AMradio reception 8F2 - Side turn signal lights 8GC - Alternator 65A 8J1 - Hand brake/low brake fluid level warning light without inscription 8K2 - Daytime driving light mode for urban driving (dim-dip driving lights) 8KA - W/o catalytic converter warning light 8L1 - Bright rod antenna 8M1 - Rear window wiper and washer system with intermittent control 8N1 - Windshield wiper intermittent control 8NA - Without parking light warning light 8Q0 - Without headlight-range adjustment 8QA - Key without LED 8R0 - Without center high-mounted stop light 8SA - Taillight assemblies, standard design 8T0 - Without cruise control system (CCS) 8TD - Rear fog light for driving on the left 8U0 - Without additional instruments for distance measurement 8V1 - Cigarette lighter 8WA - Without front fog light 8WD - With front fog light 8X0 - Without headlight washer system 8Y0 - Single-tone horn 930 - Inside adjustable exterior mirrors 931 - Plane front-passenger outside mirror, inside adjustable 9AA - Manually controlled heating system 9BA - W/o additional electric safety package 9D0 - Without preparation for two-way radio installation 9E0 - Without trunk lighting 9F0 - Without sound combination for rotating emergency light and radio antenna preparation 9GA - Interior light with door pillar switches 9HA - Without additional malfunction display 9J0 - Without supertone system and tone sequence control 9P0 - Without seat belt reminder 9PA - Standard windshield wiper arms/blades 9Q0 - Without multi-function display/ on-board computer 9T1 - Heated washer nozzles, front A60 - A8D - Luxury equipment B0N - Component parts set, complying with vehicle type for Great Britain, various parts BS2 - Special requirements French overseas territories C0B - Steel wheels 5.5J x 13 surface style C0U - Aluminium rim, 6Jx14H2 ET38 C1K - Steel wheels 5J x 13 C1N - Steel wheels 6J x 14 E0A - No special edition E1E - Campaign version Golf GT Special (Euro/German market) EQD - F0A - No special purpose vehicle, standard equipment G0A - 4-speed manual transmission G0B - 5-speed manual transmission (long ratio for China) G0C - 5-speed manual transmission G0D - 3-speed automatic transmission G0G - 5-speed manual transmission (GTI box) H52 - Tires 185/60 R15 84T (black) H0G - Tires 185/60 R14 H H0U - Tires 195/50 R 15 V HG1 - All-weather tires 195/65 R15 91T J0A - Battery 175 A (36 Ah) J0C - Battery 220 A (45 Ah) J0G - Battery 265 A (54 Ah) K8G - Hatchback L0L - Left-hand drive vehicle L0R - Right-hand drive vehicle M3P - 4-cylinder gasoline engine 1.3 L/40 kW (carburetor 2E3) base engine is T3H M3V - 4-cylinder gasoline engine 1.6 L/55 kW base engine is T2L M3X - 4-cylinder gasoline engine 1.8 L/82 kW DIGIFANT base engine is T3E M4Y - 4-cylinder gasoline engine 1.8 L/118 kW G60, big intercooler, closed-loop cat base engine is T3R NG9 - N1R - Leather seat covering Q1A - Standard front seats Q1B - Standard front seats (NAR) Q1D - Sports front seats S2K - Vehicles with self-adjusting clutch U0C - Instrument insert with tachometer clock and km/h speedometer U0K - Instrument insert with clock mph speedometer U0L - Instrument insert with tachometer clock and mph speedometer V0A - Tires w/o specification of tire brand V0F - CONTINENTAL tires V0G - MICHELIN tires VW3 - WE3 - W23 - Golf GT Special 2T "GROSSBRTANNIEN (Great Britain)" X0A - National Sales Program Germany X2B - National Sales Program Great Britain
This is one to keep a watch on as I add more.
It will in time become harder to decode the options as the online tools refer to vag listings but codes are being repurposed, so what was once a door mirror for a mk2 might now come up as an 18” space saver from an Audi A6 or whatever.
The Limited edition campaign model, launched in the spring of 1988 to celebrate the production of 10 million VW Golfs.
16500 were made in total, with 8000 staying in Germany and the rest went for export. This is not speculation, this is the actual figure from Volkswagen heritage department in Germany.
That puts 8500 outside of Germany.
The spec varied across the different markets with many non UK cars being different colours and carbed models not GTIs. These all had a One in Ten Million sticker on the body.
All of the UK ones were all GTIs and were available in a choice of only 3 metallic colours, and did not have the sticker or any other way to distinguish them other than the specification. Of the UK ones it's estimated there were less than a 1000 of each colour available. Even VW don't have specific figures, I've asked. All they know is which were allocated for export, they don't have it recorded where they went.
There were 3 and 5 door variants, and 8v and 16v engine choices, so if for example this was an equal split (which I'm sure it wasn't) then there was potentially only ever 250 in each combination.
All had metalic paint in the following colours:
Helios Blue (LA5Y), Metallic Black or Oak Green.
They were all produced in early 1988 available during the spring so should mostly be on E registrations. It would be possible to be on an F reg if it sat in the dealership for a few months before being sold. Pictured below is an F reg Oak Green, but these are from a Google image search and not a car I know so I cannot confirm it's authenticity.
They are all small bumper GTIs (were all originally small bumper - as correct for the year)
And all left the factory with the following spec:
Le castellet Forged alloy wheels (14").
Air Vacuum Central Locking.
Rainbow interior, but on early spec seats. (49)
Tinted Glass.
Hella half tint rear lights.
Dark tinted interior light with time delay.
The 8v came with Blaupunkt London stereo, the 16v got the Blaupunkt Atlanta (Euro spec, unconfirmed for UK cars as I still belive UK cars were shipped without stereos and stereos were fitted by the dealership. Most likely to avoid theft during the shipping process)
And all had a special document wallet.
That's not to say at time of purchase a customer may not have ordered some additions, such as a leather interior, leather steering wheel or even different alloys. Other specification like electric windows and power steering for example may have also been added extras, but these would have been the customers choice, not specific to the One in Ten Million model.
The document wallet
A rather nice example on 4 Star Classics
A European Non-GTI model (with some mods)
The Sticker on Non UK cars, there's one on the front wings and another on the rear panel.
L041 : Black L90E : Alpine White L94E : Oak Green L97A : Diamond silver LA1V : Sand Metallic LA3A : Mars Red LA3B : Gambia Red LA3G : Classic Red LA3W : Red Spice LA5E : Maritime Blue LA5G : Pearl Blue LA5T : Medium Blue LA5U : Royal Blue LA5W : Blue Lagoon LA5Y : Helios blue metallic LA6U : Capri Green LA6V : Lhasa Green metallic LA6W : Fresco Green LA6Z : Calypso LA7S : Stonehenge Grey LA7U : Pearl grey LA7W : Reflex Silver LA9B : Cool White LA9V : Brilliant Black LB1B : Sunflower Yellow LB1D : Mellow Yellow LB1M : Harvest Moon Beige LB2A : Sundown Orange LB3Y : Colorado Red Pearl LB4V : Samoa LB5B : Aquarius Blue LB5N : Indigo Blue Pearl LB5Q : Speed Blue LB5R : Deep Blue Pearl LB5S : Blue Silver LB5T : Steel Blue LB5W : Pacific Blue LB5X : Blue Spirit LB6T : turquoise LB6U : Mint LB6W : Pine Green LB6X : Alaska Green LB6Z : Montana green LB7Z : Satin Silver LB9A : Candy White LC35 : Titian Red Pearl LC3L : Hot Chilli Red LC3T : Indian Red LC3U : dark burgundy pearl effect LC3X : Matchstick Red Pearl LC3Z : Terracotta LC4P : Purple Violet Pearl/Mulberry LC4T : Twilight Violet LC5F : Blue Graphite LC5L : Mystic Blue LC5M : Moonlight Blue LC5P : Dusty mauve LC5R : Marlin Blue LC5S : Appassionato Blue LC5U : Aqua Blue Pearlescent LC5X : Ink Blue LC6X : Baltic Green Pearl LC6M : Bright Green Pearl LC6P : Dragon Green/Emerald Green LC6V : Green LC6W : Rave Green Pearl LC6X : Baltic Green Pearl LC7V : Blue Anthracite LC7W : Papillion Silver Helios. LC9Y : Luxury Black Helios. LC9Z : Black Magic Pearl LD1B : Yellow LD1D : Double Yellow LD1W : Wheat Beige LD2B : Snap Orange LD5Q : Shadow Blue LD6S : Northern Green LD6T : Electronics Green LD6W : Venetian Green LD6X : Reed Green LD7U : Off-road Grey LD7V : Silver Grey LD7W : Platinum Grey LD7X : Platinum Grey LG3L : Red LG5A : Vapour blue LG5T : Dark Blue Pearl LG5V : Galactic Blue Pearl LG7V : Desert Wind LG9R : Silver Arrow LK5S : Riviera Blue LK5U : Arktis Blue LK7Y : Storm Grey LN5Y : Windsor Blue LN5V : Pasadena Blau (blue) LP3G : Flash Red LP5T : Blauschwartz LP5U : Bright Blue Met LQ3A : Monza Red LR1V : Bolero Beige LR1W : Birken Pearl LR5U : Antibes Blue LR5V : Fjord Blue LR5W : Luna Blue LR5Z : Rising Blue LR6X : Marais Green LR6Y : Waterworld Pearl LR7R : Cairo Grey LR7T : Coucou Grey LR7Y : Silver Atmosphere LR8V : Nocturne Aubergine LR9A : Campanella White LW5Y : Bright Blue Pearl LW5Z : Jazz Blue LY3D : Tornado Red LZ5T : Europa Blue Mica LZ3N : Ruby Red Pearl R902 : Arctic White Z6U : Imperial Green
Hi All Thought I would share a couple of sites I have found over time to look up the VW Part No and position of fitment. First is a parts Base for VAG and others with exploded views of different areas :- http://www.oemepc.com/ Found it very helpful to track down a part and its fitment !
This one compares different manufactureres part No's for the same part and specs :- http://www.vehiclepartsdatabase.com/vehicles Recently came across this site looking for info on vavle guides, gives detailed info on each manufactorers of the same part to compare specs, you can put in the part No you have and it will cross refference it with other makes, or just look up the part you need ! Hope this is in the correct section !
We were talking the other day, and decided we’d try and put together some information on what is involved in turning a humble Golf into a car which is happy to go racing.
This is not going to cover all bases, it is not going to give a hugely in depth or deeply technical run down of everything that is possible, and some things won’t be covered at all, but hopefully it will be mildly interesting or at least informative for people who have thought about doing this or just wondered what is involved.
We’re going to skip the first step where you either dismantle your chosen complete car or collect a bodyshell, and we'll also skip any component, part, tool or kit purchases you need to make. Just straight into the work itself in a series of posts starting at the ground up. The pictures are compiled from various cars we’ve had around, so when it changes colour repeatedly don’t worry!
An important note before starting, please understand what’s meant by a racecar here, we mean competition cars.
We are not talking about cars that may see a one off track day, though fair play to these folks :thumbs: Nor are not talking about cars which go quickly on the road and have a few fruity bits fitted to them, also fair play :cool: And definitely not ‘race inspired’ show field clutter. If that's your thing, go grab a pumpkin spiced Latte or something :bout ye:
No disrespect to anyone or their pride and joy, if it’s your car and you enjoy it then more power to ya, but we’re talking cars which are built for the purpose of getting the kind of stick you can only give a car on track. Even people calling occasional track cars 'racecars' is irritating, so just cool it on all that crap and enjoy what you're doing without any misrepresentation. Preemptive rant over.
More importantly than that, it is incredibly important to look into what series or events are available to your chosen car, looking at the regulations of those series (and others) to see which way to go and making a plan which will work and trying to stick to it. Don't get sucked into trying to build a BTCC car on an individuals budget. Getting out and having fun in a lesser spec’d car, and improving on it later, is more valuable than going to town and spending years in the garage… ask me how I know. Seat time is king! :thumbs:
Some series like the Production GTI Championship is very conservative with what you’re allowed to change on the car, leading to great racing and (fairly) evenly matched cars. Some like the Classic VW Challenge give more scope for modifications and have some very serious cars in the field, organiser Ken Larks Corrado for example, and some like the Scottish Saloon championship and Pembrey’s Welsh Sports & Saloons championship are incredibly liberal letting you run big turbo’d 20v’s and slicks and whatnot and even featuring ex-BTCC cars on occasion :shock:
As said we'll be starting at the beginning, so the first post will be on the car itself in the most basic state.
Thanks, Tom
The Shell
It’s always a good idea to kick things off with the bodyshell itself. In a perfect world, you’d have a brand new pre-production shell, which you’d have had pulled off the production line before the seat belt brackets and so on, underseal, all those things have been put on, you’d send it off for acid dipping to get the coating off the metals, your staff would weigh it, crack the computer design and simulated testing, complete the fab work, moulding and final assembly in some insanely rapid time frame and you’d forget about it until turning up to pre-season testing without a care in the world to get busy behind the wheel. BUT we’re assuming for the sake of this thread, and real life, that your build starts like most of ours.
So in stark contrast to the above, you pick up a shell which has seemed like a winner to you, the best you can find for the money you have or simply all that is available, and you’ll hopefully have a fairly solid starting point to get cracking on with. Prepare to spend the next few days / weeks / months covered in metal dust, sucking in toxic fumes, burning yourselves, and generally being a badass.
First things first, get yourself a clean slate. Get rid of all that bitumen, sound deadening, underseal, all those things that make your road car a nice pleasant place to be. In some pics, it is already removed, but all locations are outlined whether they’re there or missing. Interior wise, there are individual patches on the rear panel
Inside the rear quarter panels rearward of the rear turrets
Inside the rear quarter panels behind the interior rear quarter cards
Inside the front doors
On both of the interior surfaces of the front wheel wells
And on the shifter tunnel
These are easily removed with a wallpaper scraper and a heat gun. It is handy to sharpen one side of the wallpaper scraper *slightly* with a sharpening stone, a belt sander or something along those lines, but leave the other side, which will meet the panels while scraping, to avoid skagging the metalwork or making the bottom of the scraper an uneven surface which will make your life harder. As far as the amount of heat required, you’ll get an eye for it very quickly. Do small areas at a time as it cools quickly, heat the area moderately, it doesn’t need to smoke or bubble, you just need to warm it up a touch, get that portion out of the way and move on.
The firewall’s interior side is also covered in these, so they've gotta get it too. On top of this, both the front and middle sections of the floor pan are covered in a bitumen kind of coating, which is deceptively weighty once it’s all clumped together.
This comes off better without heat for the most part, as when it’s cold it chips and isn’t stuck as rigorously as the individual pads, so with a good sharp scraper and moderate force at the right angle you can take it all off without much grief. It’s worth eyeing up where there are seams and joins in panels etc as well so as not to keep smashing a scraper into the OEM seat crossmember or similar. There is a big sound proofing mat, seemingly made of clothes from the holocaust blended with some leftover disgusting felt stuff and a black rubbery backing. There is some under the carpets, some covering the firewall / bulkhead, and some with the rubber backing stuck directly to the inside of the roof and the metalwork beneath the dashboard.
After this, the actual body is properly exposed. What may have looked like a very solid car may now not look like it did with a thick coating of tar, but hopefully it’s all okay. Identifying, assessing and sorting out any corrosion, holes or anything structural makes sense at this point. A good straight base is invaluable, so take care of anything that needs taking care of so your work later isn’t wasted on a rust bucket.
The next logical step in our opinion is to bin the unused brackets and mountings that you will no longer be needed. Off the top of my head, the washer bottle bracket in the bay, moving to the inside the rear seat base, the rear seat upper brackets on the rear suspension turrets, the rear seat belt mounting bolt plate in the C Pillars and behind the rear turrets. With some of these, such as the front seat crossmember and the front seat rails, your best approach is to cut off the bulk with a mix of angle grinder, air saw and even tin snips to minimise the amount of grinding back you need to do afterwards. The reason for my opinion on this, is due to the shear volume of spot welds attaching them. Cutting the bulk off and grinding then flap disc-ing down the remainder is much quicker.
So once you’re left with this, for example, just grind out what’s left until this skin is thin enough to lift, just don’t prise skins apart with force, as you’ll just bend the one you’re keeping and make a mess.
With others, like the washer bottle bracket, rear seat belt upper bracket (pictured), the easiest approach is to drill out the handful of spot welds which attach this ‘skin’ to the panel beneath it, as they're much less concentrated than on the areas covered before.
Seam sealer and the rubberized stone chip stuff is the final hurdle in terms of now-unnecessary crap stuck to your shell. There’s a mountain of this, seam sealer all around the engine bay, on many of the panel joins in and under the car, coating all four wheel wells and the entire underside of the car. This definitely shouldn’t be any kind of priority, but if seam welding or going full bore to keep weight down you’ll find yourself doing this at some point, at least to some extent. Same old heat gun and scraper job here with the wire wheel on a drill or preferably angle grinder and a rag with paint thinner or panel wipe to finish up the job.
It’s worth remembering the panels themselves have a little weight to give up as well, the inner skins of the doors for example, but before getting too keen on cutting things up this is one of those check and check again moments for your rulebook. Interestingly, the MSA excludes bolt-off panels from its definition of “bodyshell” in its regulations, so that’s nice
By this point, hopefully you’ll end up with a nice bare shell, with the factory weight and provisions for a nice quiet car well and truly having gone out the window.
Roll Cage
The next thing to address is the lack of anything resembling a climbing frame. A well built roll cage can save your life, and a badly built one can kill you, or at the least not help if needed. A lot of the time it doesn’t come to this, and of course that’s a good thing, but with things like roll cages, seat mounts, brakes and whatnot, it pays to think in this way as if things do go wrong and luck isn’t on your side, it can be this serious, and you can’t race or party if you’re dead. There are countless videos on Youtube from British circuits in ‘regular’ tin top racers, it is a very real concern.
It’s important to check the regulations again here, most series in the UK simply reference the MSA’s Competitor Safety section, which gives all the information you need to build a compliant cage. Read, re-read and keep it handy whilst building :thumbs: The basics, and I mean basics, are that mounting feet must be 3mm thick steel and cover an area of 120cm2. The cage should be as close as possible to the pillars etc and follow them properly. All mandatory tubes which must be present in any cage - the Main Hoop, the A Pillar bars, the Windscreen bar, the rear Upper Stays and the one mandatory Diagonal, which can be set across either the rear Upper Stays or across the Main Hoop - must all be made from 45mm O/D seamless tube with a 2.5mm wall thickness. Optional tubes, such as rear lower stays, harness bars, etc, can be made of 38mm OD 2.5mm thick or 40mm OD 2.0mm thick tube, which can save a little weight but sometimes it saves money and keeps things simple to just use 45mm OD 2.5mm thick tube across the board. Specs vary for T45 tube compared to steel, but it’s all in the Competitor Safety section. It’s also worth noting, some cages do not comply to these regulations but are still legal. As an example, the Safety Devices Mk2 Golf cage was designed, originally built and then homologated and certificated when regs were more lax. This means the tubing is 38mm OD throughout, so while if you made your own cage like this, or modified one of these cages, you would not pass scrutineering, as an off the shelf item from Safety Devices with the certificate they provide it is still legal for competition now, even after the regulations have been updated. Never black and white, always check and re-check, always do your own research and always ask (MSA, a local scrutineer, etc) if you are unsure.
Here’s an example of a weld in cage, kept basic to keep weight down, going for a full bore WRC looking cage will look very nice but there’s already upwards of 60kg of weight in a basic cage, so bear that in mind.
If you choose to fit a weld in roll cage as opposed to a bolt in (which will still require proper welding of mounting plates to be legal and effective) you can increase the rigidity of the chassis even further. Often these are gusseted to additional points on the car besides the tubes mounting locations, most noticeably the A Pillars, and frequently there are additional tubes passing through the firewall to fully tie the front suspension turrets into the rest of the roll cages structure. This is obviously very good for very stiff suspension, very sticky tyres and a healthy dose more power in an aging shell.
There’s loads more to this, but this is simply an overview for the sake of this thread.
Seam Welding
Seam welding is a good place to go once the cage is in. This is tricky, as generally it’s dirty ‘car metal’. You need to be committed when you fire the welder up, as bits will blow through and you don’t want to leave holes, so get stuck in. The best way we’ve found is to wire wheel the areas that are getting your attention, blow torch them briefly to get the sealant to run out from between the skins, let it cool, wire wheel it again and that will minimise how much runs out when you start welding, but you’re bound to get some, so keep it in mind. You wouldn’t want to do more than an inch on to an inch off, so inch welded, inch skipped, inch welded, and so on. A lot of people say an inch every two inches, but either way I find it useful to map this out with a Sharpie before starting as I lose track once I start otherwise, and a massive irregularity can look a bit odd if you’re concerned about that. We weld 20mm, skip 40mm, peachy.
We never go further forward than the front suspension turrets, or further rearward than the rear suspension turrets, so you still have some form of worthwhile crumple in the shell in a big impact. Think about it this way, what good is it going to do stiffening up areas of the car that have no bearing on handling or anything anyway, if it has a cost. And that cost will be more force transmitted to YOU in a big smash after hitting something at pace. Not cool. Seam welding is fairly time consuming and with a proper weld in cage, there’s a fair question over whether it’s worthwhile for an individual building a car for clubman use. If you have the time to kill between buying parts, feel like you should give it a go, or just plain think “if the pro’s have it, there must be something to it, so I want it” then by all means crack on. I’ve done it on mine for all three of those reasons. But likewise, there are fast cars competing without any noticeable seam welding and others with just key areas like suspension turret-to-shell joins for example seam welded, rather than doing every join on the car outright.
Seat tubes
Mounting your seat is as important as anything else. I’ve seen a seat come out simply under acceleration on a trackday, I’ve seen a seat pull it’s mounting bolts through their mounting points in a crash, and you don’t want this happening when it’s your ass that’s planted in the seat in question. Typically, seat tubes are welded in, with spreader plates at either end and brackets coming off them forwards or rearwards to put the seat where it’s wanted. Once fully welded in, these are bombproof. Most kits have brackets with floating nuts to allow different width seats to be fitted and allow a small margin for error in bolt holes, and most side mounts which bolt to these to then bolt to the seat have numerous holes in them to allow for angle changes to the seat and movement forwards and backwards to suit a shorter or taller driver in the future, within reason. An important note here is to use properly sized washers on the bolts from the seat tube to the side mount, to stop them pulling through, and also to use a washer on the bolts from the side mount to the seat itself.
Interior and safety
Moving onto the actual parts and whatnot for a moment, obviously all this info is out there too, so I’ll keep it relatively brief. Starting with the seat a seat which should be a fixed bucket with a suitable harness, so a 5 or 6 Point with a proper buckle. You can’t really release road car style seatbelt buckles if you’re upside down with your weight tensioning the belt, so that’s why those are illegal for race use. Both the seat and harness need to be FIA approved items and also in date, as they’re lifed for about 5 Years from the date of manufacture. For the steering wheel, it pays to have a proper (not eBay crap) quick release boss kit to aid in getting out of the car over the seat and door bars. Remember GTI International the other year when a mickey quick release boss let go? Yeah, you don’t want that at 130 odd :thumbs: Then it comes down to an extinguisher, battery kill and the rest of the things you need, i.e. dash, clocks, pedals / pedal box, shifter, the usuals really. The extinguisher will be regulated by the MSA with regard to size and is also a lifed item. The killswitch should be wired properly so it doesn’t let the car run on with power from the alternator, but as said this is an overview and wiring diagrams are easy to come by. Both the extinguisher and kill switch need to be operable by the driver in their normally seated position with the harness fastened and also by a Marshal outside the car, so you will run pull cables, or wiring if electrically operated, to the scuttle panel to activate these as well as having them within reach of the driver. The battery kill needs to isolate all circuits on the vehicle, excluding the extinguisher system if it’s electrically activated, and the extinguisher needs to be the correct extinguishant, properly charged and at least 2.25 litre capacity with lines to a nozzle for the engine bay and the interior of the car.
Again there is way too much going on to cover an entire interior and all the parts it is made up of in detail, so please take this as a basic run down to spark your own research.
This has been copied across from the old forum so there may be some confusing bits in places!
Ebay is an awful website. Temptation in the form of a computer! Stuck a bid on this (alcohol may have been involved) and won!
Its a 1991 8v GTI with no mods. Its nearly totally original except for the tow ball on the back. Although its got 160k on it, it drives really well and looks not too bad. drove it 250miles from were i picked it up outside leeds in batley and drove it to scotland and on the boat. Let the photos do the talking.
The g60s!
Sunroof!
All in all the cars not bad does have a few things that nee sorted. theres rust bubbling along the bottom of the drivers door so thatl need rubbed down and sorted but the rest is mechanical.
The engine temperature sensor doesnt work so iv no temperature on the clocks and its the same with the oil temperature on the mfa. it also needs a wheel bearing on the drivers side and the backbox looked at as its blowing a little. Finally, the gearbox linakge needs replaced i think as 5th gear is hard to find and theres a lot of play in the gears in general.
theyre all wee things and with a little tlc i think i can turn this car around. this is all iv planned for now other than my cd player and sub, want to keep it oem for a while and see what happens.
opinions and suggestions please!
iv had a shopping bonanza for parts the last few days. iv got a meguars clay kit to try and shine the bodywork back up and deswirl it, a new thermostat and oil temp sender, a gear linkage repair kit and today its going to try to egt a new backbox as the one on it is too loud and i think there might be a wee bit of rot starting to set into it. to be honest half the racket is likely it blowing.
also got the heater replaced the other day. the new one was from a scrappy and squealed something shocking so a good dose of gearbox oil and gt45 solved that. iv got nice warm air now. my cd player went into it too so iv got a head unit that looks modern now. going to see if i can get the wheel bearing sorted in it tonight if i can use my neighbours ramps and have a good look underneath it.
im still really pleased with the wee car. handles like its on rails and still turns a few heads (not sure if thats good or bad though). the only thing i dont like is more frequent visits to the pump. going from the TDI to the petrol is a big change after years of really good mpg (50ish to 30ish)
ill get some more photos up after its been clayed
had a few wee things done over the past few days.
got a new exhaust on it. the backbox and front box were clean rotten lol which his maybe why it sounded the way it did. also got the led side lights in tonight. theres some difference in them
hope to get some of the chrome trim onto it to see how it looks. hopefully itl have chrome wiper arms and proper chrome inserts in the door handles to try and brighten it up slightly. also looking at the getting the rust on the drivers door sorted professionally for the show season.
going to spend the weekend putting parts across from the other golf and going to try and get some of the sensors replaced to try and fix some of the gauges on the dash. really pleased with this wee car so far except for the mpg
any reason why its sore on fuel? the mfa reads low 20s all the time but to be honest i think its more like 25ish looking at the rate i go through it. any idea why its so low?? iv been driving it real easy and not going over 60 but it seems to make no difference!
got some of the chrome trim on today. ignore the pure dirt on it!
not too sure if i like the wiper arms or not. what do you think of them?
the wee pup seems to like the gti interior
wednesday night is hopefully the big night for getting things sorted. might do the belts if i get time as id like them done sonner rather than later
In dash 3.5" (if door speaker are fitted this is a 1" dome tweeter in a 3.5" housing) In front doors 5.25" (if fitted) In rear parcel shelf supports 6"x4"
Throughout the production of the Golf/Jetta there were various special (and limited) editions released. This is a common marketing exerciser to boost sales and keep the range current.
Carat 1984-1986 Match 1985 Fun 1986 Flair 1986 Hit 1986 Memphis 1986-1990 Pikes Peak 1986-1987 Syncro 1986 Berlin Golf 1987 Bistro 1987 Special 1987-1991 Sky 1987 Tour 1987-1990 Flash 1988 G60 16V Limited 1988 Manhattan 1988-1992 Champion 1988 Swiss Champion (Syncro) 1988 One in 10 Million 1988 Öko Golf 1989-1992 Atlanta 1989 Boston 1986-1992 City Stromer 1989 Edition One 1989-1992 Edition Blue 1989-1992 Limited 1989 Rallye 1989 Black Line - Red Line 1989-1990 Country 1990 Country Allround 1990 Country Chrompaket 1990 Function 1990-1992 Fire and Ice 1990 Madison 1990-1991 Moda 1989-1990 Plus Ultra (CL) 1990 Quadriga 1990 G60 1990-1991 G60 Syncro 1991 Pasadena 1991 Function 1991 Barcelona 1991 Travelling ? Metropolitan ?
It's not out of the question for an individual dealership to create their own specification model from the accessories list and create localised 'editions' there's no real way of knowing much about these.
To check you car has the correct interior you need to check the code on the boot sticker. The trim isn't in the options it's listed to the right hand side of the paint code as two letters.
GTI 1983-85 JN Black/Silver
JP Black/Red
Early GL ZH
Mid CL Auto JM COLOR HAHNENTRITT
CM 1987-1990
Special - Function
Special - Manhattan
GTI 1985-87 UQ Black / Red Sometimes refereed to as candy stripe:
UN Black / Grey
UP Black / Green I don't believe this was ever available in the UK, only ever seen on import cars.
Grey / Red Stripe (early spec Recaro sports seat option)
GTI One In Ten Million 1988 49 Colour-stripe (Rainbow - same material but different seat shape to late spec 16v) These are early rainbow trim specific to One in Ten... cars. Note there is now horizontal stitch across the base of the seat and they have the smaller adjustment handle, not the big "Ejector" seat type.
The door cards to go with rainbow trim just have the grey lines and none of the red, green or blue so may look like the wrong ones at first glance.
Cloth upholstery GTI 16v late spec Colour-stripe cloth for 16v (Rainbow)
Sports Check Cloth for GTI late spec HY Grey / Blue
HZ Grey / Red
UA Grey / Red (same name but slightly different pattern hence unique code was available for later spec Recaro sports seat option)
Leather VC Black Leather YB Slate Leather YG Beige Leather
Cloth upholstery for Jetta GTI/GTI 16v late spec KV Slate KW Anthracite (this same cloth was also available for later spec Recaro sports seat option for Jetta)
GTI / GTI 16v / GTI G60 Run out spec
XT Ultraviolet (this same cloth was also available for later spec Recaro sports seat option)
XU Ultra-red
Leather upholstery for Jetta/Golf GTI/GTI 16v GTI G60 late sec TB Black Leather TF Slate Leather
The Tour was a special edition available in 5 metallic colours: Diamond Silver Metallic Red LA3Z Helios Blue Atlas Grey Cosmos Blue
The car had colour coded mirrors, and some text also says part painted bumpers although the brochure clearly shows it hasn't. Also states colour coded mirrors were not included on Atlas Grey or Helios Blue but I find that an odd thing to believe - surely it would be all or none?
As with all of the 'specials' there was an decal on the rear quarters panels, this lead into full length pinstripes just above the swaige line.
The car was in luxury spec, similar to GL model. Available in 3 and 5 door
Interior equipment: Specific upholstery in blue / red fabric on a light gray background Height-adjustable headrests Plush carpet Passenger side vanity mirror "Imitation" leather gearshift gaiter and gear knob Plush carpeted parcel shelf and side shelves Sport steering wheel (is listed but from the brochure image I'm not sure, did they consider this 'sporty'?) Analog clock (digital LCD for 90hp, with rev counter), Center console with ashtray and cigar lighter Front door storage pockets Height-adjustable driver seats
Engines and gearboxes: 1.3 55 hp 4 speed (5 speed optional) 1.6 75 hp 5 speed (automatic optional) 1.8 90 hp 5 speed (automatic optional) 1.6D 54 hp 4 speed (5 speed or automatic optional) 1.6 TD 70 hp 5 speed
The standard tailgate struts, if original to the car will be getting on a bit now and you may find your tailgate doesn't lift all the way up, or drops down after a while. For anyone over about 5ft tall you'll have no doubt banged your head a few times. But don't fear there is a solution, either replace with new to the original spec or add some upgraded alternatives from another vehicle.
Below is the standard specs:
Mk2 Golf Original tailgate strut VW Part number 191 827 550 B
length: 500 mm colour: black housing diameter: 18 mm Piston rod diameter: 8 mm exhaust phase: 270 Newton lifting length: 200 mm
The following are suitable upgrades, they will lift the tailgate slightly higher and will lift with more force, handy if you have a heavy speaker loaded parcel shelf or aftermarket spoiler. Note the Newton value to compare how much addition force is applied.
Mk3 Golf VW Part number 1H6 827 550 A length: 500 mm colour: black housing diameter: 18 mm Piston rod diameter: 8 mm exhaust phase: 350 Newton lifting length: 205 mm
Mk4 Golf VW Part number 1J6 827 550 E length: 500 mm colour: black housing diameter: 18 mm Piston rod diameter: 8 mm exhaust phase: 500 Newton lifting length: 205 mm
VW Polo 4 (9N2) 2001- [BONNET LIFTER] VW Part number 6Q0 823 359 C length: 500 mm colour: black housing diameter: 20 mm Piston rod diameter: 8 mm exhaust phase: 310 Newton lifting length: 205 mm
VW Polo 4 (9N2) 2001- VW Part number 6Q6 827 550 length: 500 mm housing diameter: 18 mm Piston rod diameter: 8 mm exhaust phase: 380 Newton lifting length: 205 mm
Lupo > 2005 VW Part number 6E0 823 359 C ength: 500 mm housing diameter: 18 mm Piston rod diameter: 8 mm exhaust phase: 280 Newton lifting length: 205 mm
Lupo > 2005 (alternative) VW Part number 8L0 823 359 ength: 500 mm housing diameter: 18 mm Piston rod diameter: 8 mm exhaust phase: 320 Newton lifting length: 205 mm
There are other VAG models that may be useful but they seem to vary quite a lot across models so it's harder to confirm a good match from a specific car without listing specific part numbers, with so many choices above it's better to stick to on of those listed.
Mk3 Golf is probably the most suitable, with Mk4 being the choice if your tailgate needs to lift additional weight or if using a remote popper.
having issues with sticky or slow window regulator, try these links.
I did pull mine apart further a few years ago on drivers side, this week will try do the passnger side see if can free it up, the powers reaching regular as lights dim... but not moving glass. damp has set in to motor i reckon.
UPDATE Pulled door card off today, and managed to replace door lock mechanism, at the same time i did have a quick look at the window motor, i reached inside the runner and pulled/tugged on the wire cable and then loosened the securing bolts on the large runner pressed the window button, magic works... so basically just needed a hand to move, i then added white grease to the PTFE runners, and went up/down a few times, happy with quick fix. took 30mins to do 2 jobs...happy New Update passenger door window winder, froze again so thats it....replacing with repro model. jp group unit supplied, think was 40£ the power connection is 2 pins but different to oem, so i cut and joined up. now running up and down again.
P.S DONT FOLLOW MY WIRING, IVE MANAGED TO PUT IN REVERSE, SO AT SOME POINT WILL HAVE TO RECRIMP.. HAHAHAHAHAHAHA