
Topics

This section allows you to view all Topics made by this member. Note that you can only see Topics made in areas you currently have access to.

Topics - Cope

1
Suspension & Steering / Bumpsteer and Roll Centre Correction - A DIY Walkthrough
This has been a big item on the list for quite some time now, and it’s going to be interesting to see how it will effect, what in my mind is already a well handling car.

This post is fairly in depth and fairly nerdy… if that tickles your pickle stay tuned.

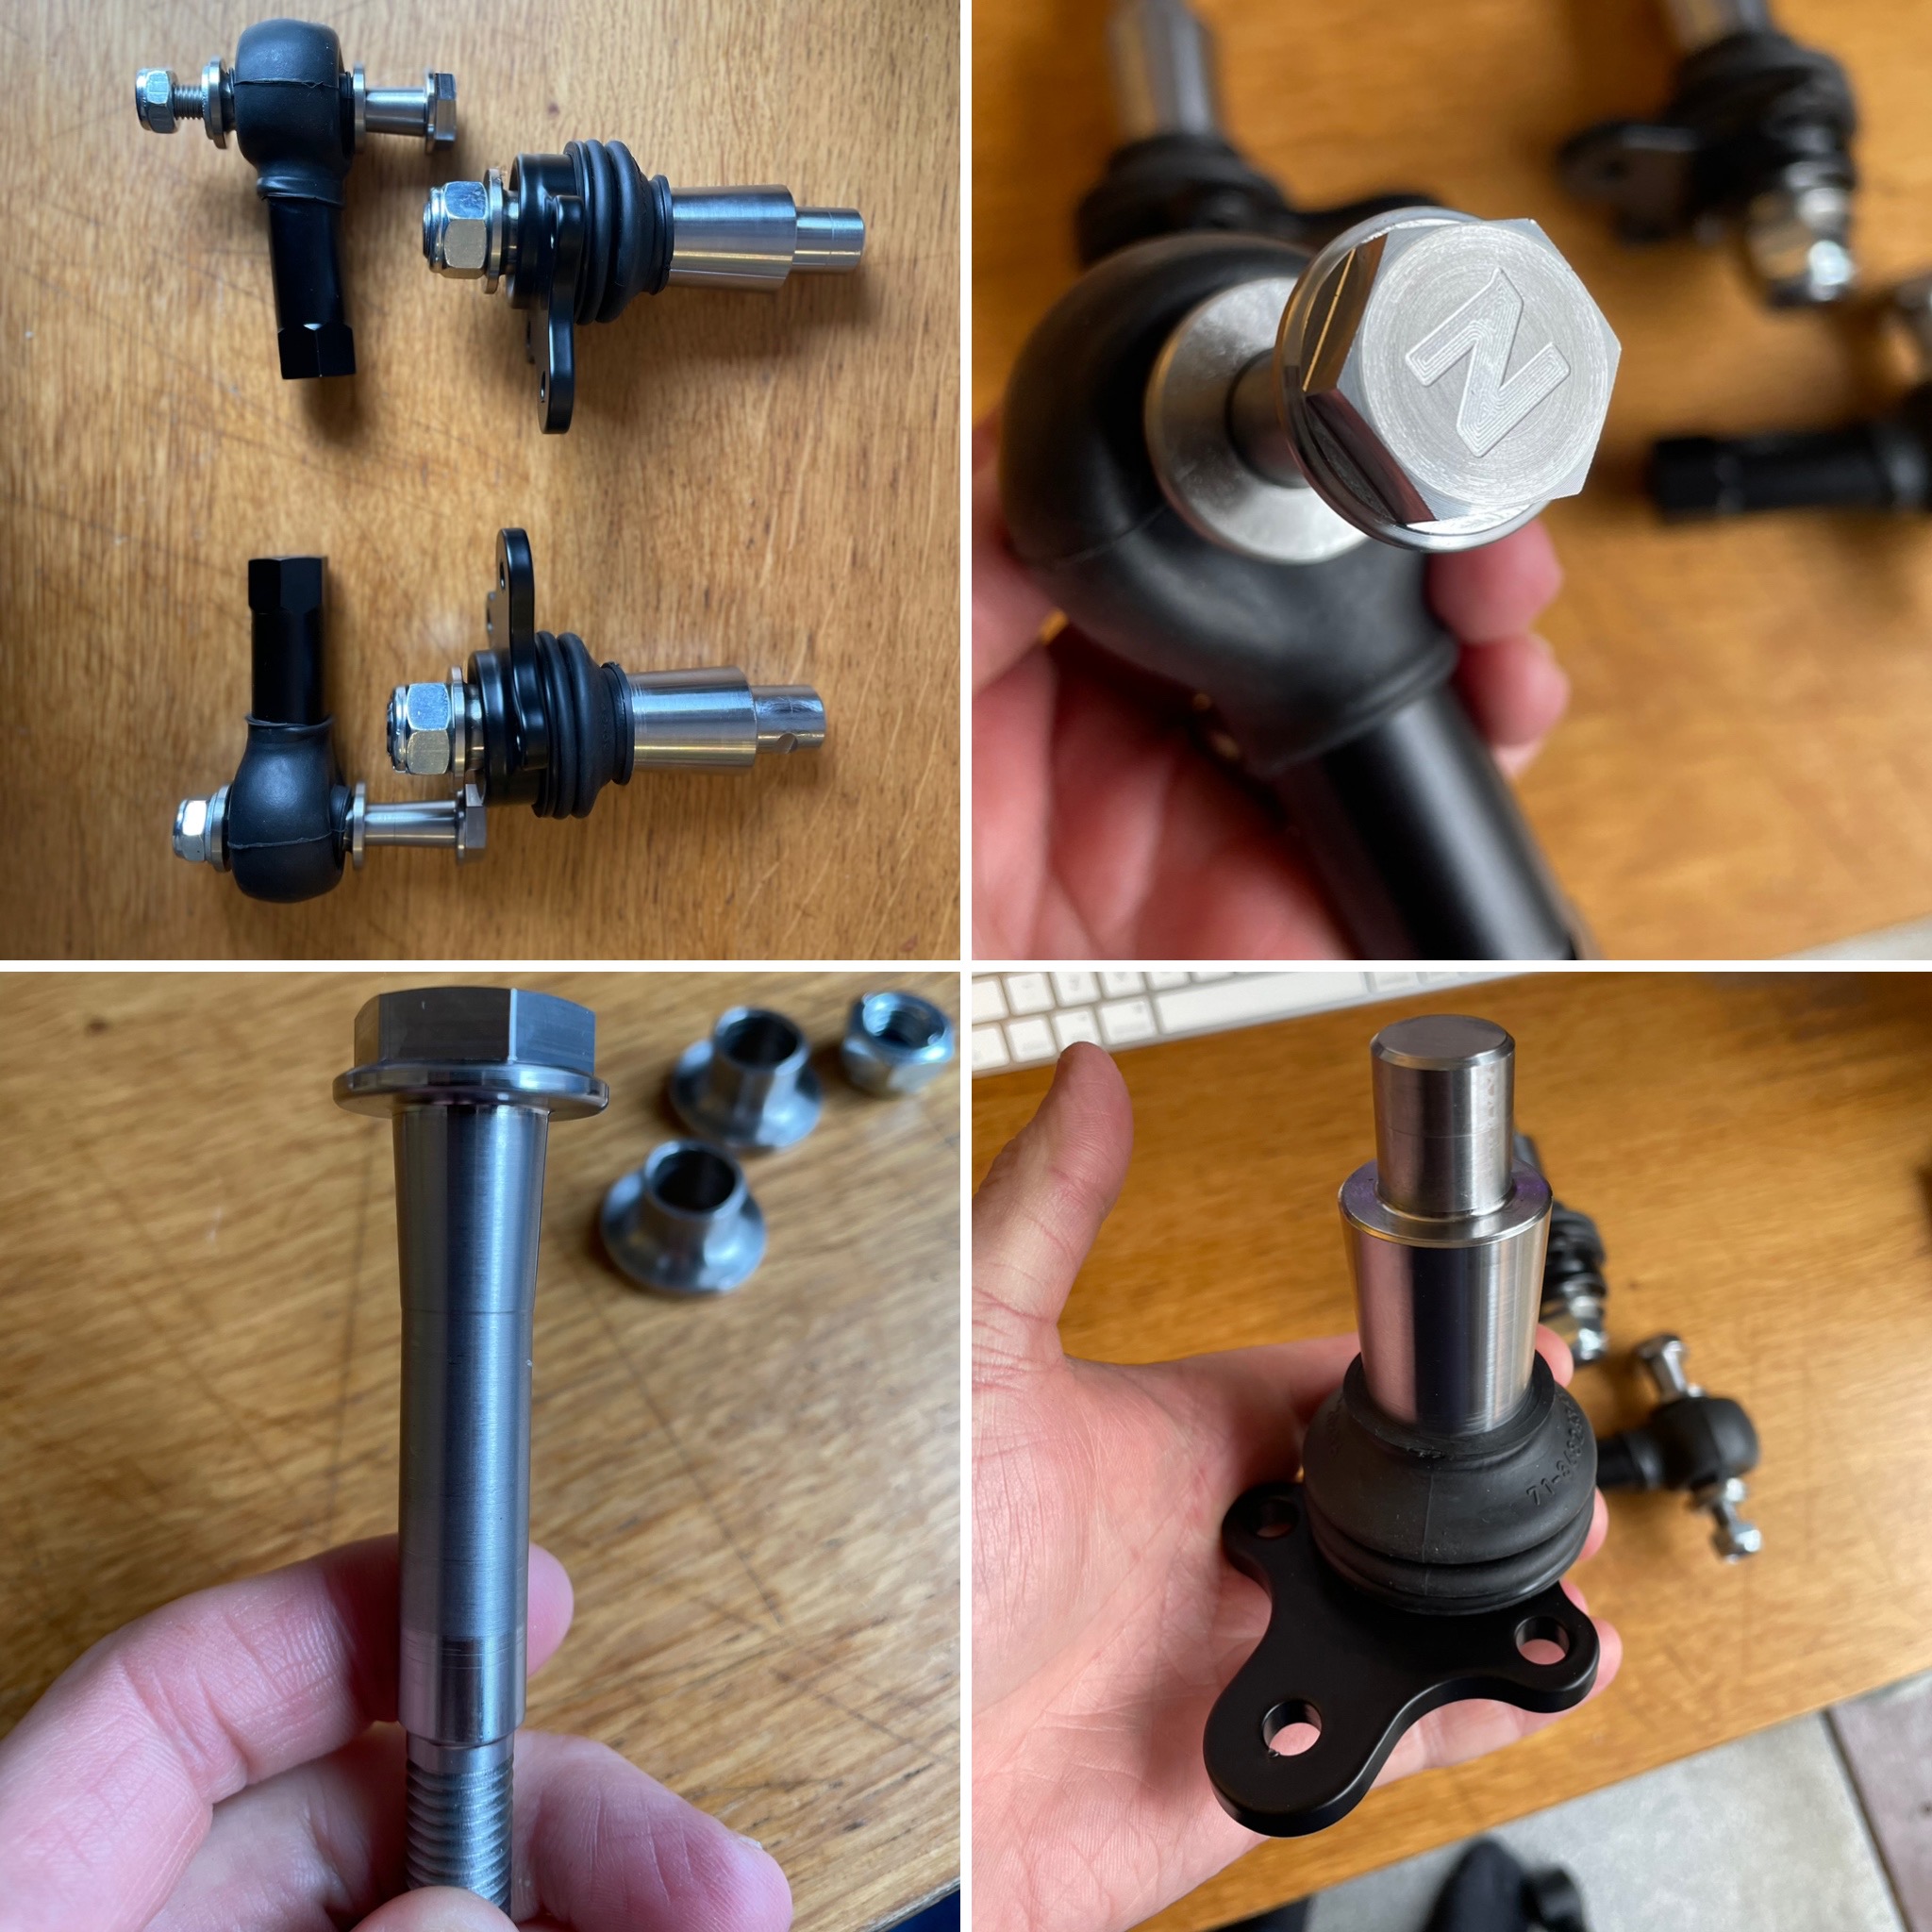
I chose to start with the Noath Engineering Roll centre correction and track rod flip kit. A lot of the off the shelf ones I don’t like the look of and I’ve heard numerous stories of them failing. The main reason for this kit was it was tried and tested on Nige’s golf, and they use really high quality materials.


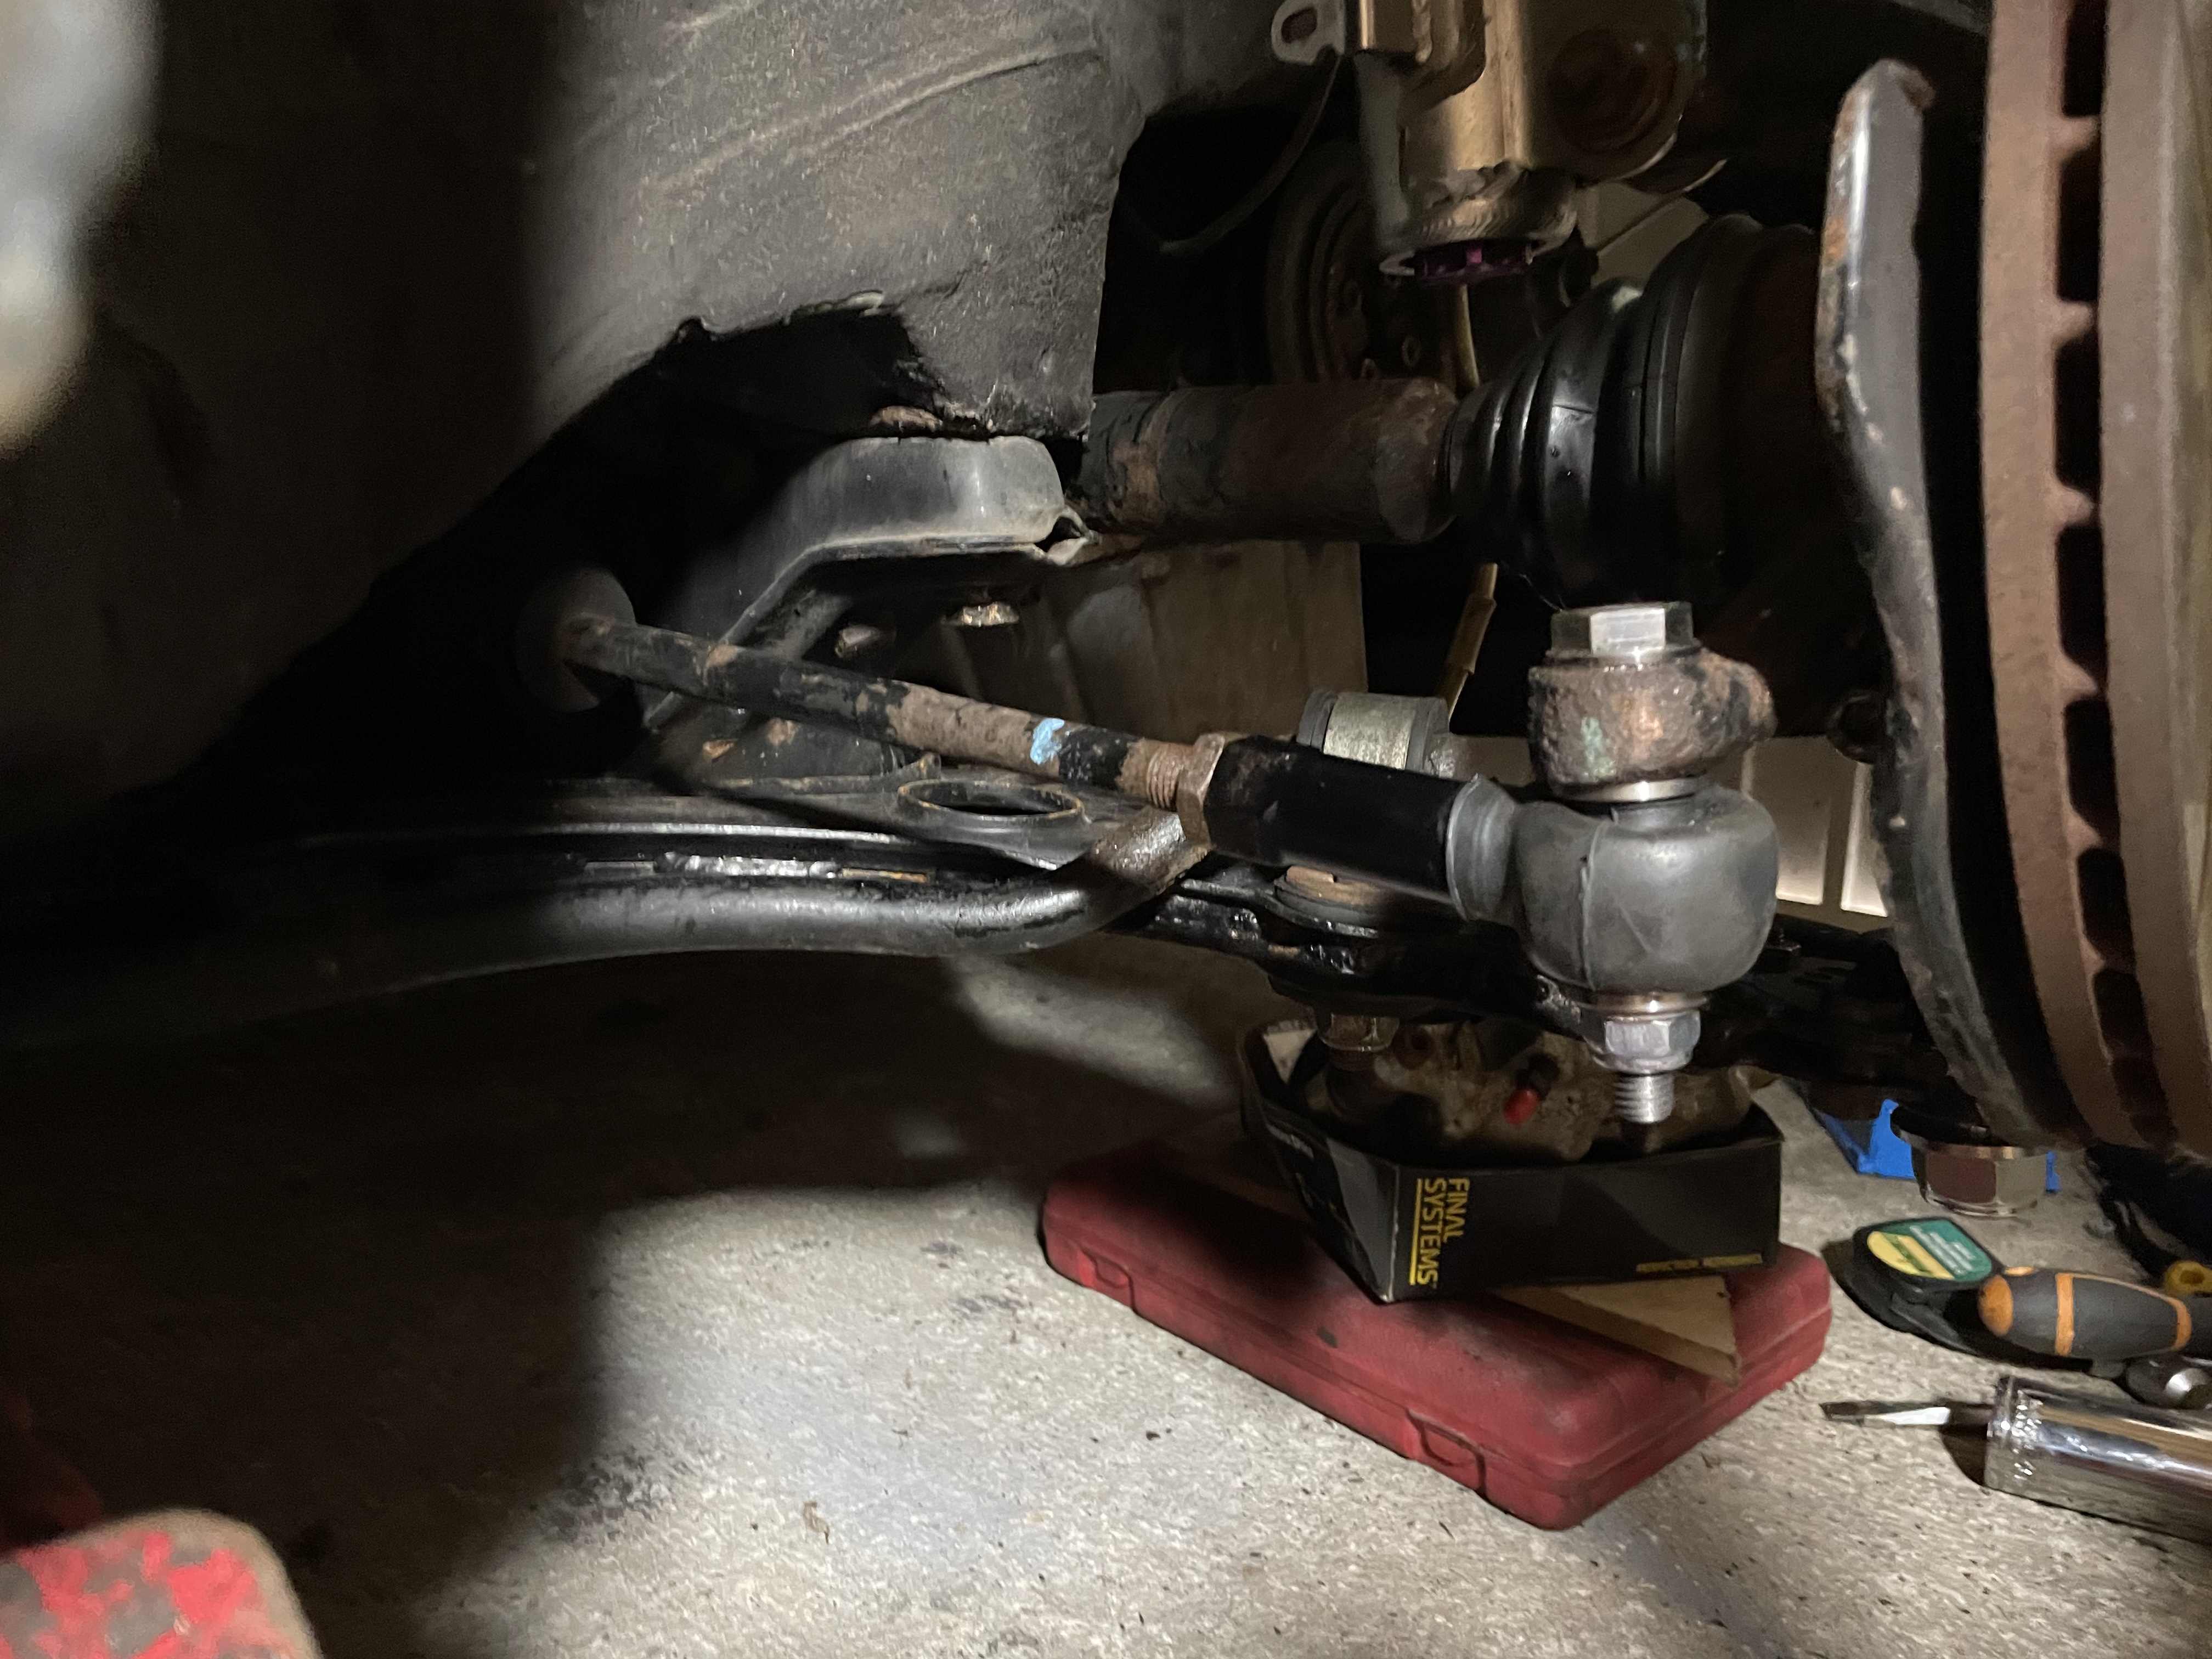
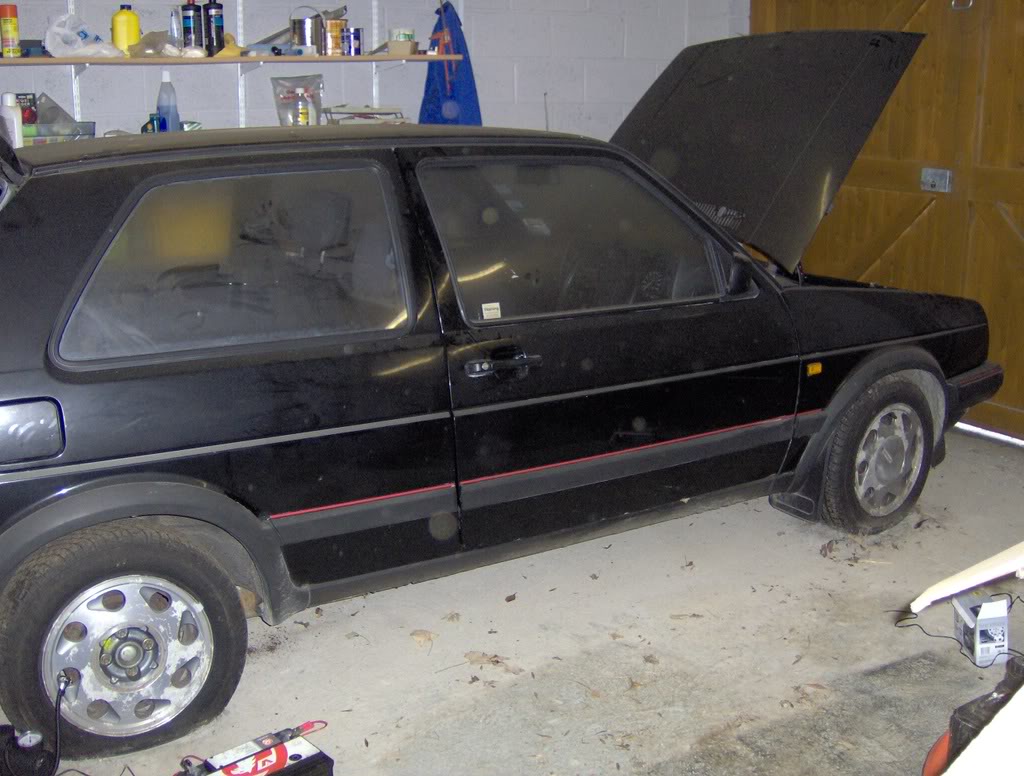
If you look at the angle of the wishbone it gives you an idea of the roll centre, before and after the kit.
OEM at ride height


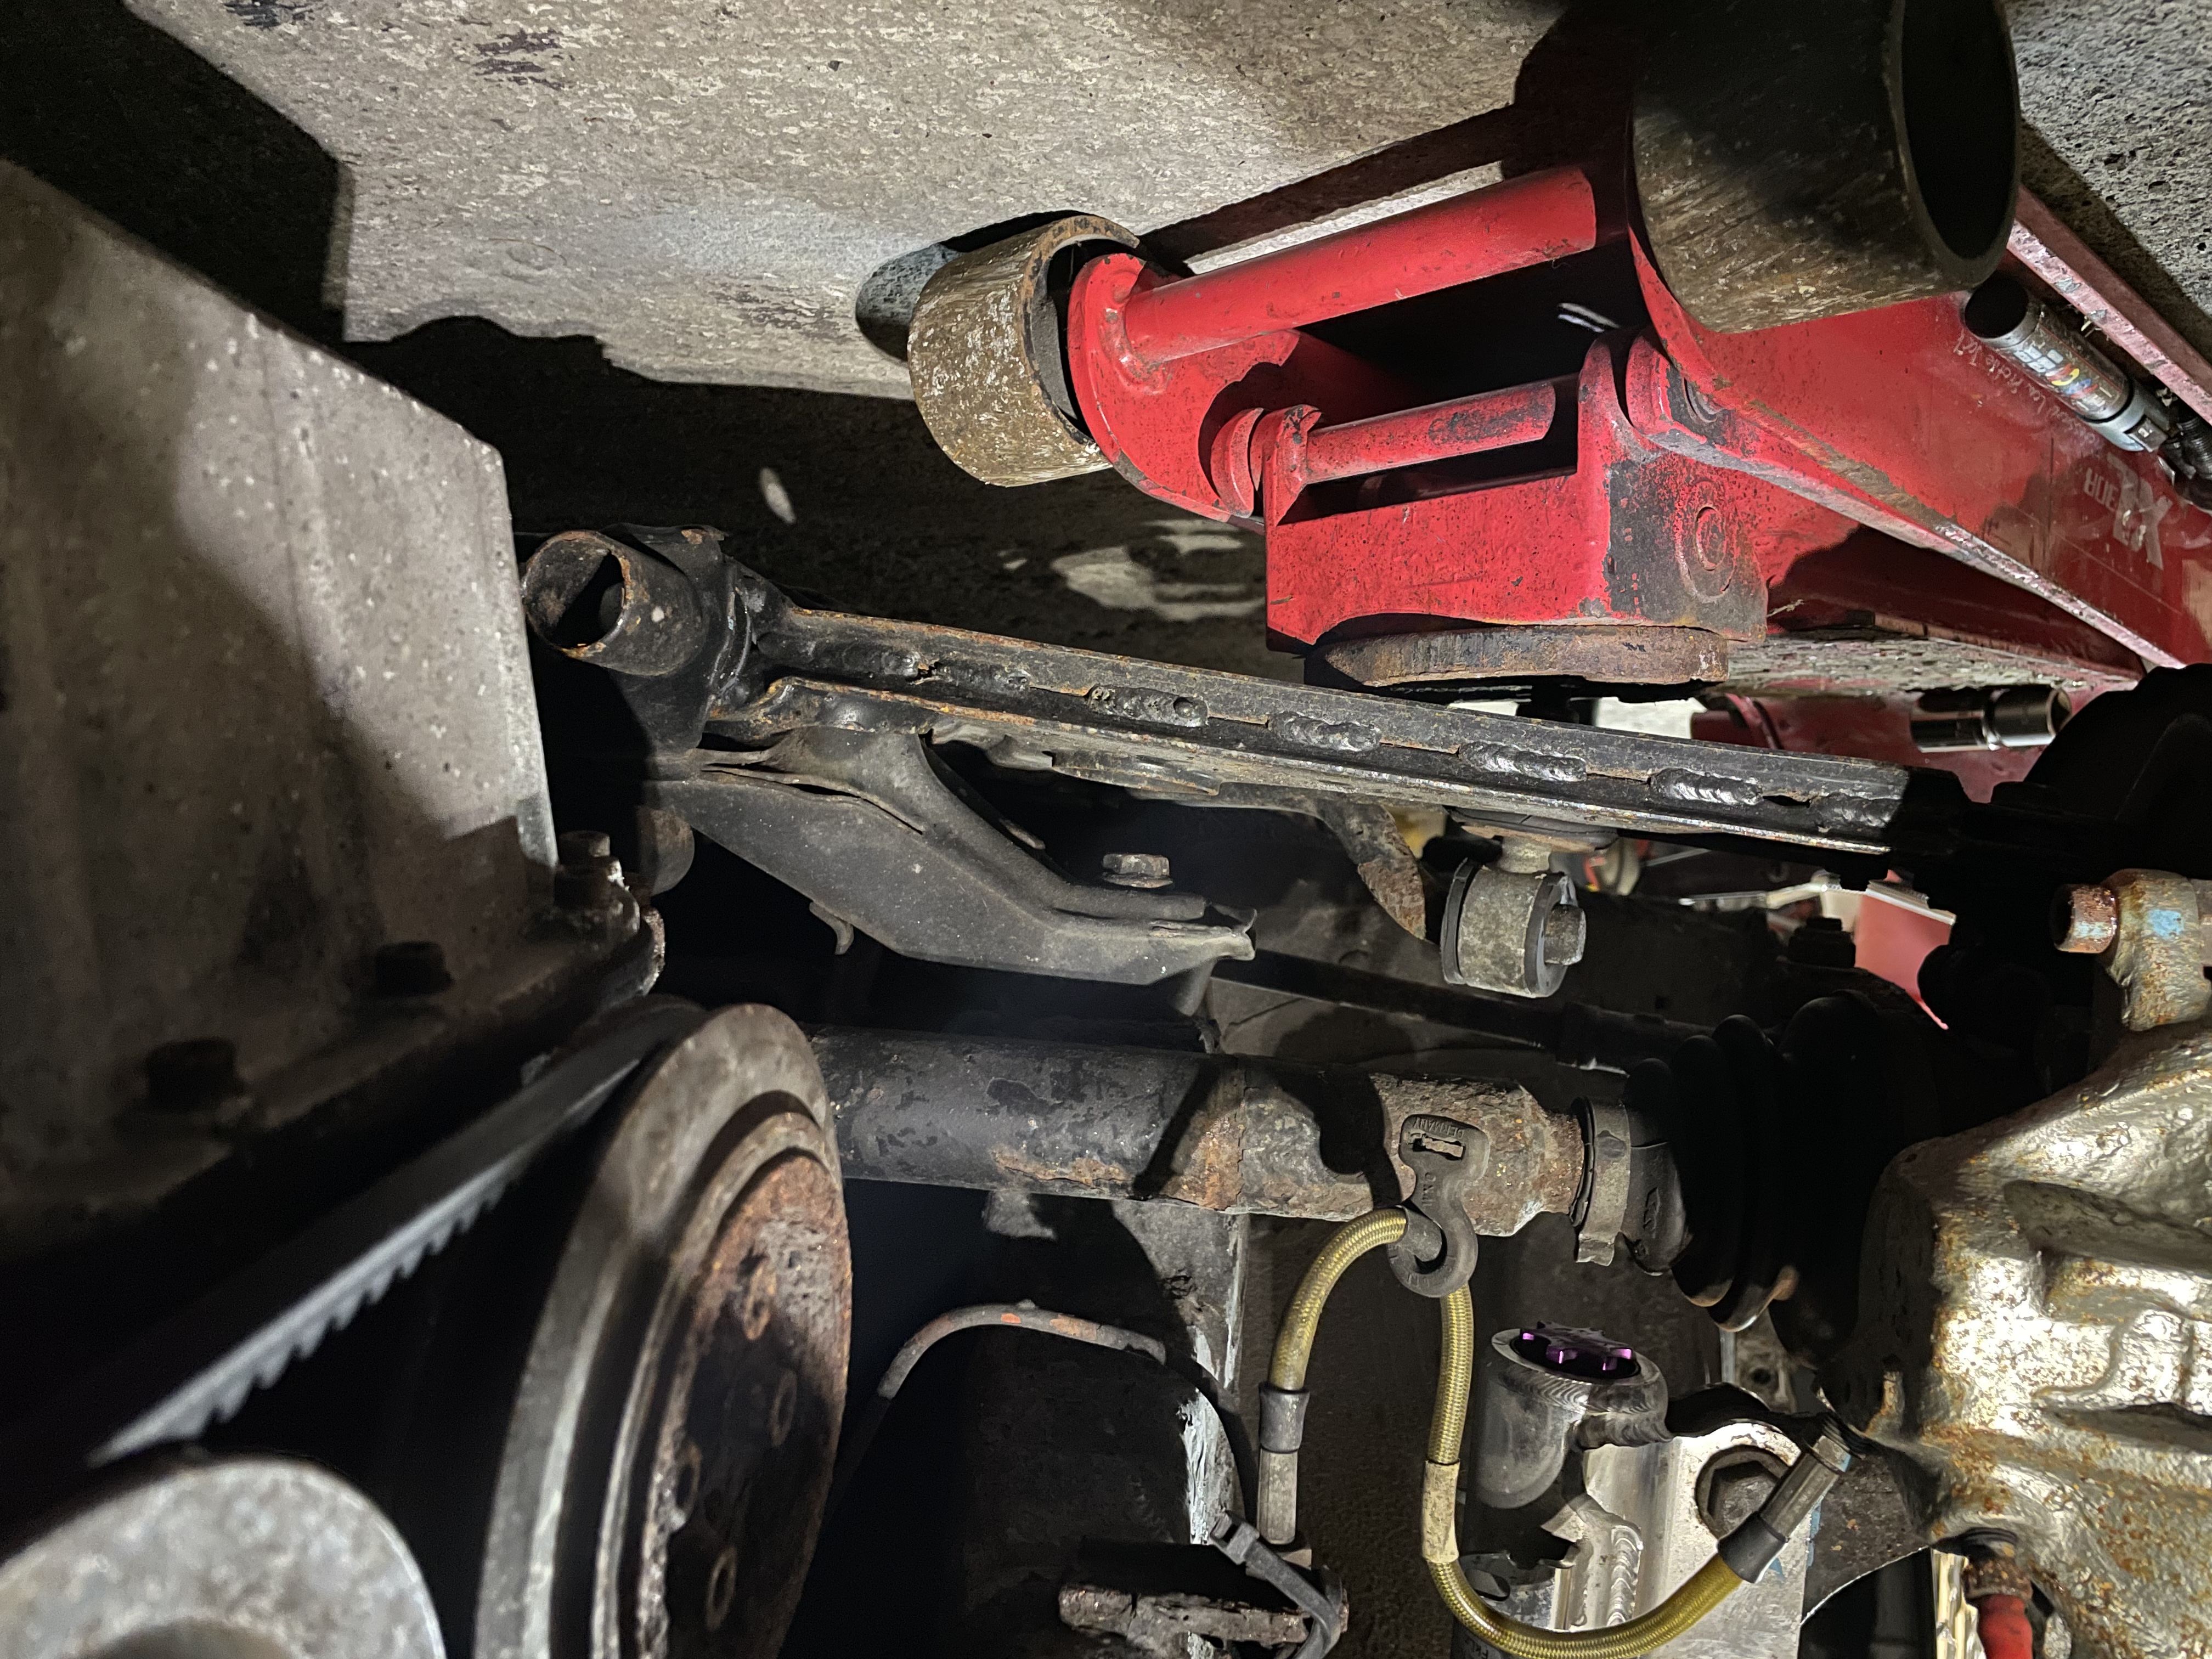
Noath Kit at same ride height


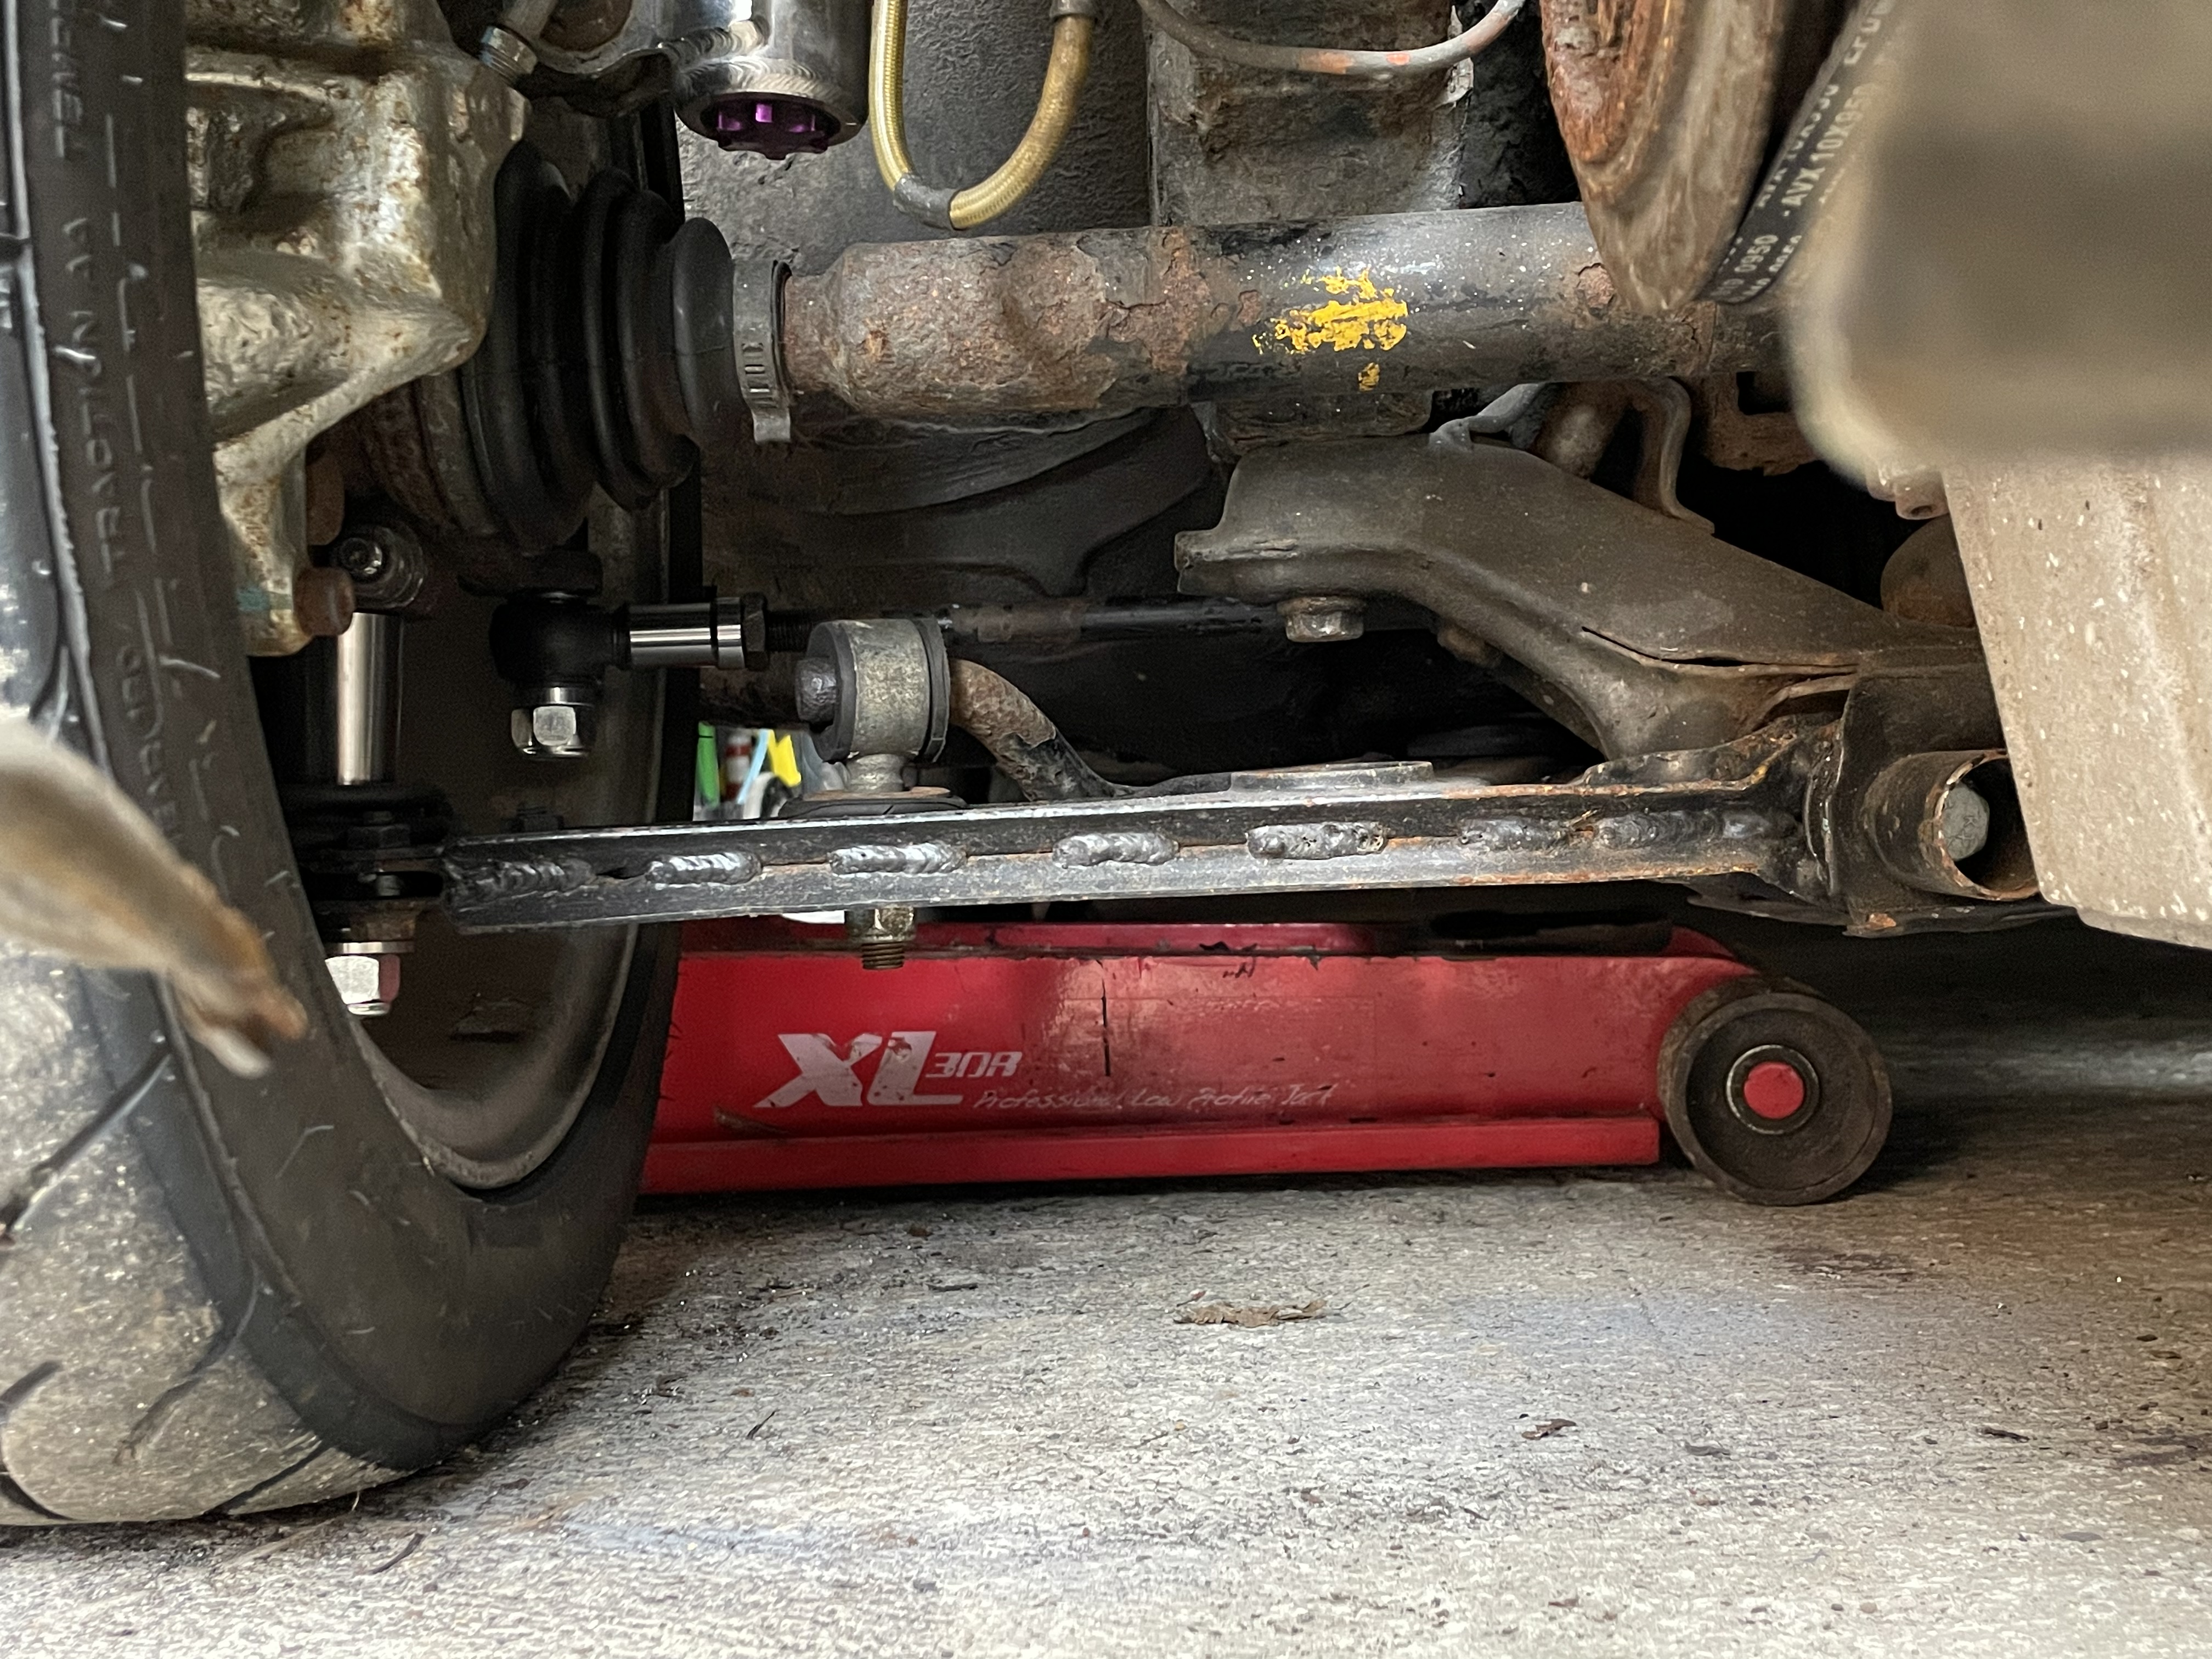
With roll centre you are limited by the size of the pins you can use in the BBJ, for interference with the wheel, especially on 15’s.

Now onto the track rod flip kit, I was thinking about fitting the kit and leaving it at that, but curiosity got the better of me and I wanted to work out exactly what the factory bumpsteer was, in comparison to the kit.

At this point I want to just reference Nige’s website for those who haven’t seen it, a lot of what I’ll be going through here, he has covered. www.pinderwagen.com

So, bump steer. What is it? and how do you measure it?

Bump steer to put simply, is unwanted toe change through a cars suspension travel. The changes can be pretty crazy, and this can cause unpredictability in handling – especially on track, where you will naturally use more of the suspension travel due to the forces.

Bumpsteer is effected by the arc created by the lower ball joint mounting point and the track rod mounting point, and their relationship to each other. – its almost like a push and pull effect.

How do you measure it? There’s a few ways, you could take it to a specialist, who will no doubt charge you an arm and a leg. There’s a Longacre gauge, which are upwards of £600. Which again isn’t feasible for us ordinary folk. And where is the fun in not learning along the way!?

Taking inspiration from the PinderWagen, I used 2 sheets of flat wood. I bought these from B&Q for £10 – much more respectable!

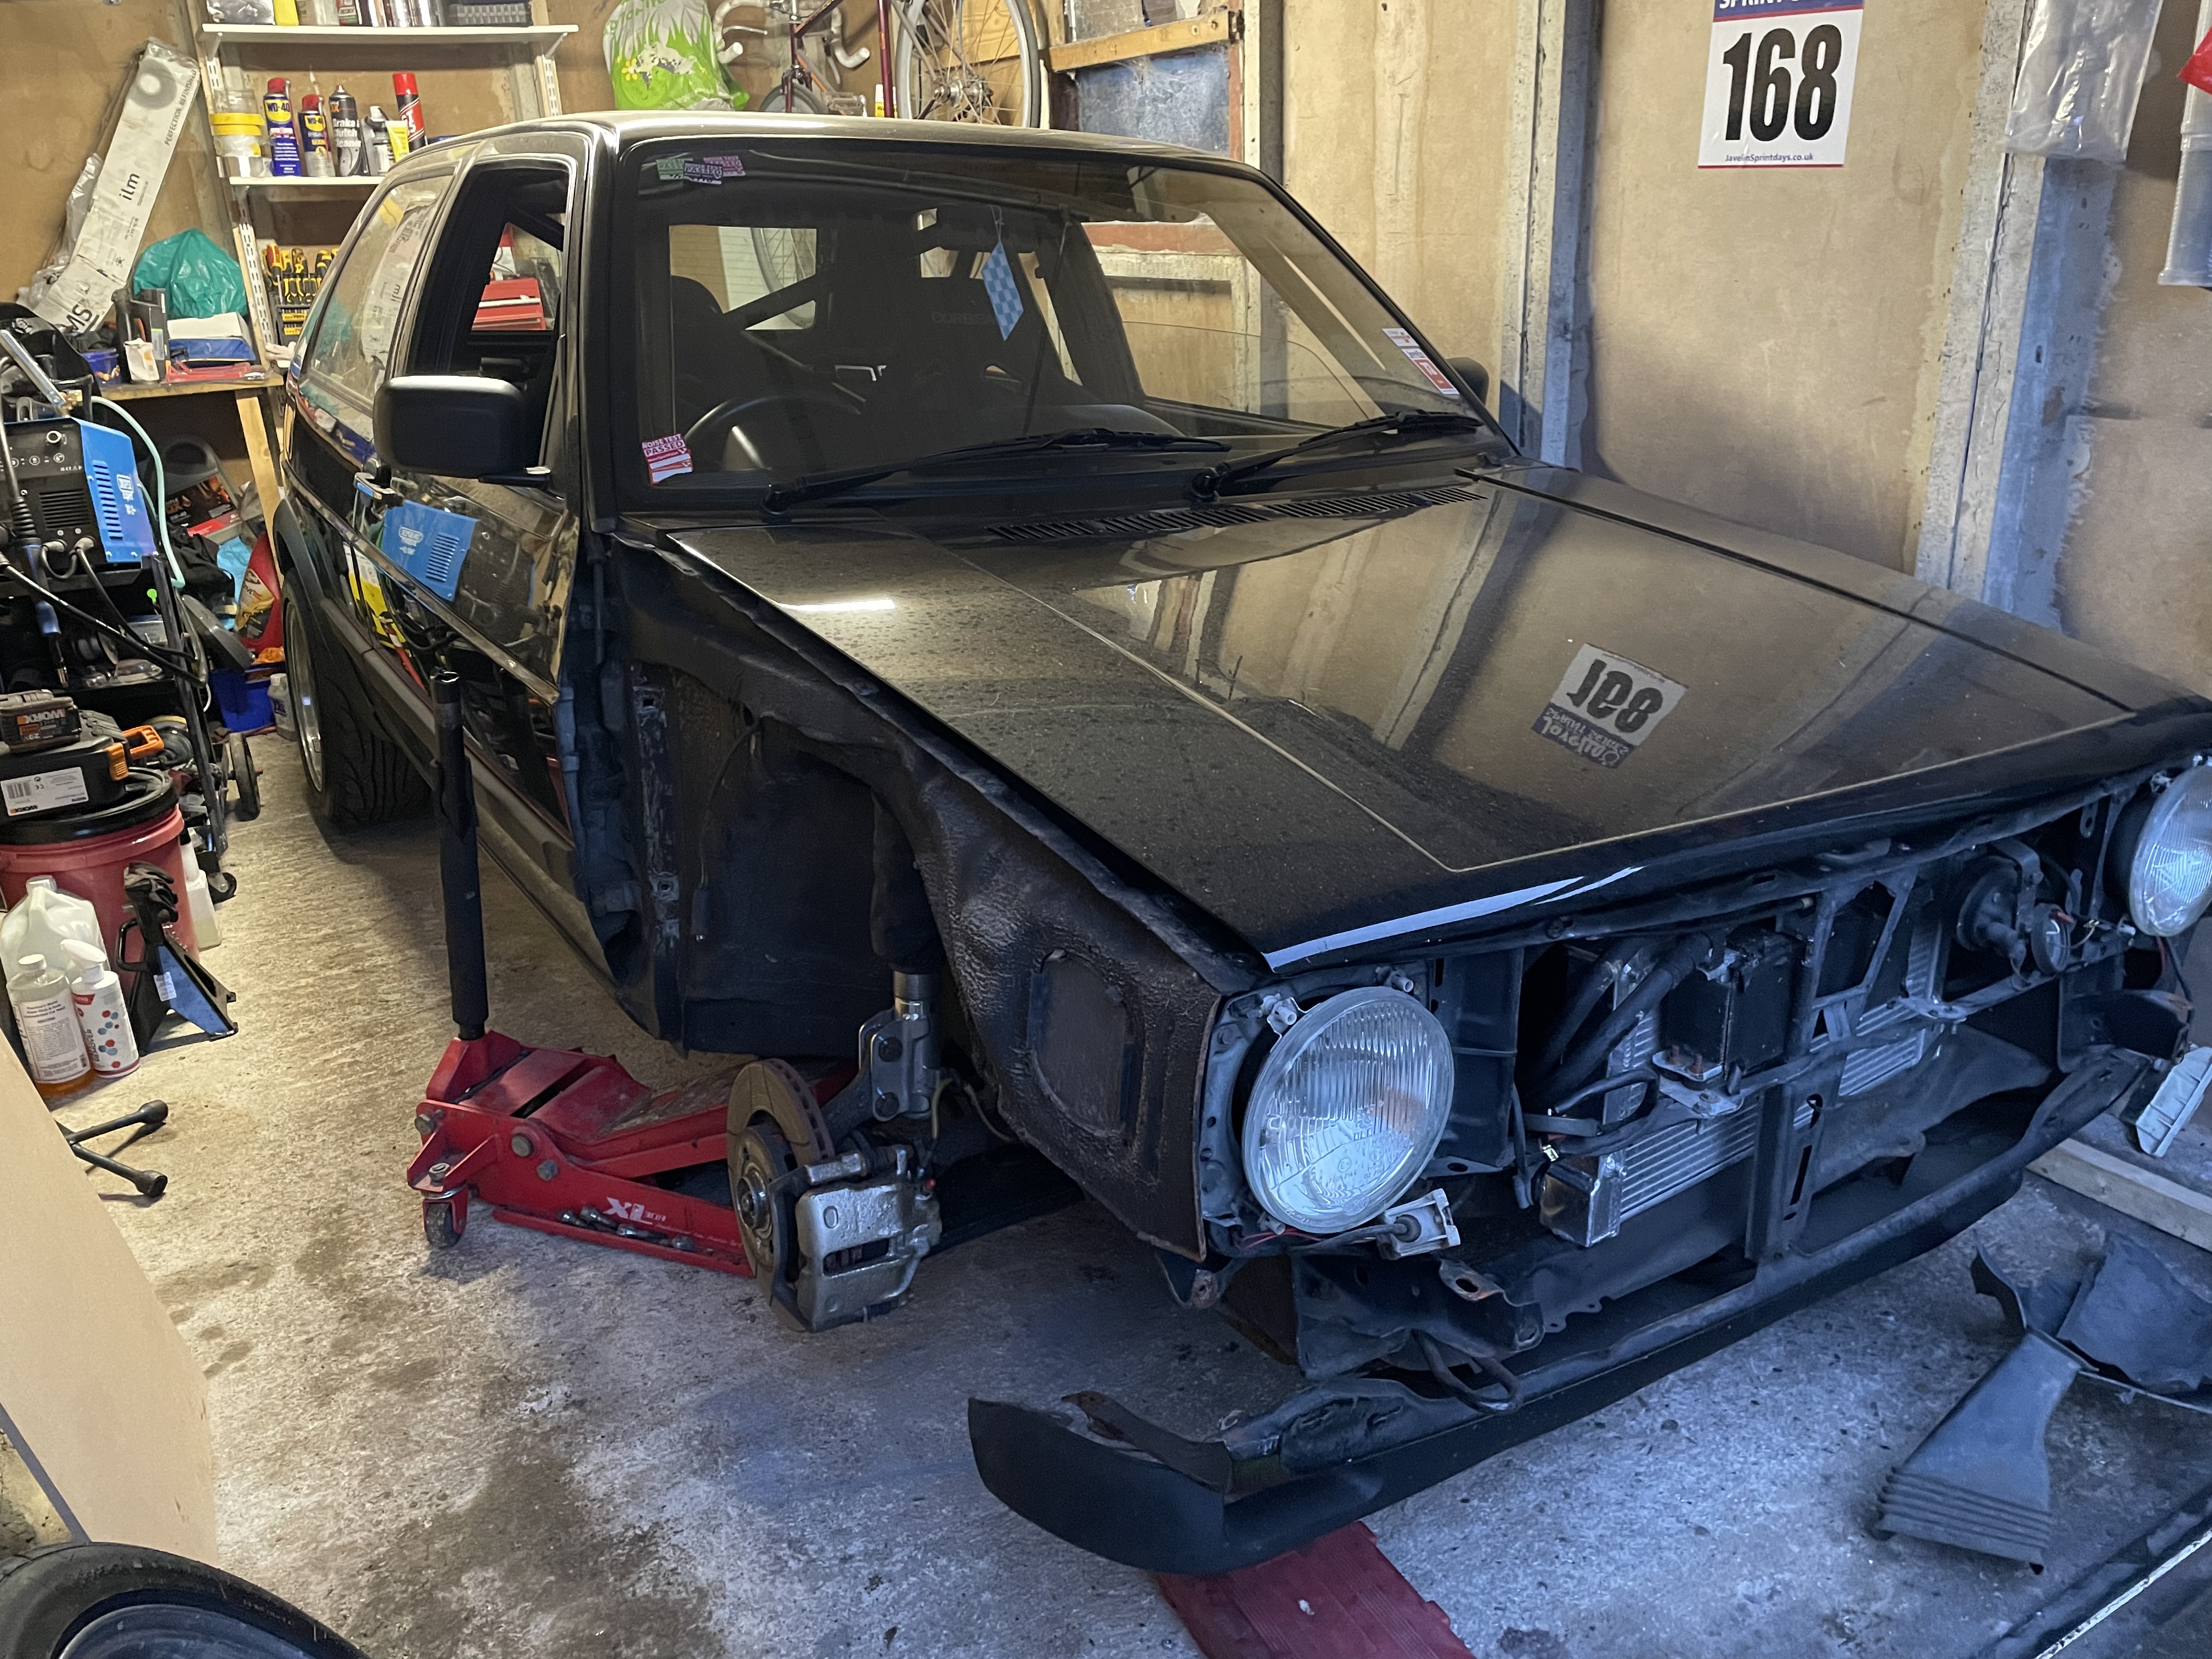
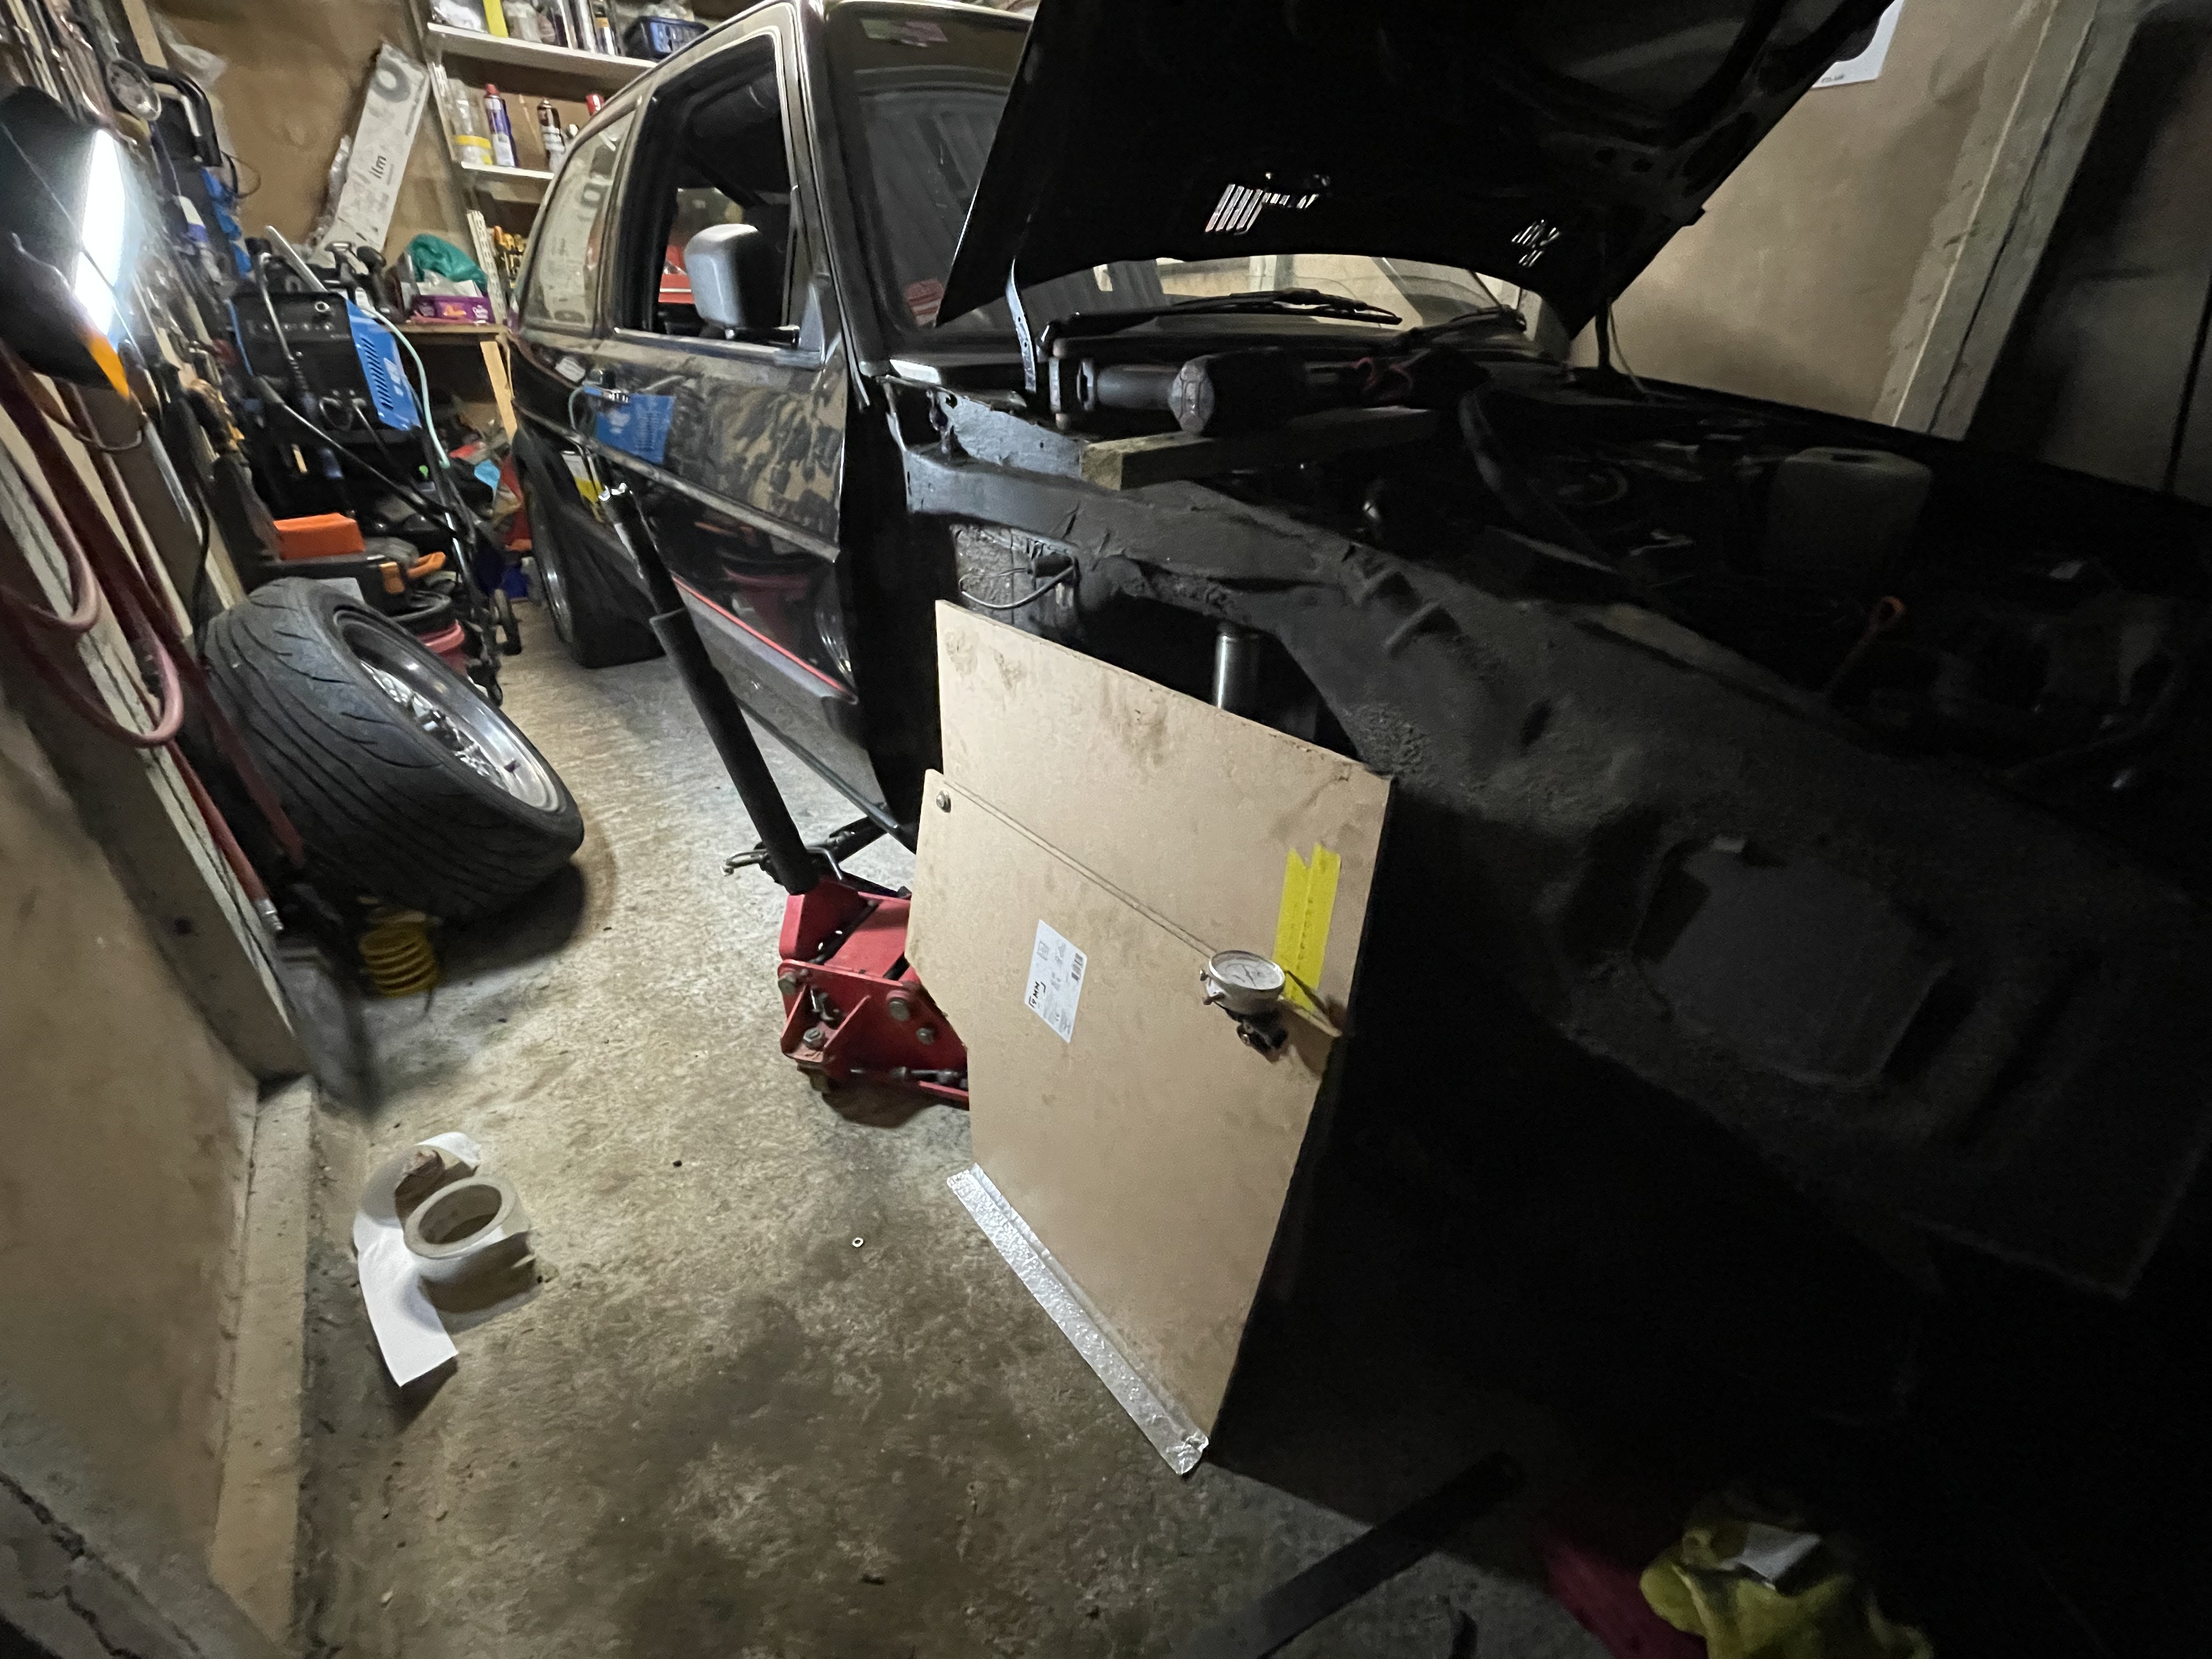
Before you do anything it’s important to take some initial measurement. With the front bumper and front wing removed, it gives great access to the suspension.


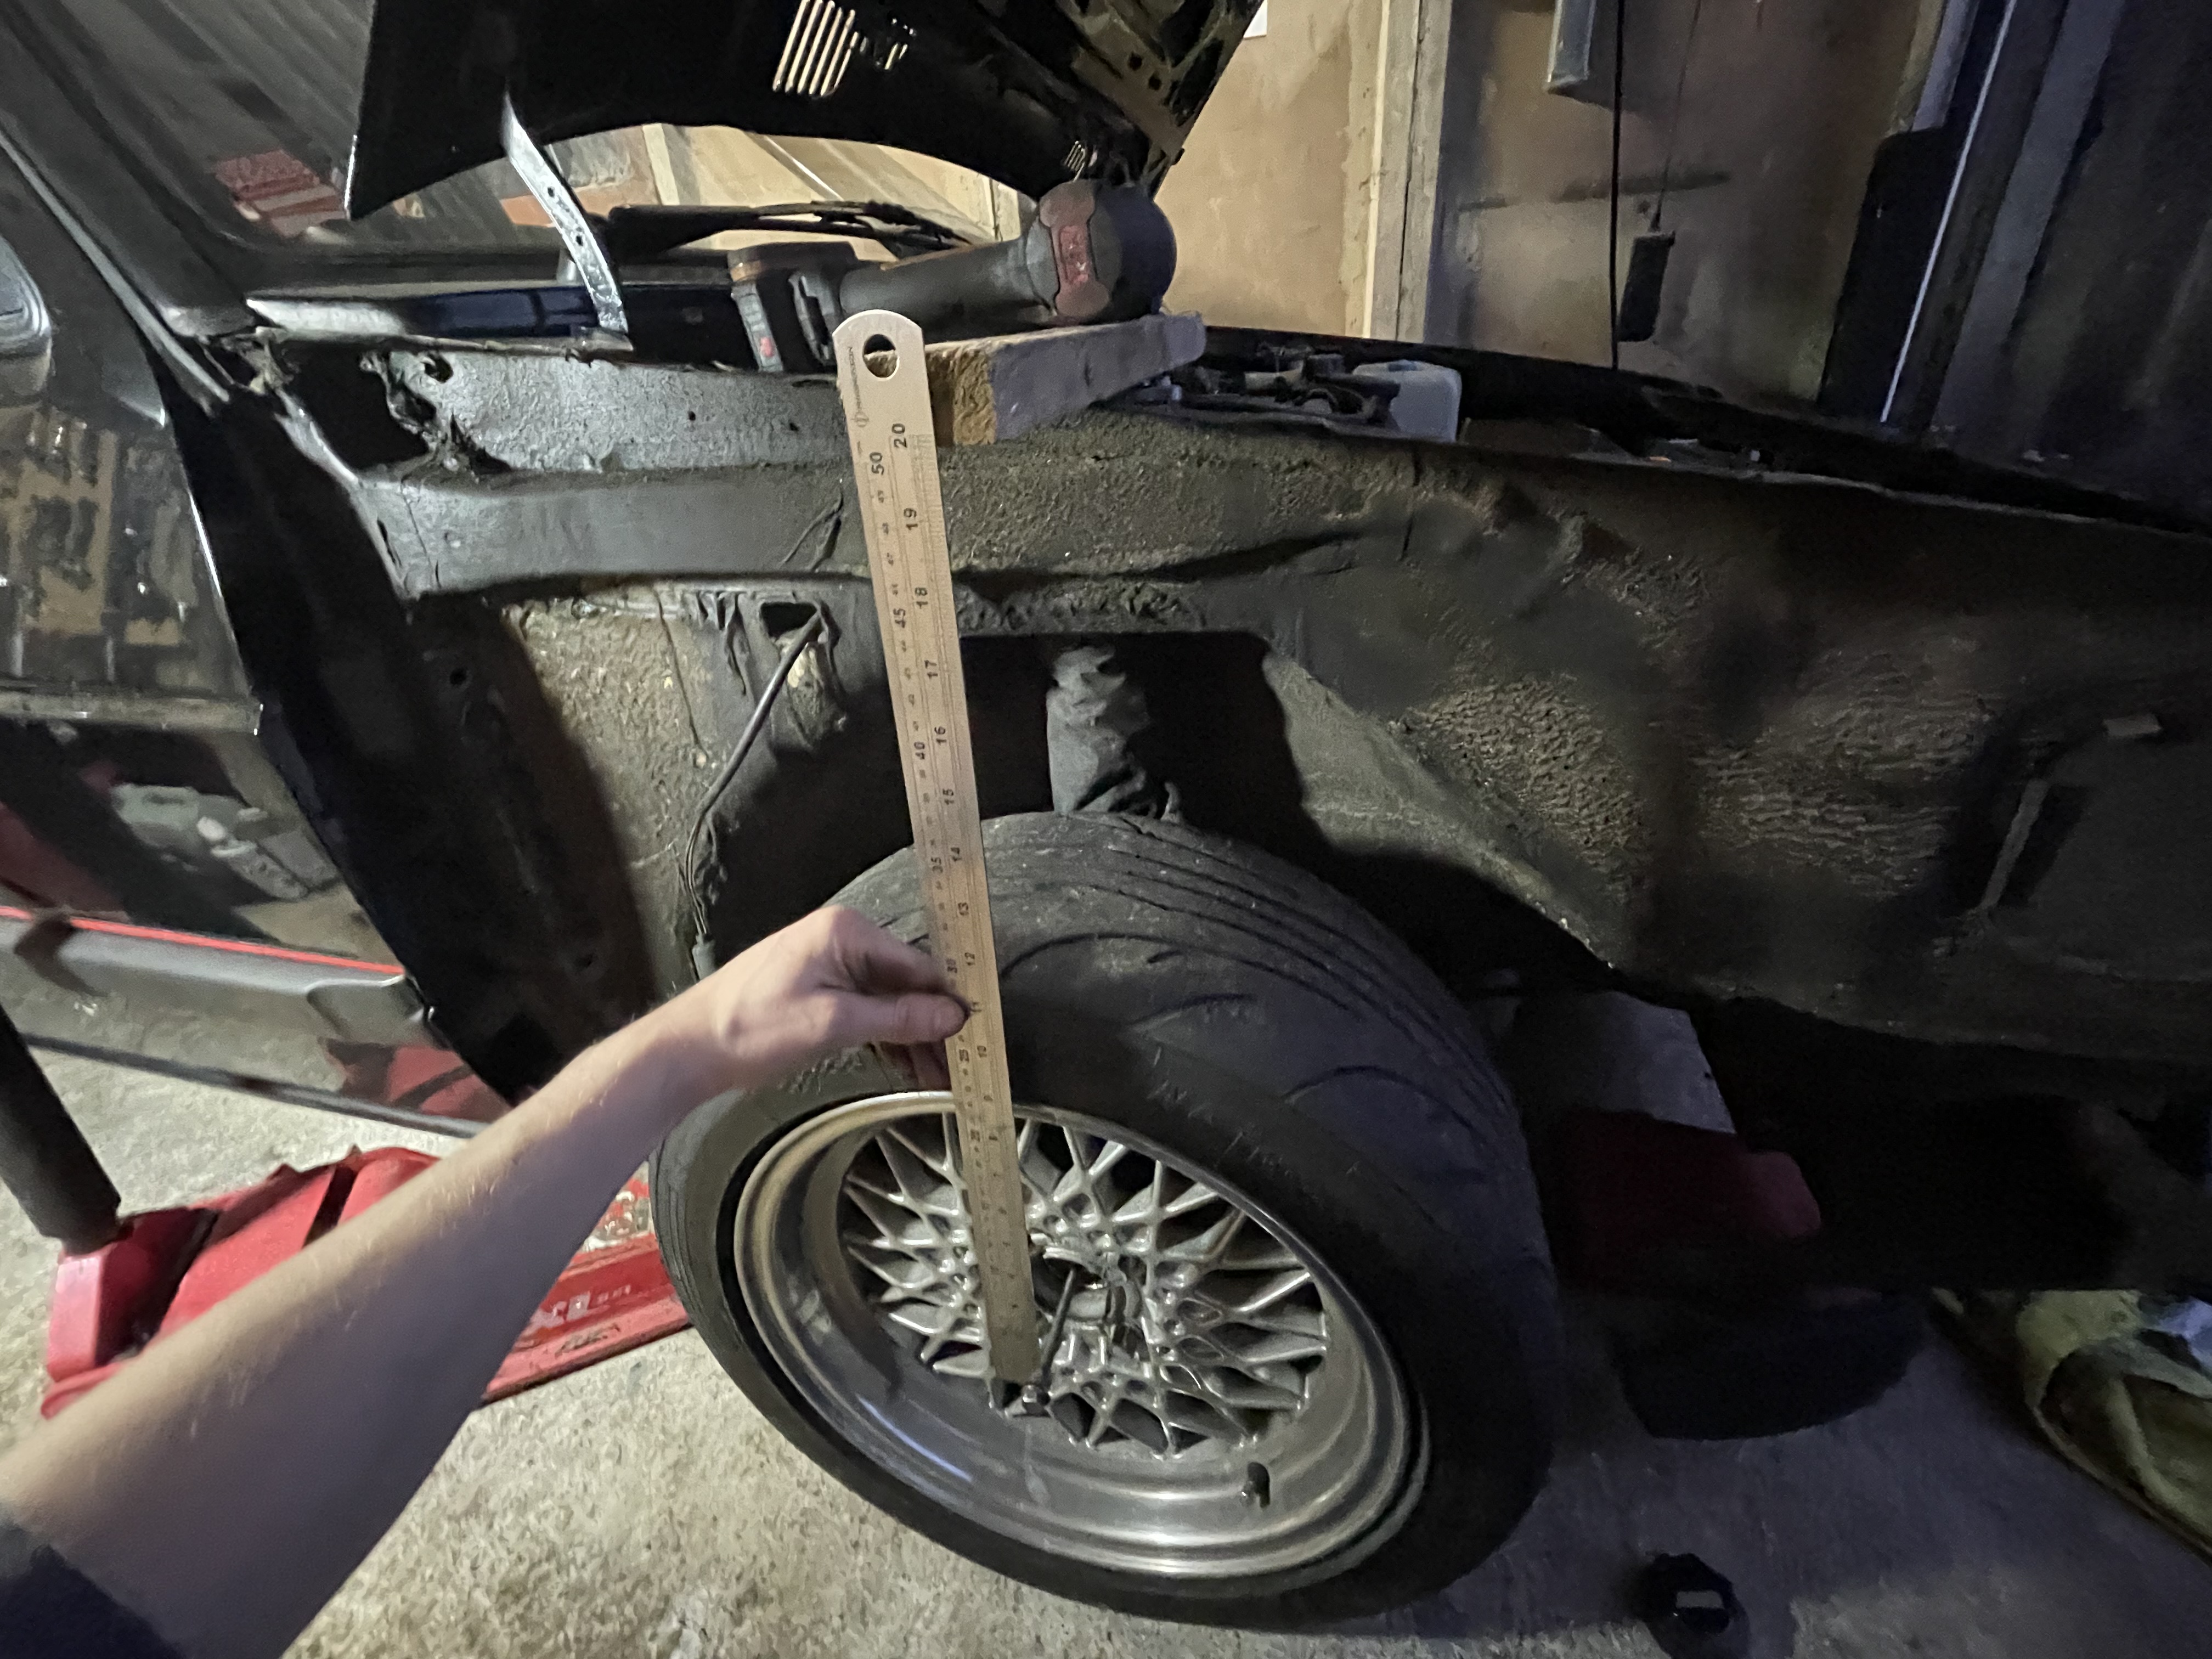
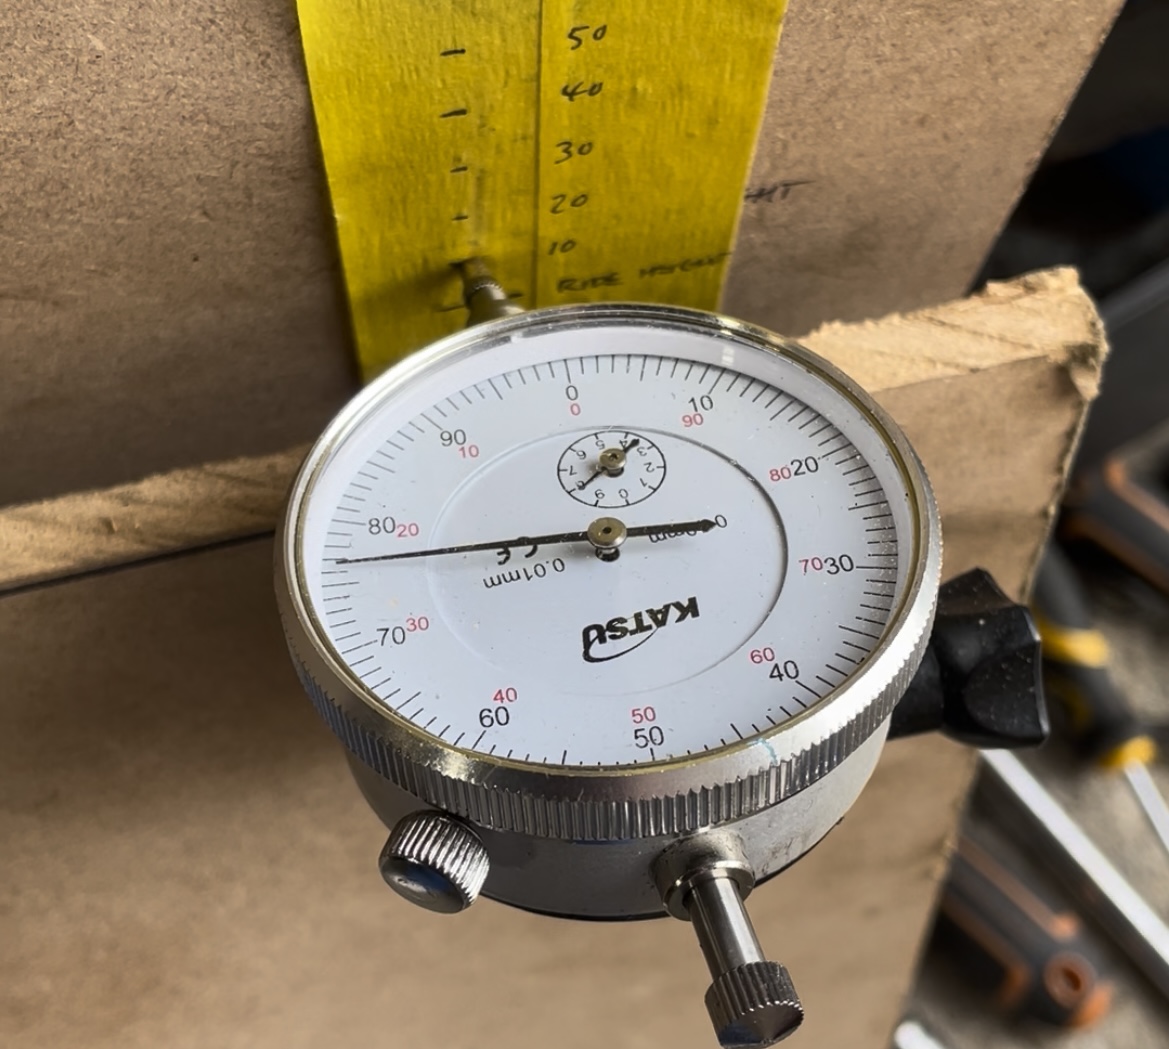
This is how I measure ride height, using a bolt in the hub and a block of wood on top of the inner wing. It’s also a good idea to measure the front sill to floor height at this point.


Next up you need to remove the front spring, this makes life a lot easier when jacking the suspension up and down.

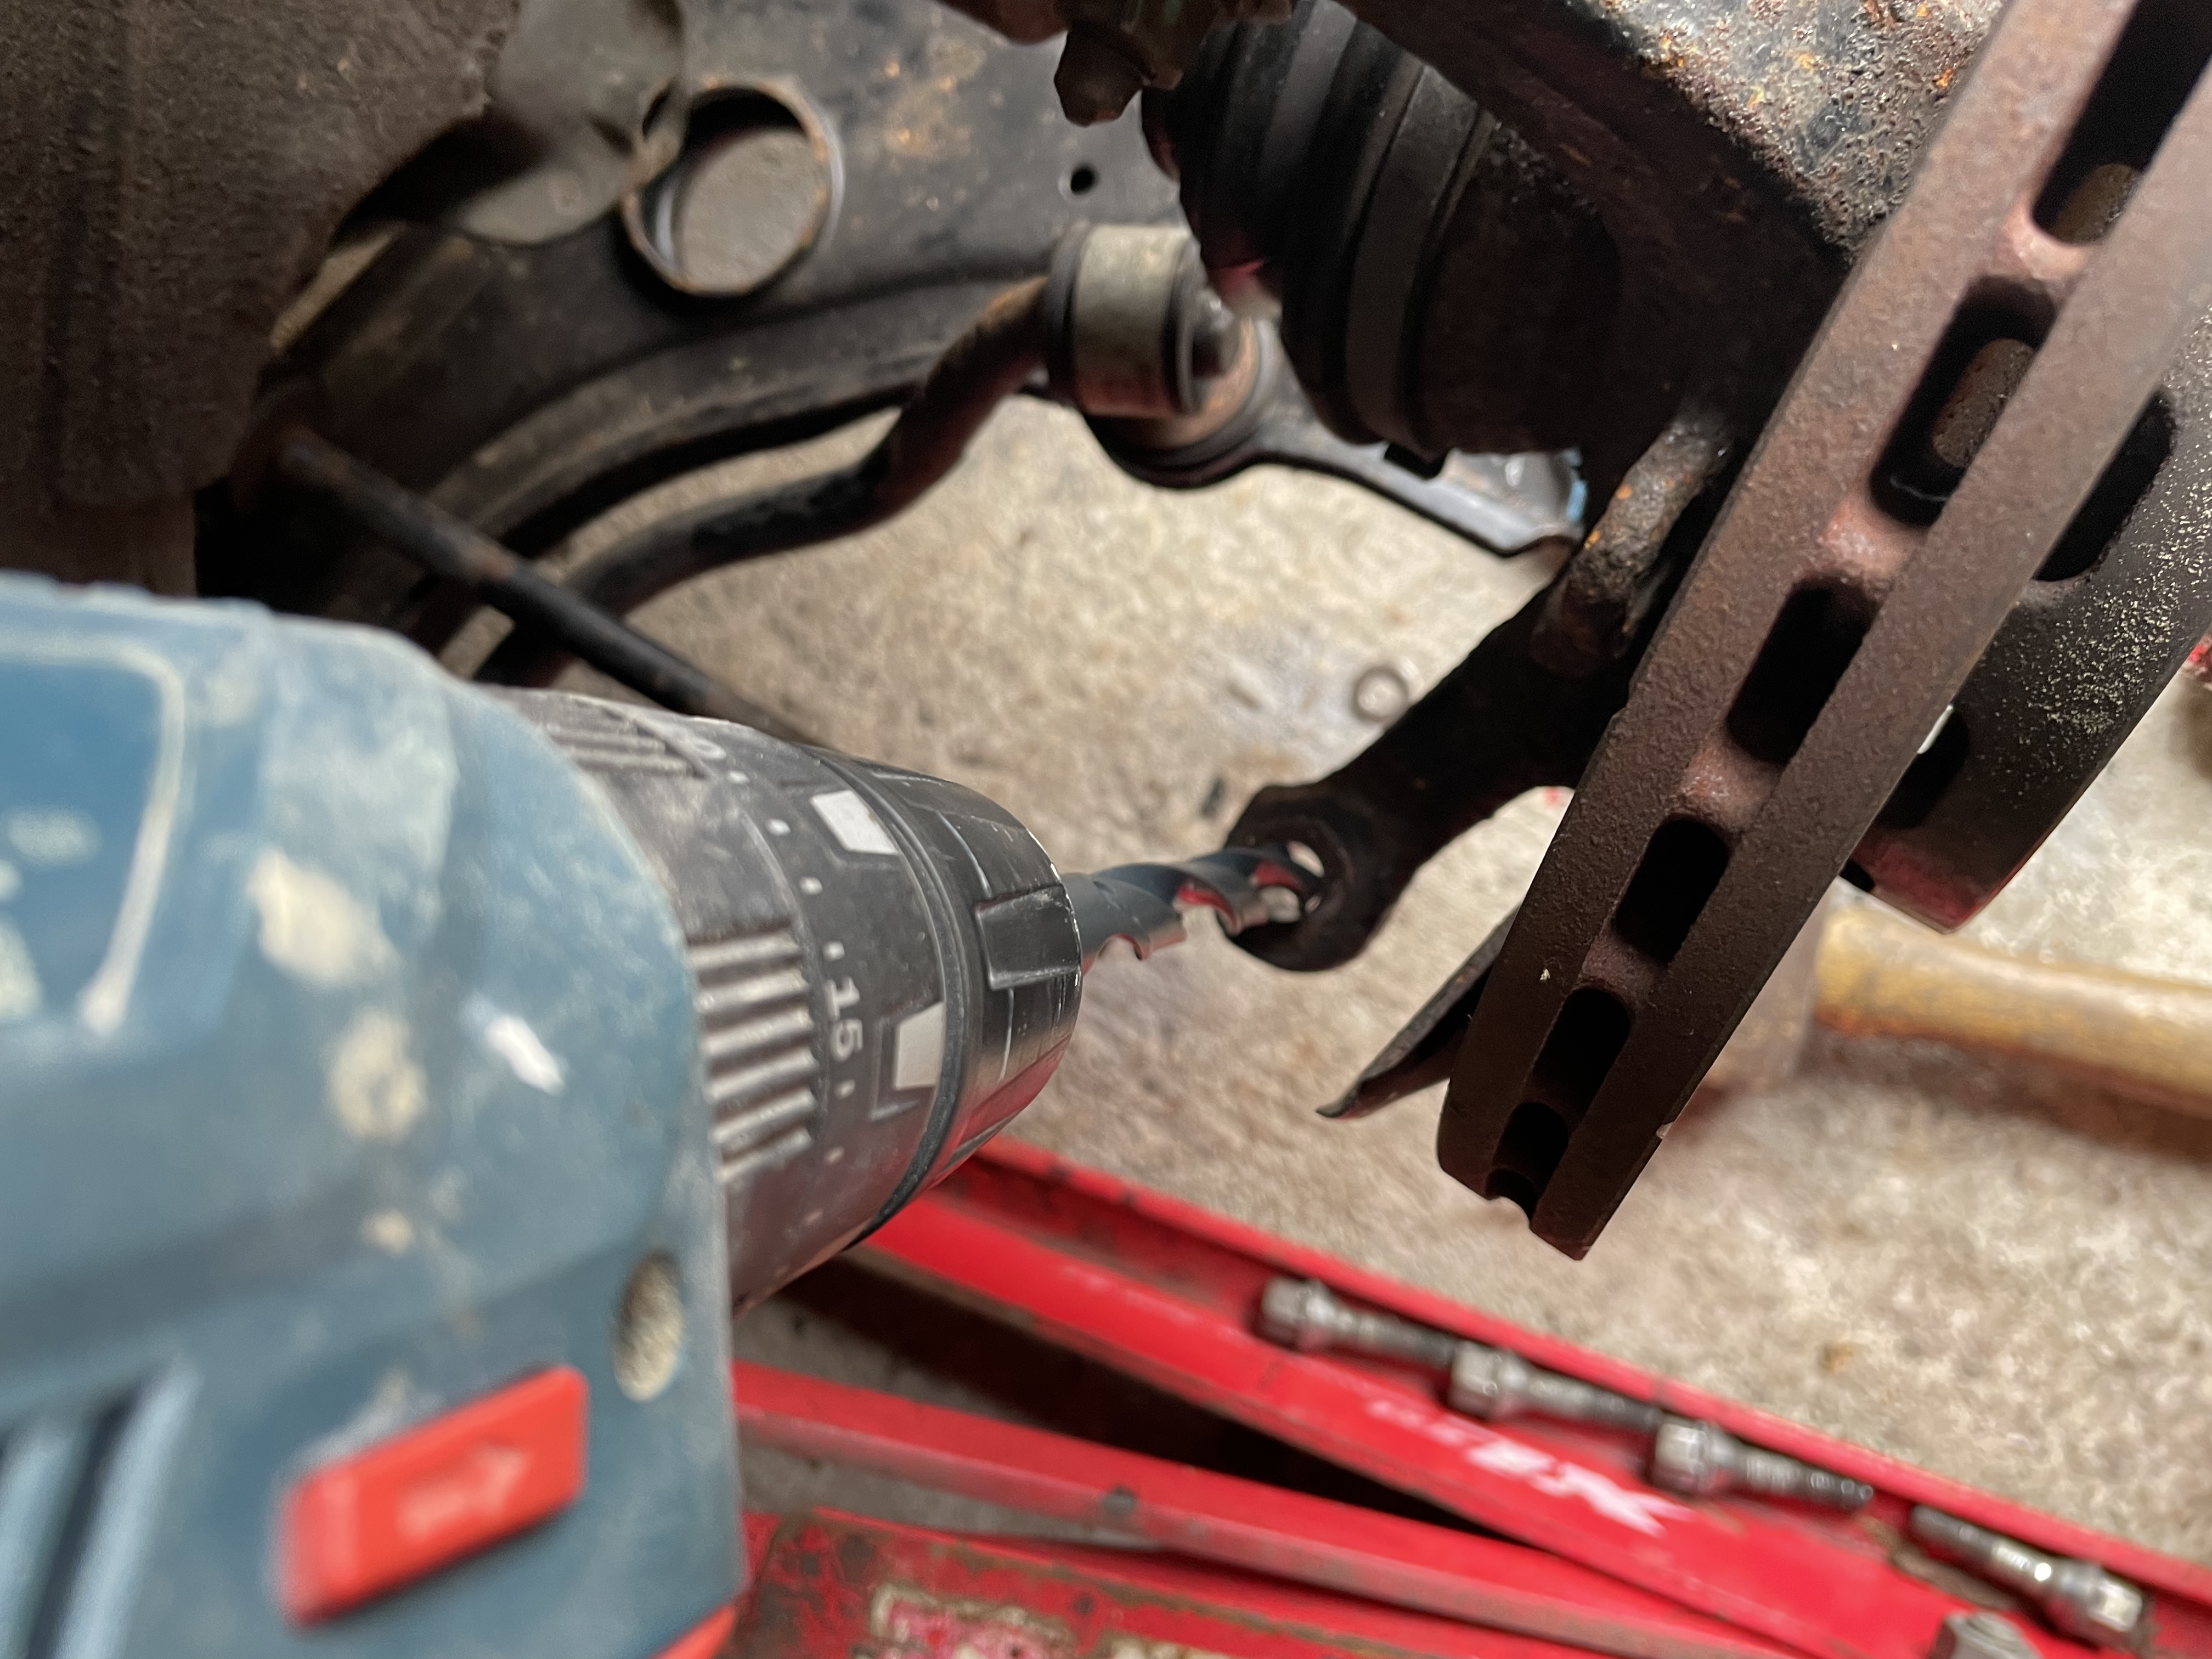
Next up is to drill out the bolt pattern so it can be mounted to the hub.


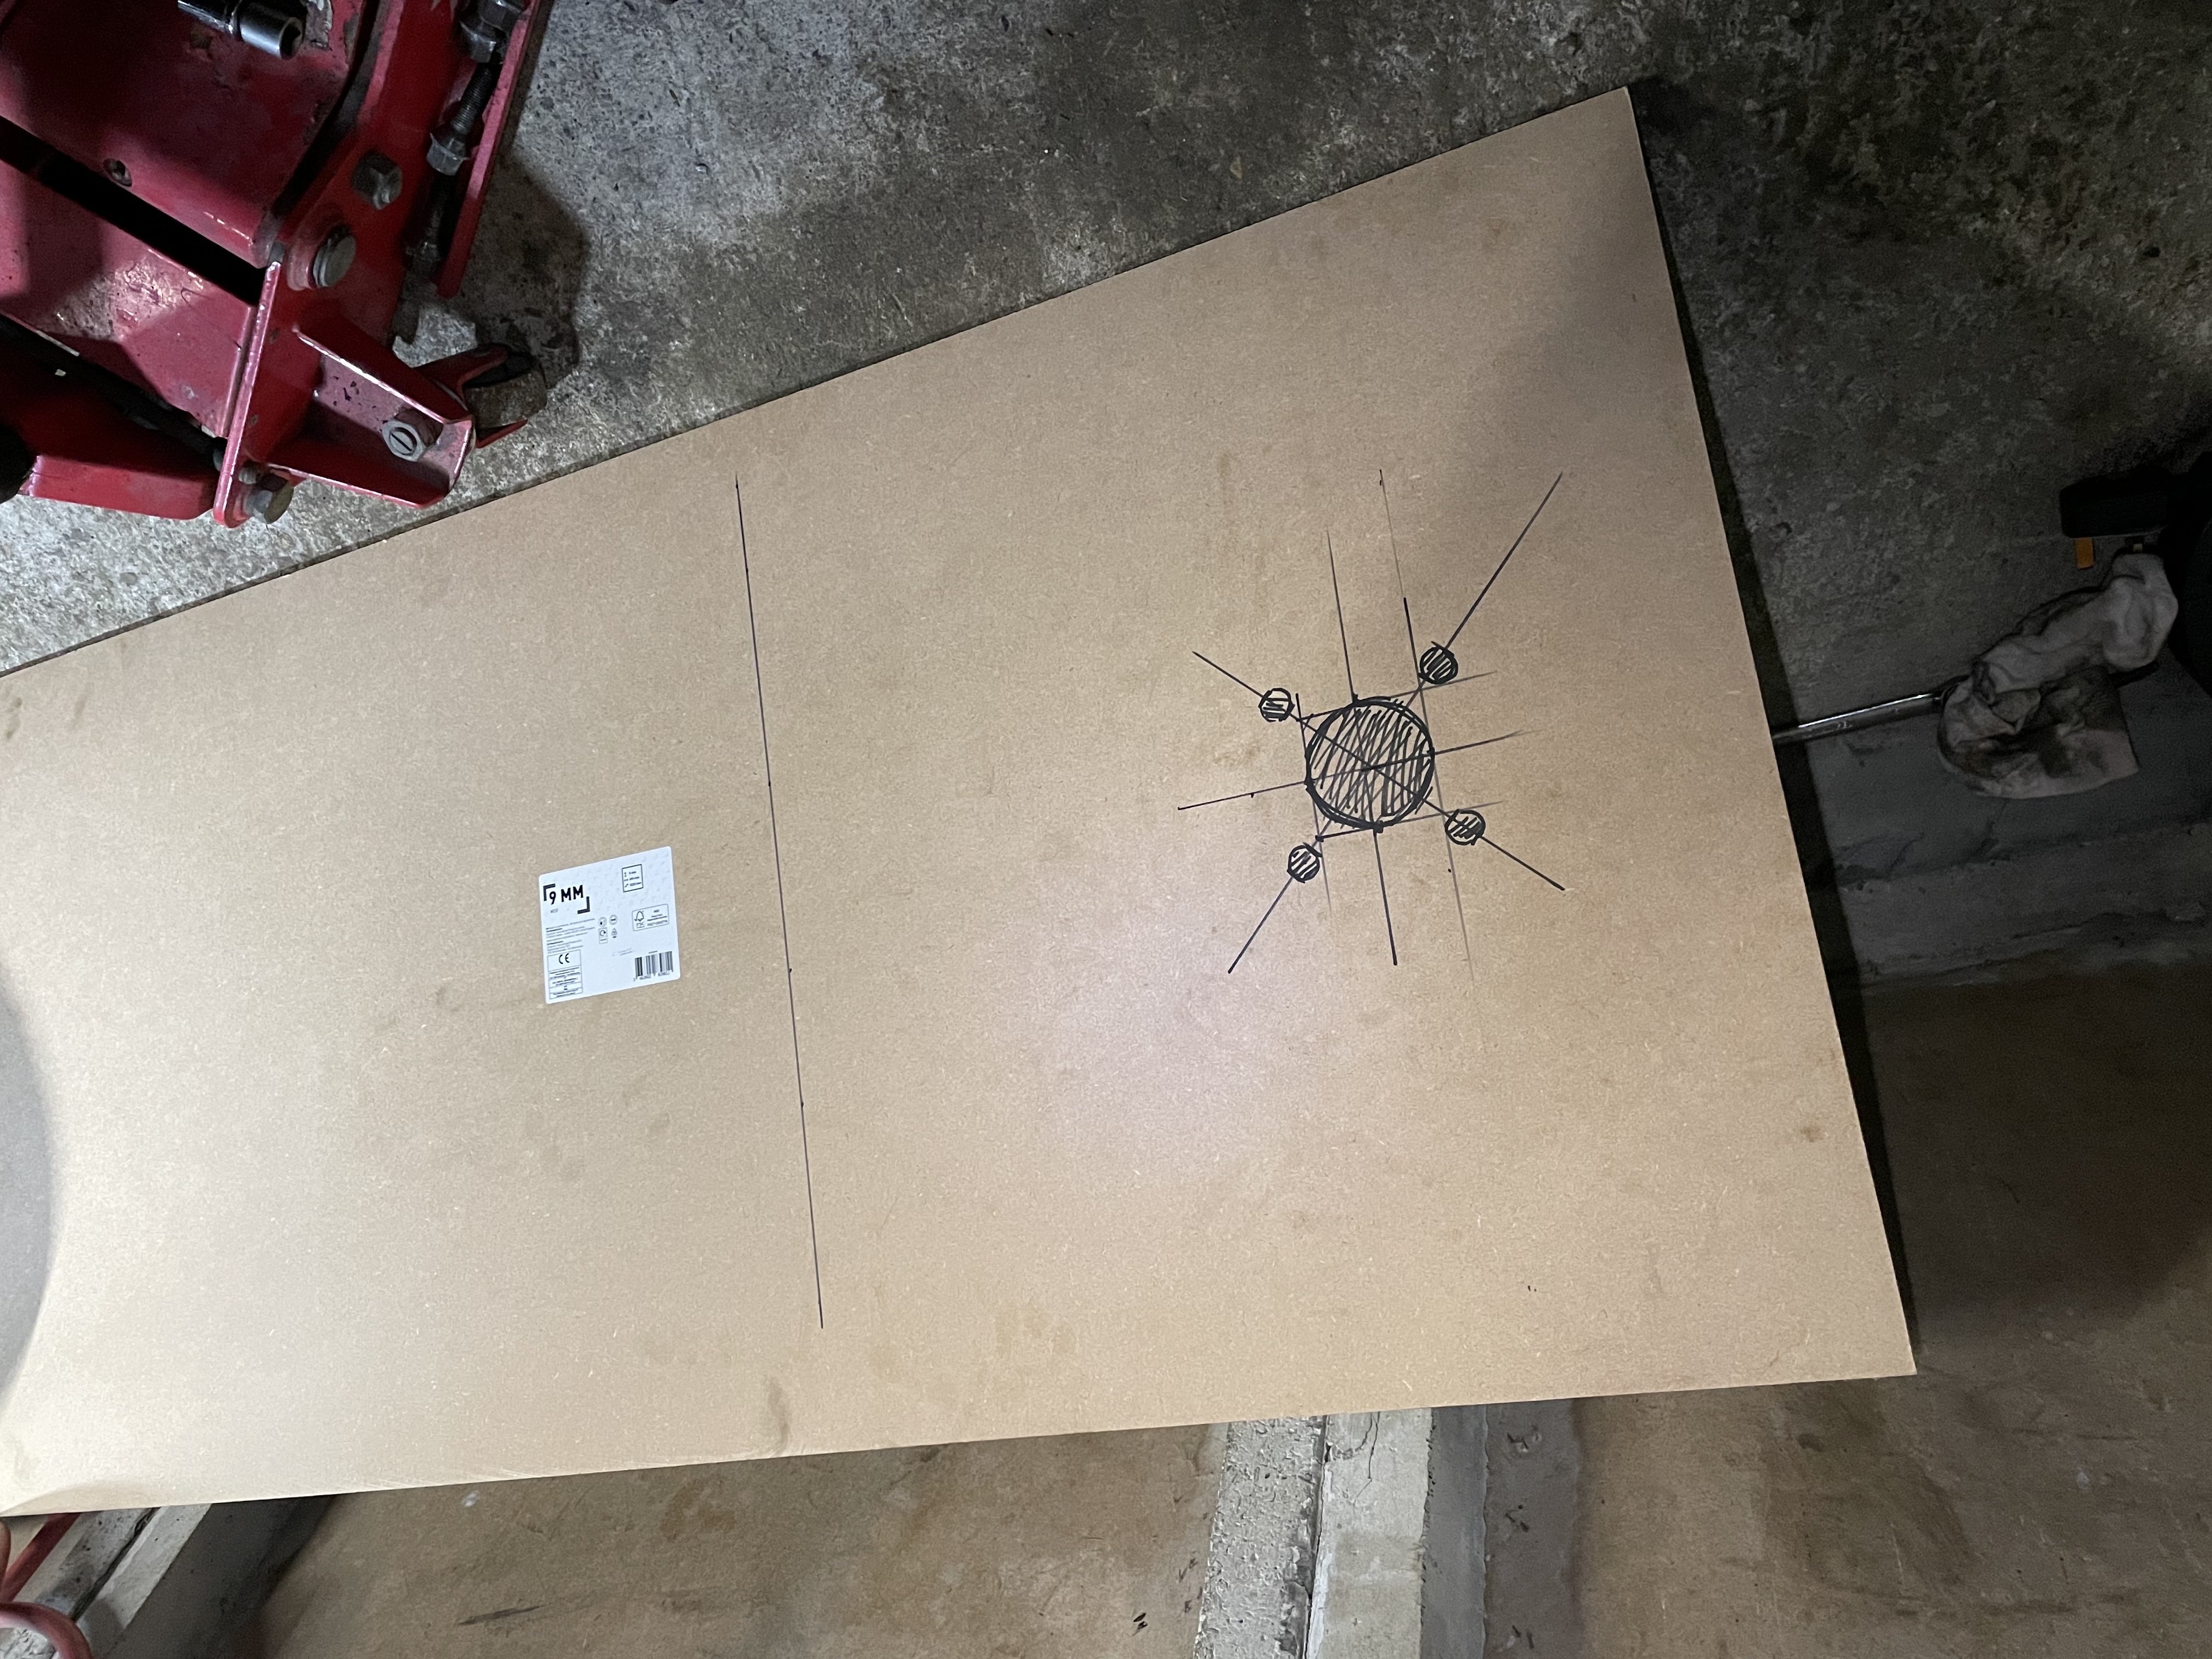
The wood was cut into 2 pieces, one will be bolted to the hub, the other will pivot off the floor, and the distance between the leading edge, throughout the suspension travel is where we will measure the bumpsteer.

There’s a few ways to measure it, you can use a steel ruler – time consuming and has ability for inaccuracies. Vernier calipers are another option, much more accurate but again a bit of a faff, measuring and remeasuring.

I chose to go for a dial gauge, they are fantastic, measuring 1mm through one full rotation of the dial, they are also very inexpensive, this was £8 on amazon.


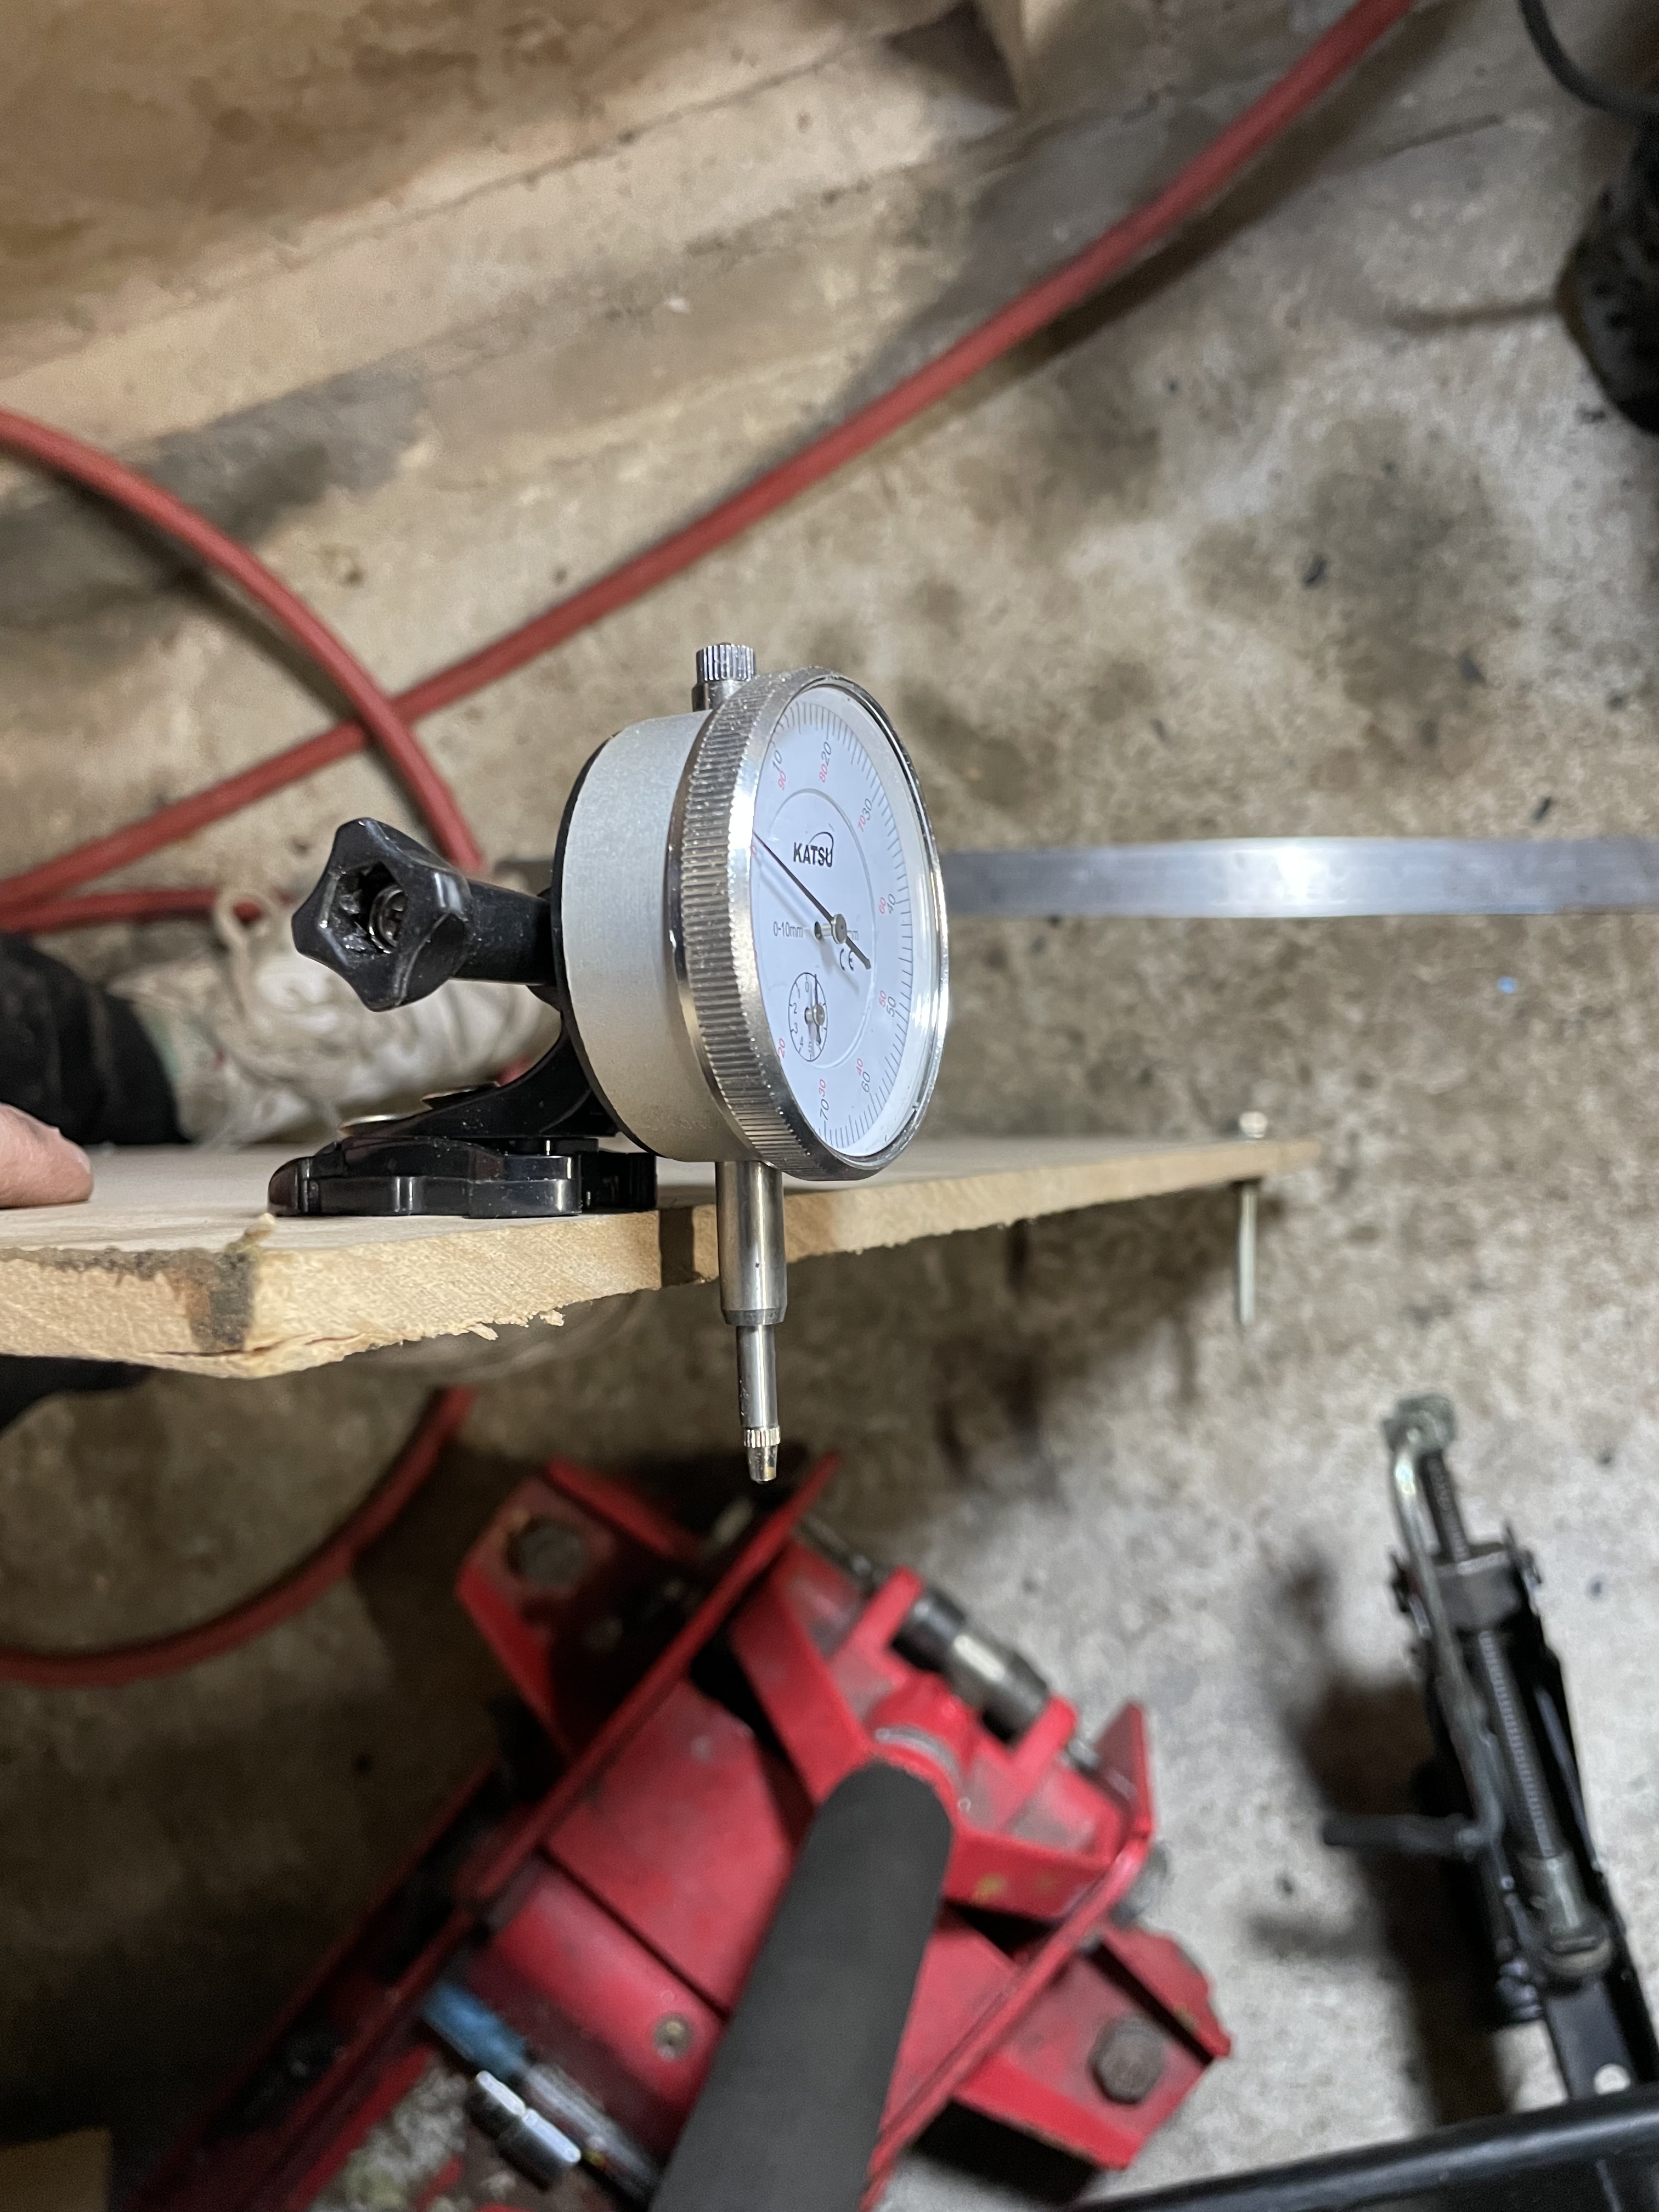
The gauge needs mounting to the wood, I used an old GoPro mount – this worked out really well.


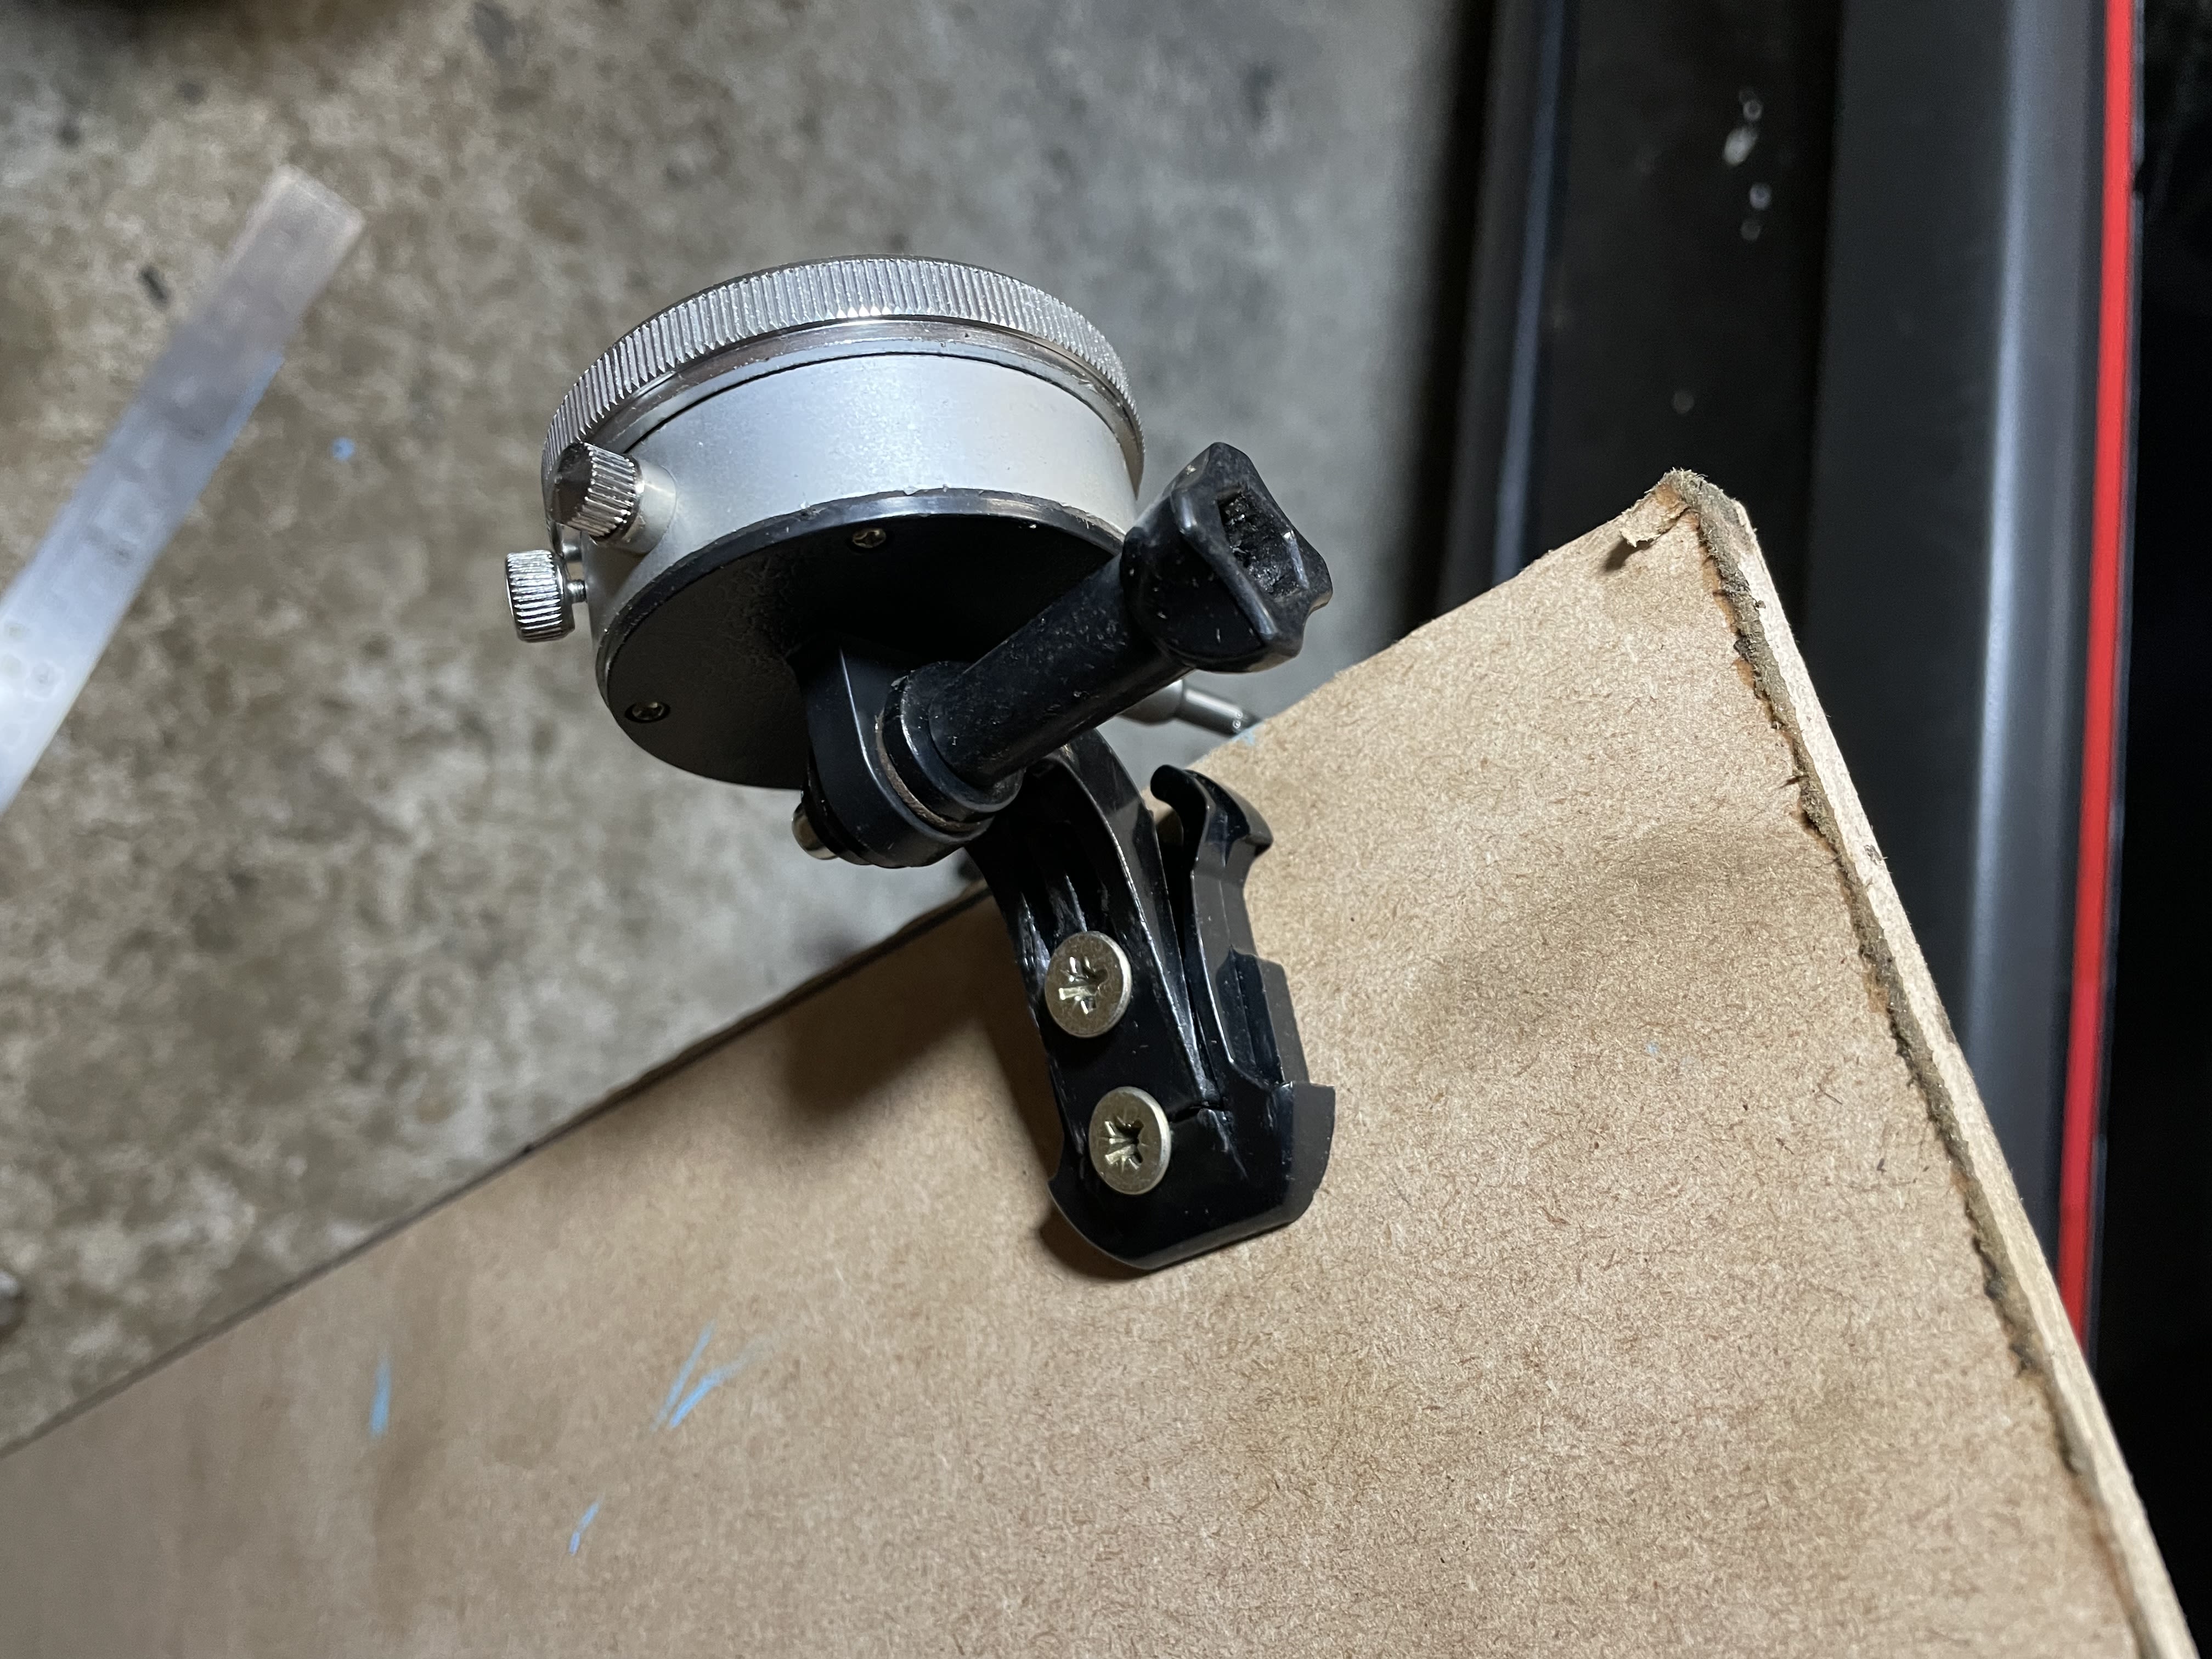
on the other side of the wood, mirror the length of the gauge with a bolt. This will remain constant and make any measurement visible on the gauge.


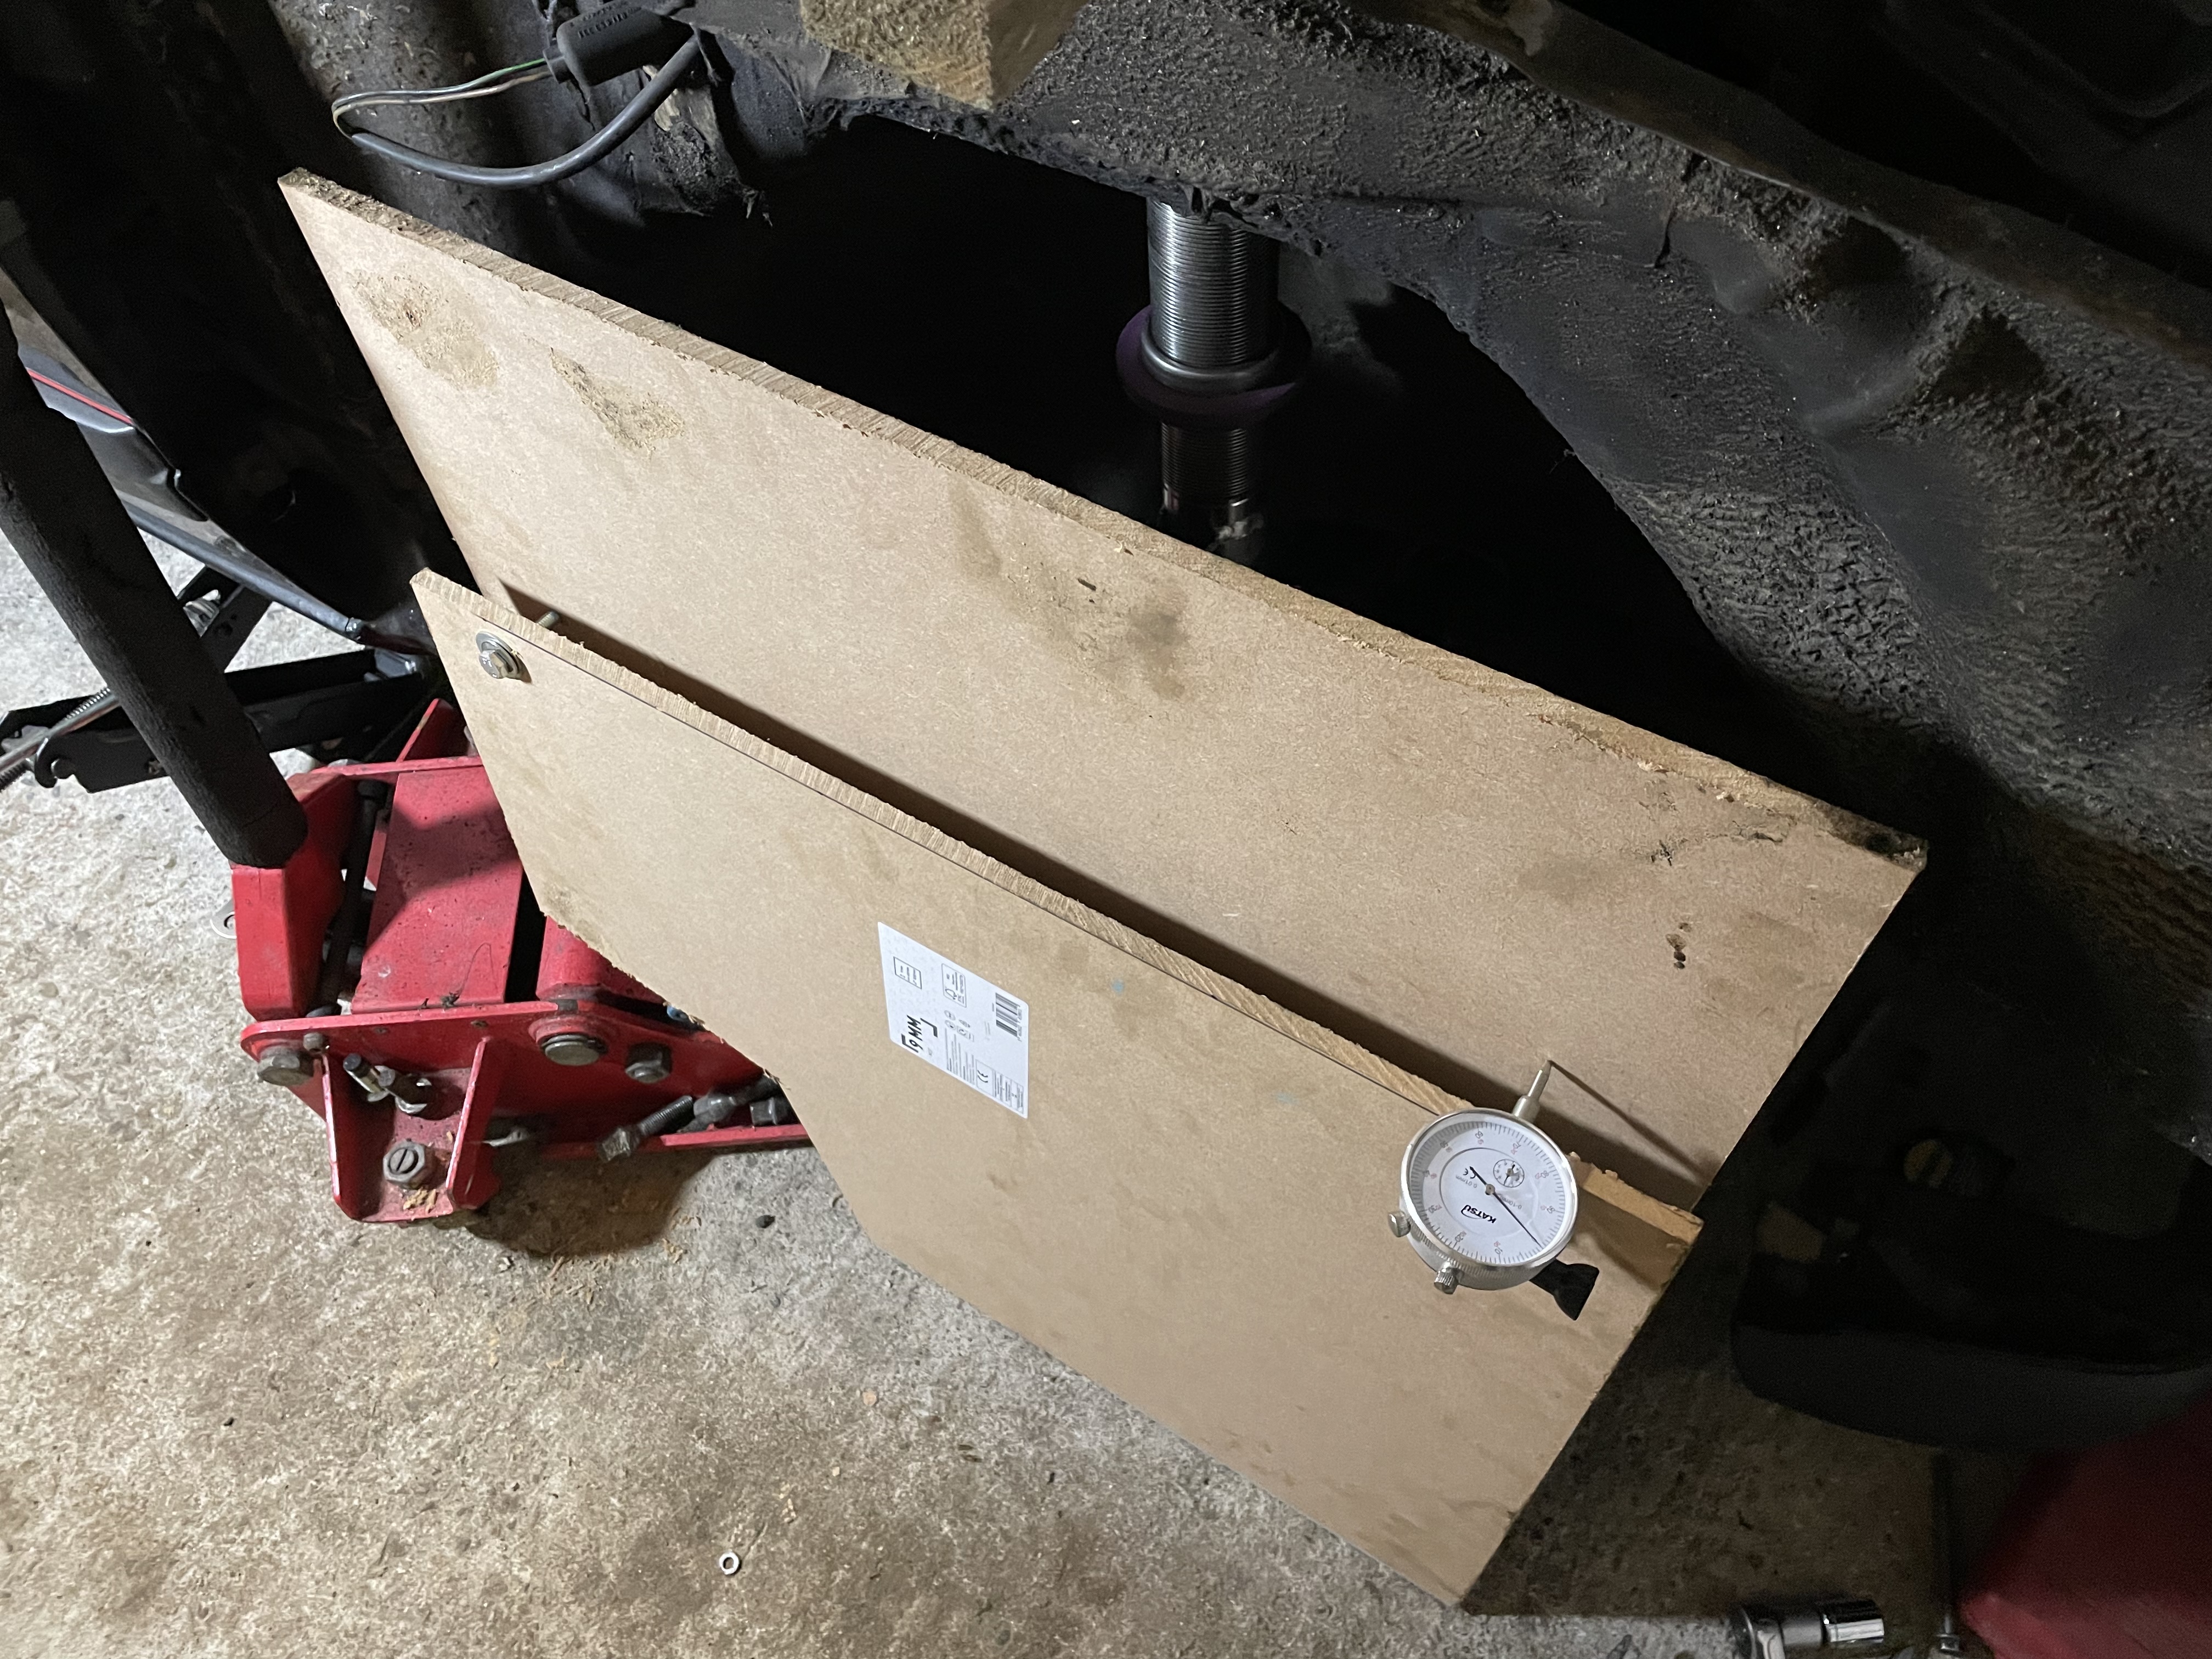
With everything ready to go, and the front wheel off, I lowered the car back down on the jack so it was the same height as the sill to floor height we measure previously. I don’t have 2 jacks and axles stands are too high, so I used the standard scissor jack to keep the height of the car consistent. My main jack I used to raise and lower the suspension.

The standard set up was then measured.
The best way I found to measure this accurately, was to jack the suspension up to ride height. The dial gauge was then zeroed. I then jacked the suspension up to full compression, released the jack slowly and filmed the dial gauge on my phone.


With the results filmed on my phone, I could sit inside and plot everything on a graph.
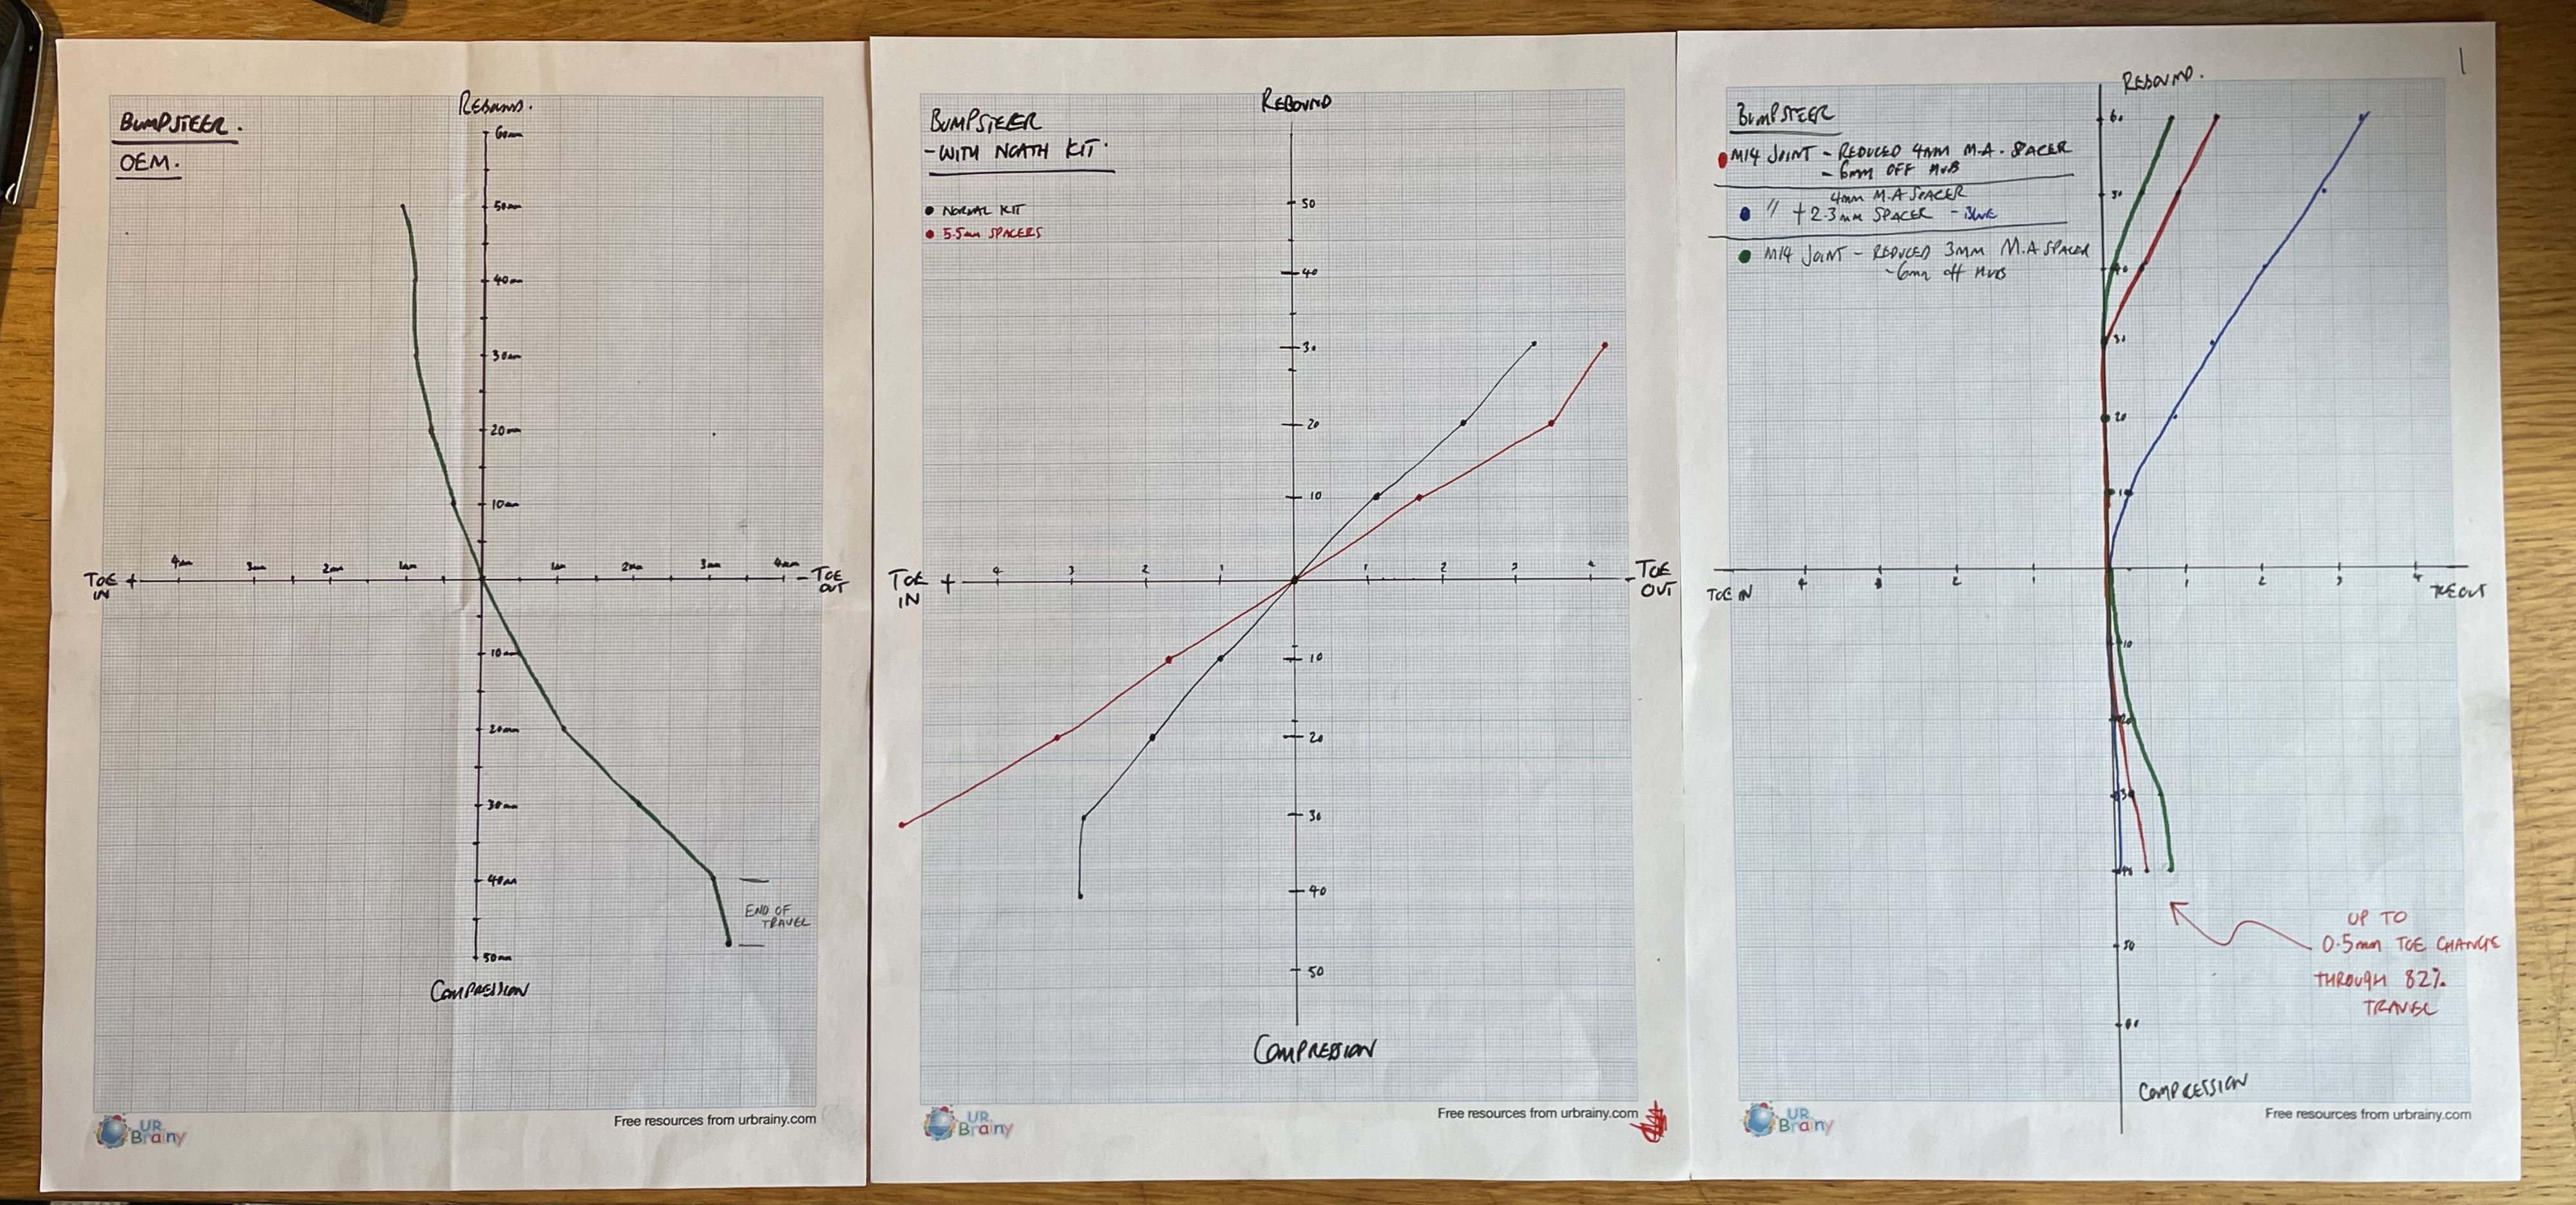
The straighter the line, the closer it is to zero bump steer.


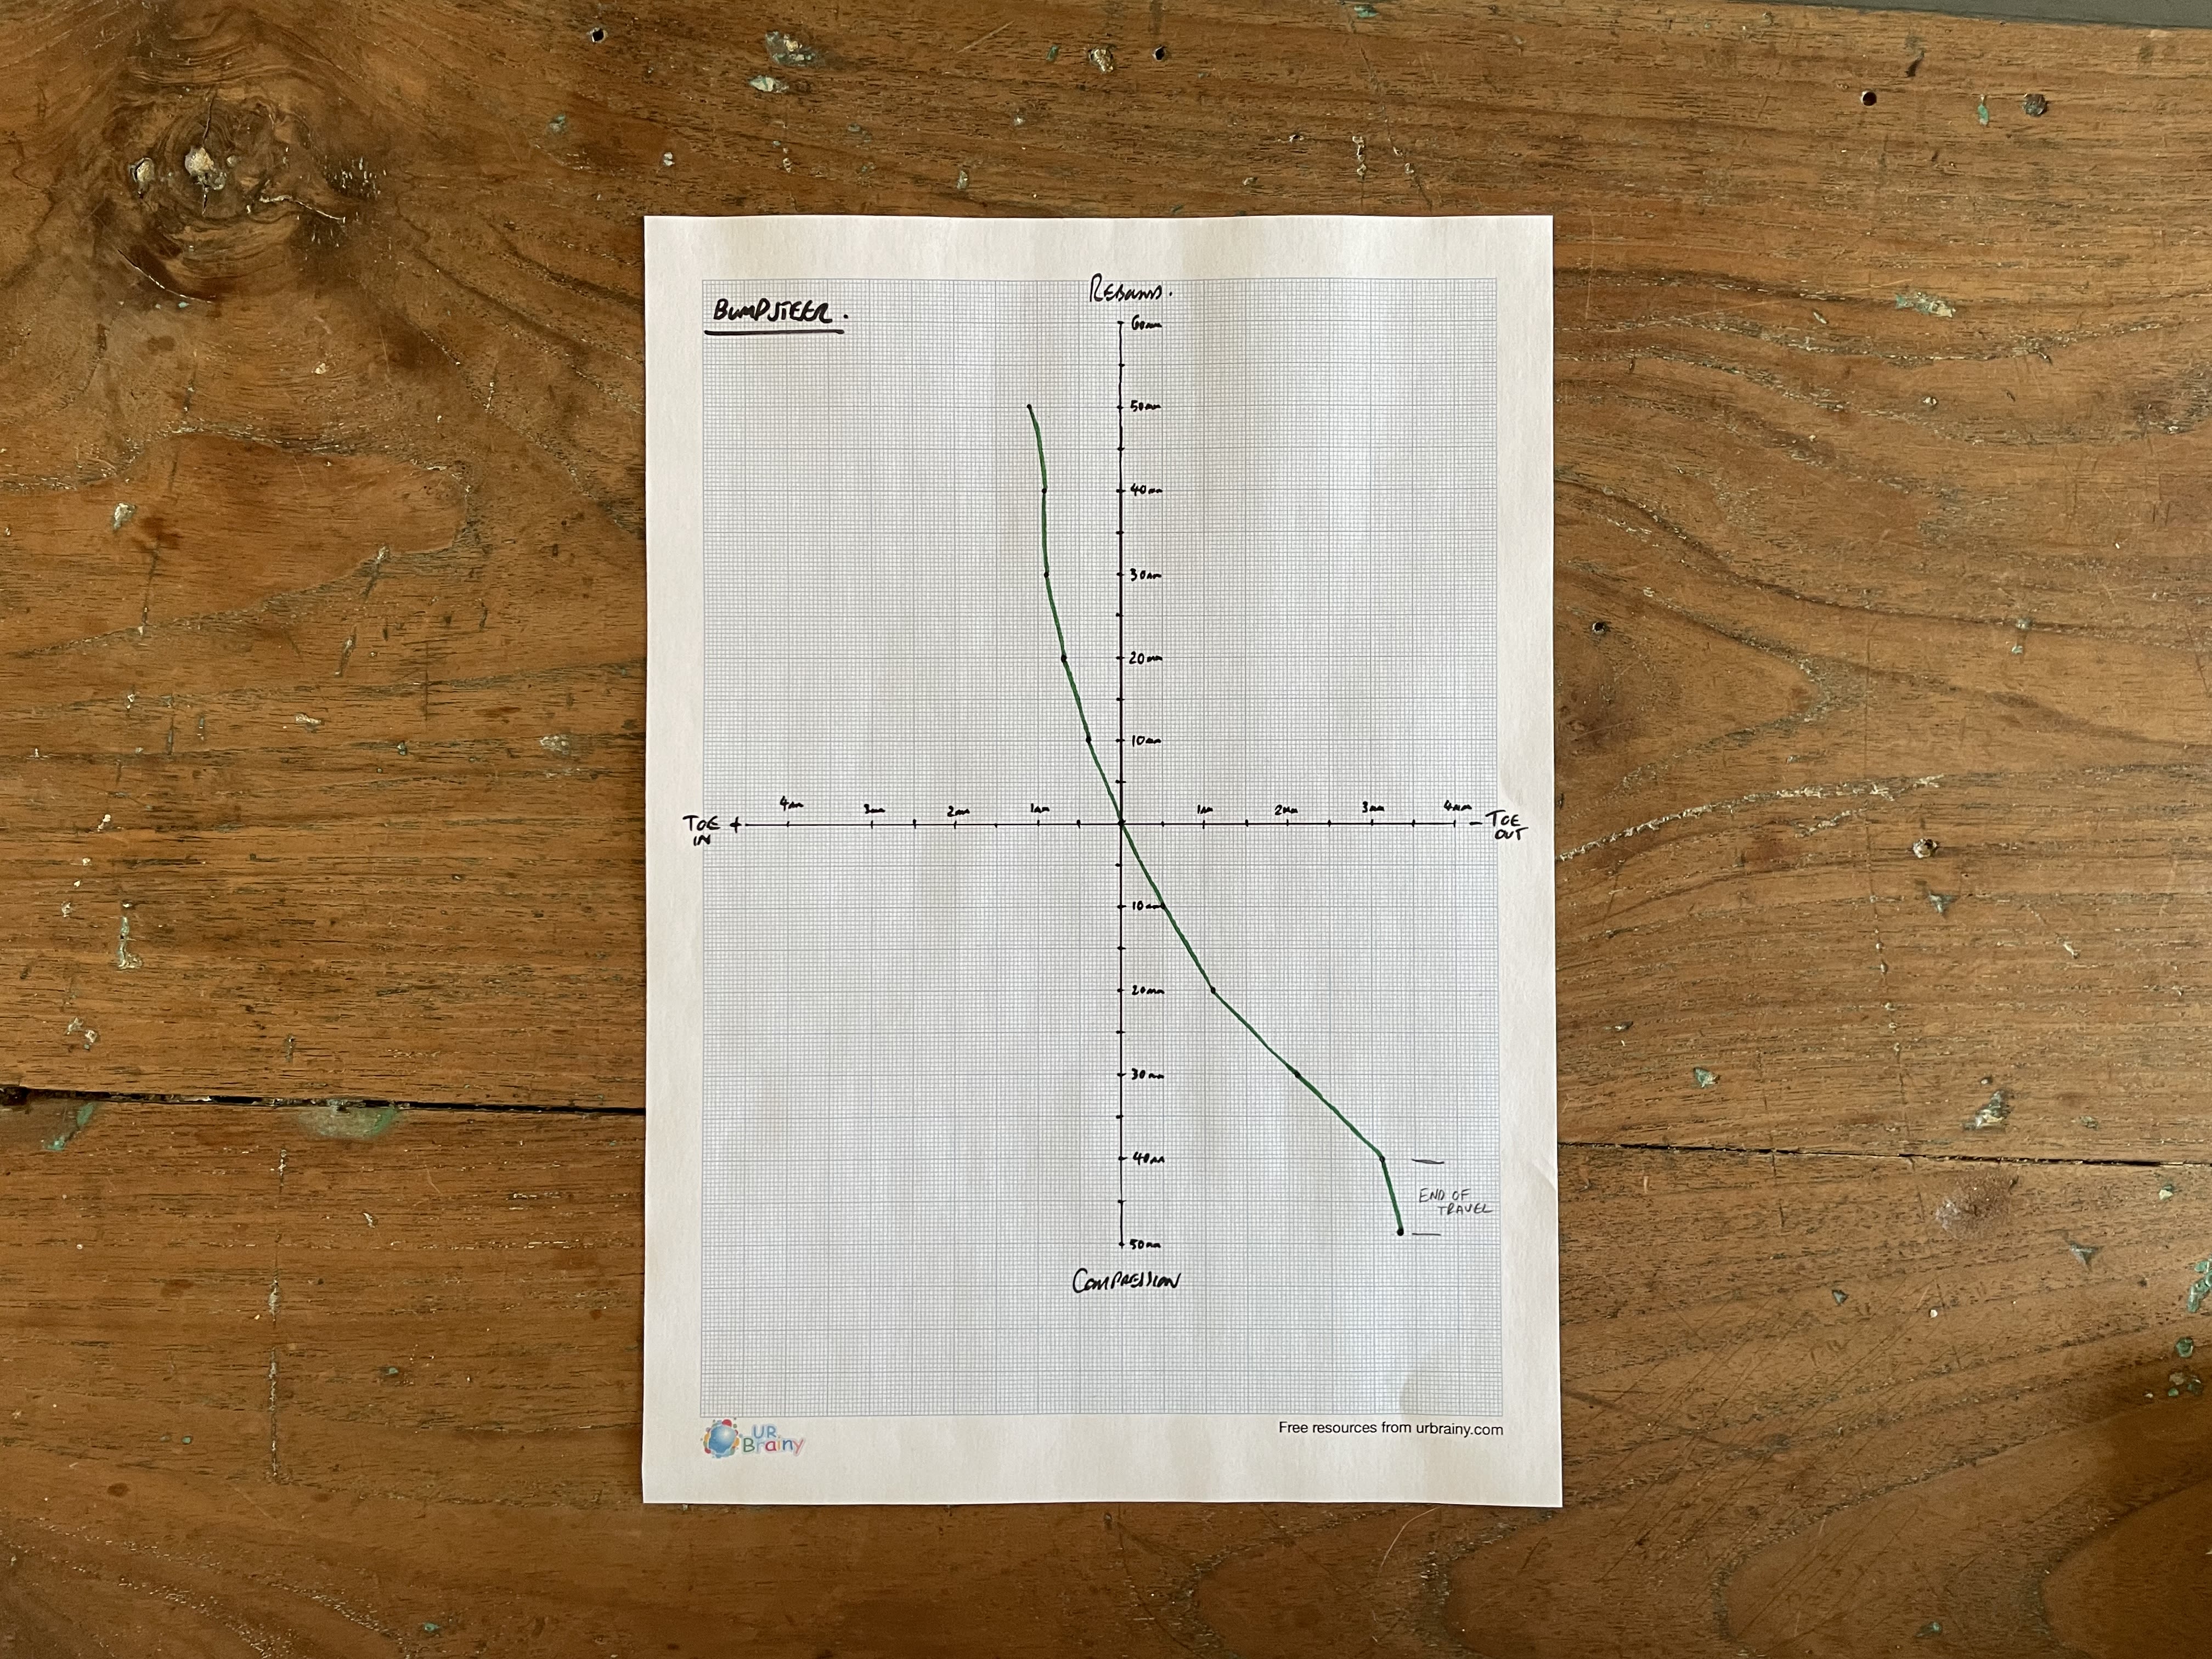
To explain the above:
X axis – Shows toe change in 1mm increments, toe in to the left, toe out to the right. (each small square on the graph is 0.05mm)
Y axis – Show suspension travel in 10mm increments, from full extension, through ride height to full compression (each small square is 0.5mm in travel)

The suspension was jacked up and every 10mm a dot was plotted on the graph, with a line of best fit to see it visually.

What we can see in this standard set up is we gain toe in as the suspension extends from ride height and gain toe out under compression.

In driving terms, toe out gain under compression isn’t necessarily terrible, certainly more favourable than toe in, which I think is why the car felt pretty good anyway. – But we are still seeing over 3mm of toe out at 40mm compression, which is significant.

So how does the Noath Kit compare?
Well, as we mentioned earlier, the relationship between the LBJ and the track rod is what effects bumpsteer, so if you were to just fit the extended ball joints and keep the track rod as standard the bumpsteer would be horrendous, quite literally unmeasurable!


I’ll also point out at this point that bumpsteer is bespoke to each car, there’s no one size fits all. Noath doesn’t sell this as a ‘bumpsteer kit” the idea of flipping the track rod is to get the bumpsteer back towards oem, as best they can for a bolt on kit.


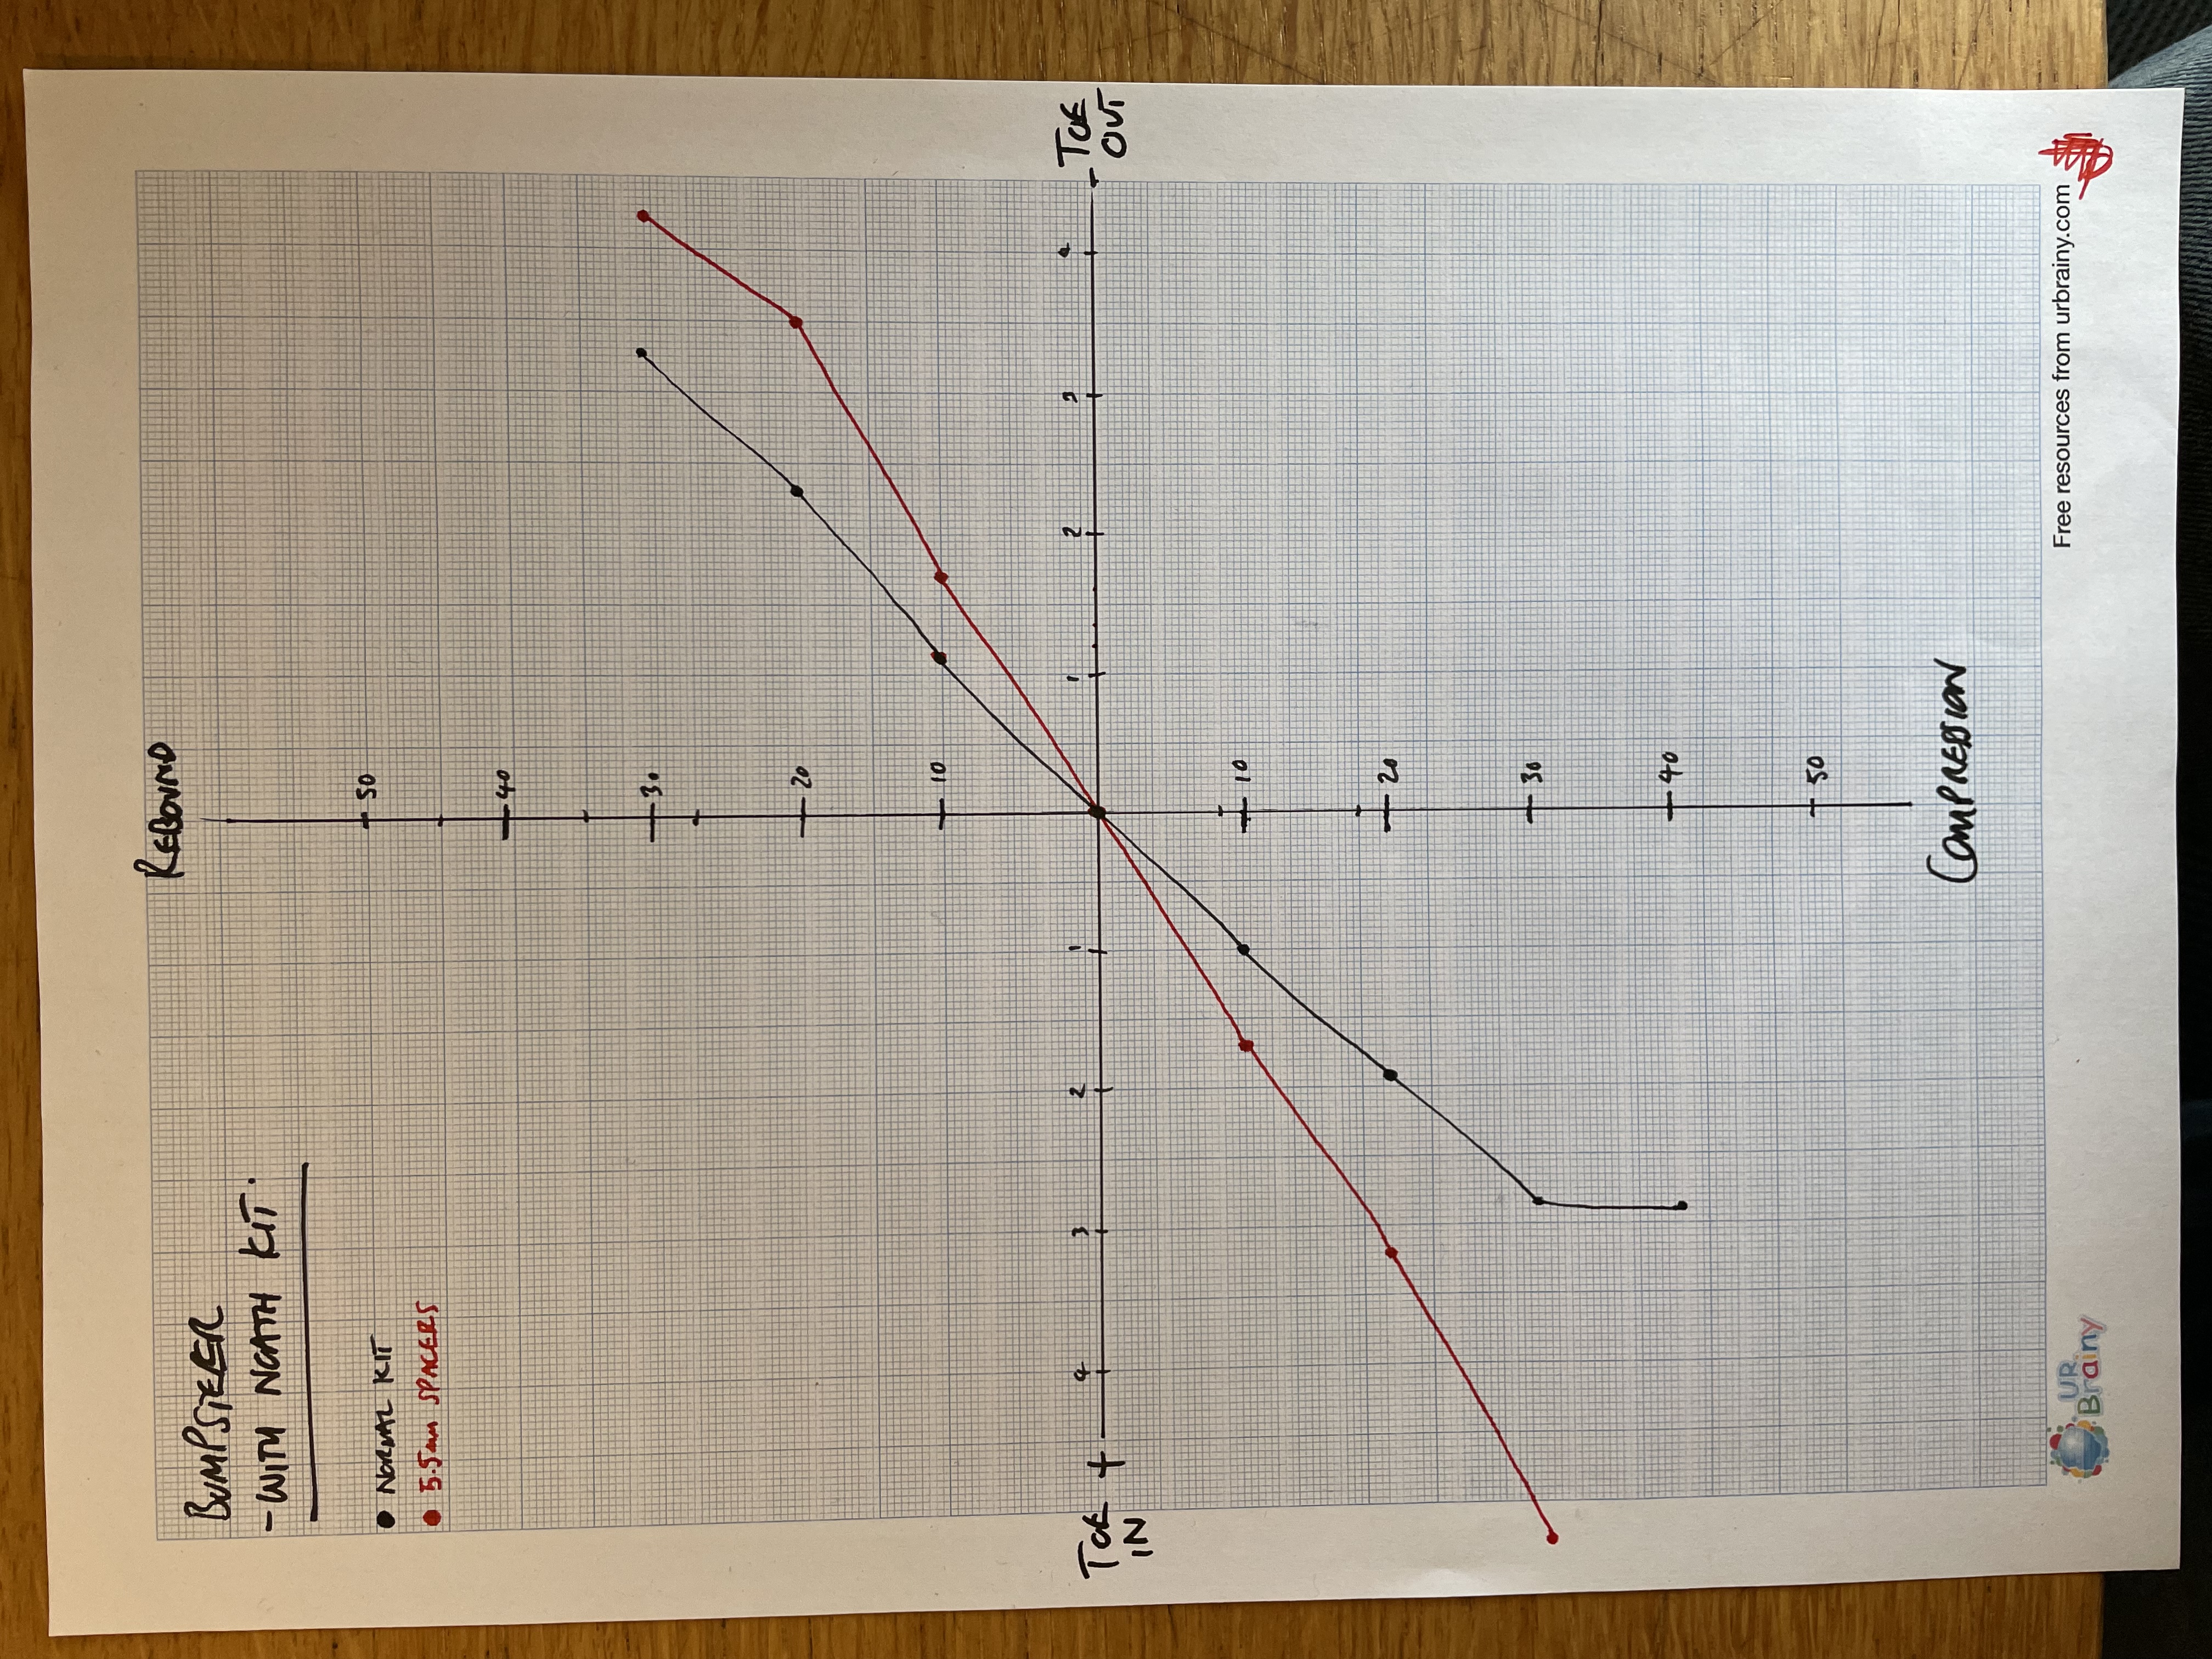
This graph shows the Noath kit, as it is, as you can see its actually worse for bumpsteer than the oem set up. So although we have corrected the roll centre, that has now had a direct effect on bumpsteer and made it worse.

The red line on the graph shows the track rod end lowered 5.5mm using washers, this was to see which way I need to move the track rod. As you can see the redline is worse still.

With that data collected I had to work out a way to move the track rod up. I could cut down the misalignment spacers Noath provided, but there was a casting on the track rods which would need to be ground down.


Going over the graphs again, I’d worked out I’d need more than just a trim of the spacer.
The only way would be to trim the hub to get the desired height.

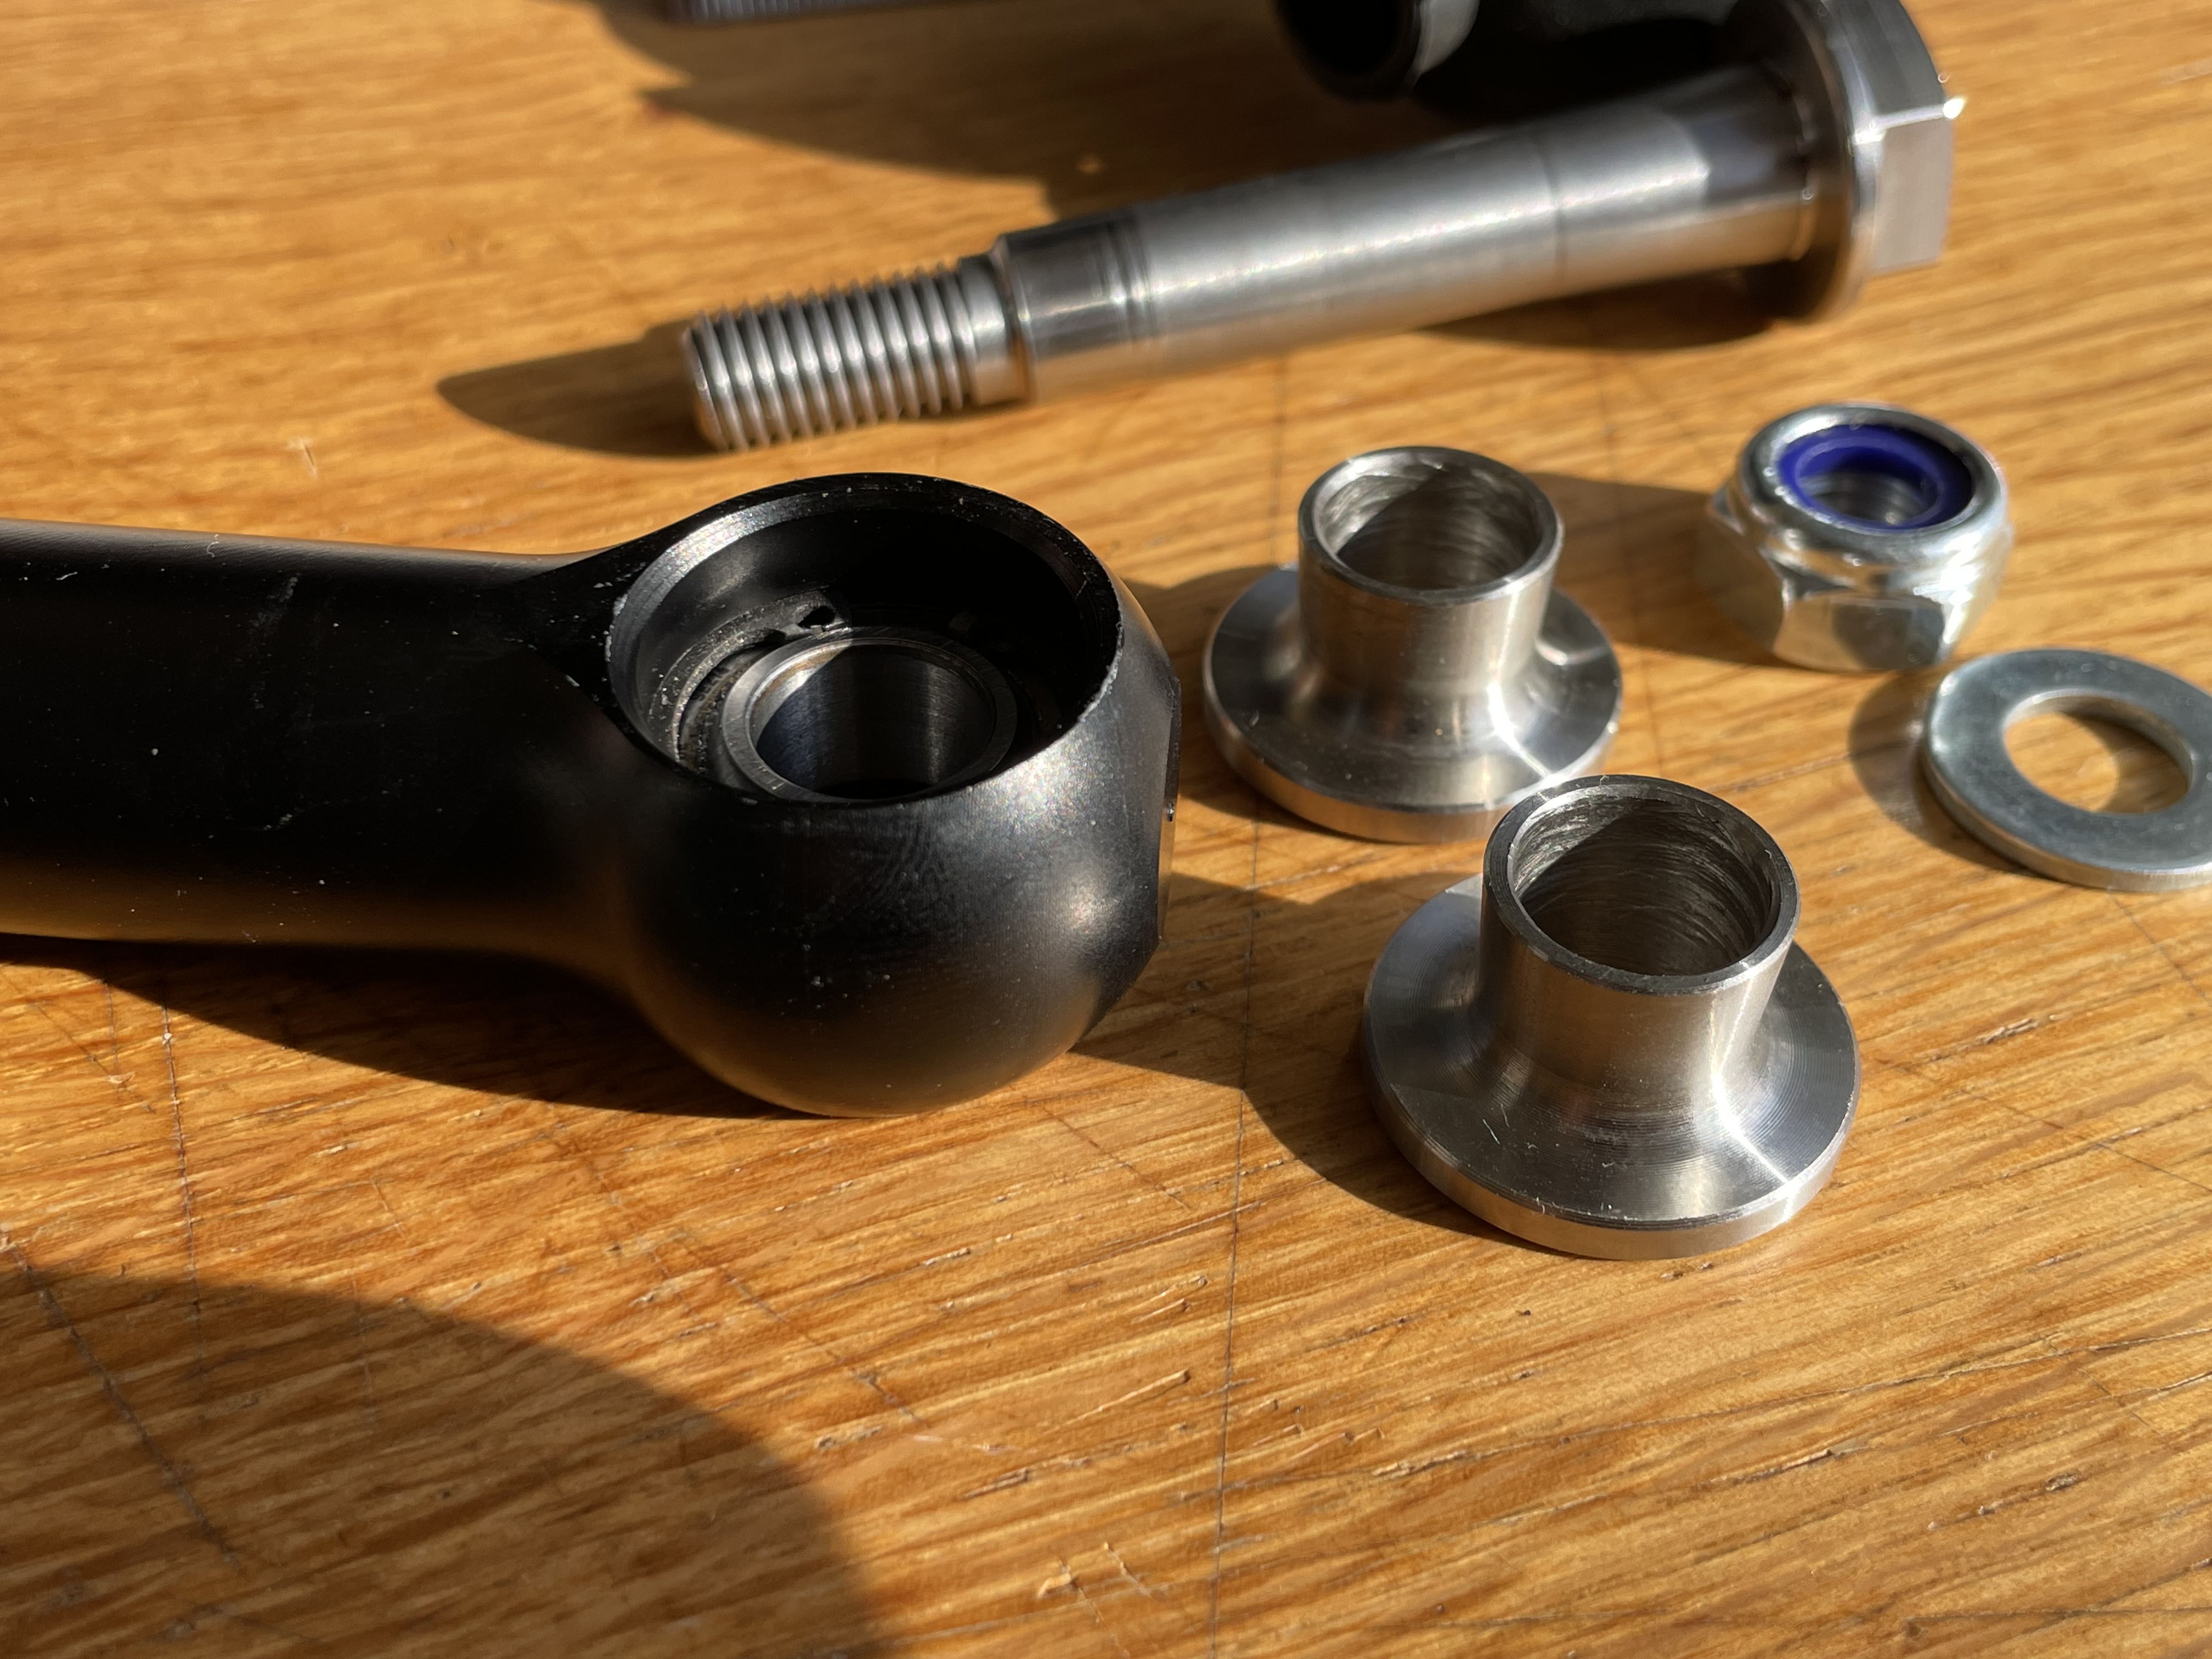
This caused another issue, the Noath kit comes with a tapered bolt which is great for a direct bot on kit but if I had to trim the hub the bolt would no longer sit correctly in the tapper.

So I decided to drill the hub out to M14, and use an M14 rose joint instead.


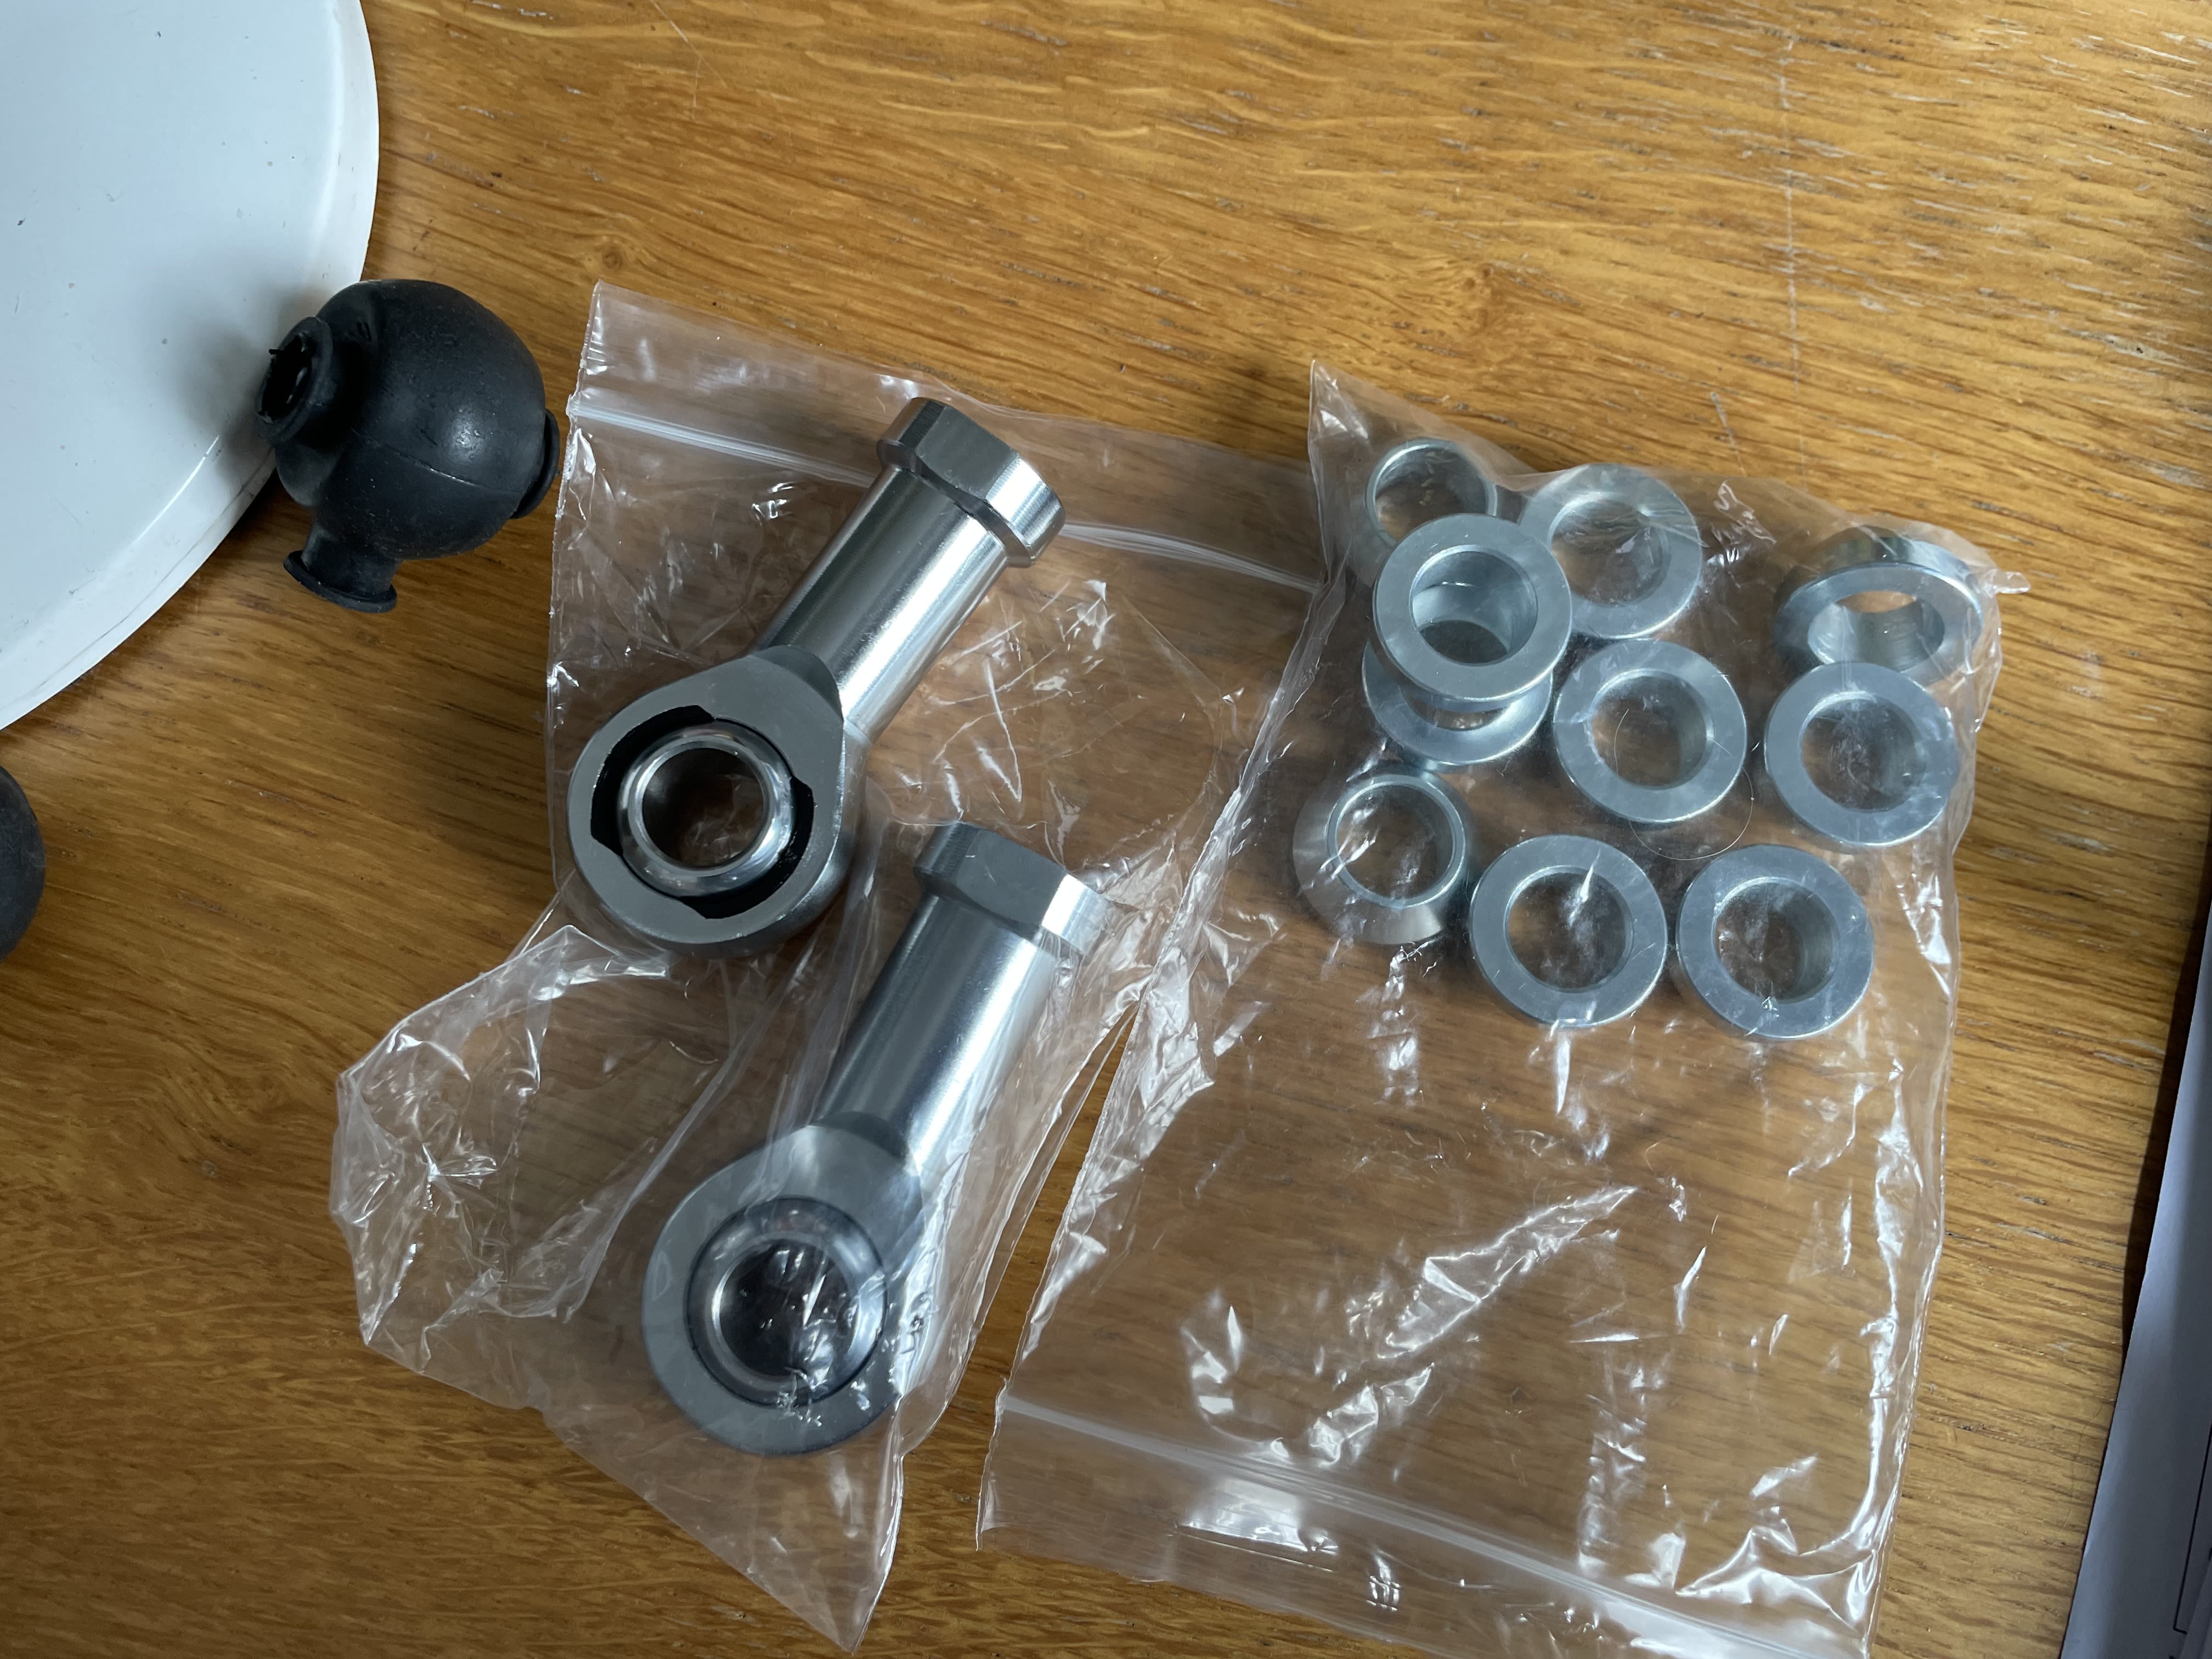
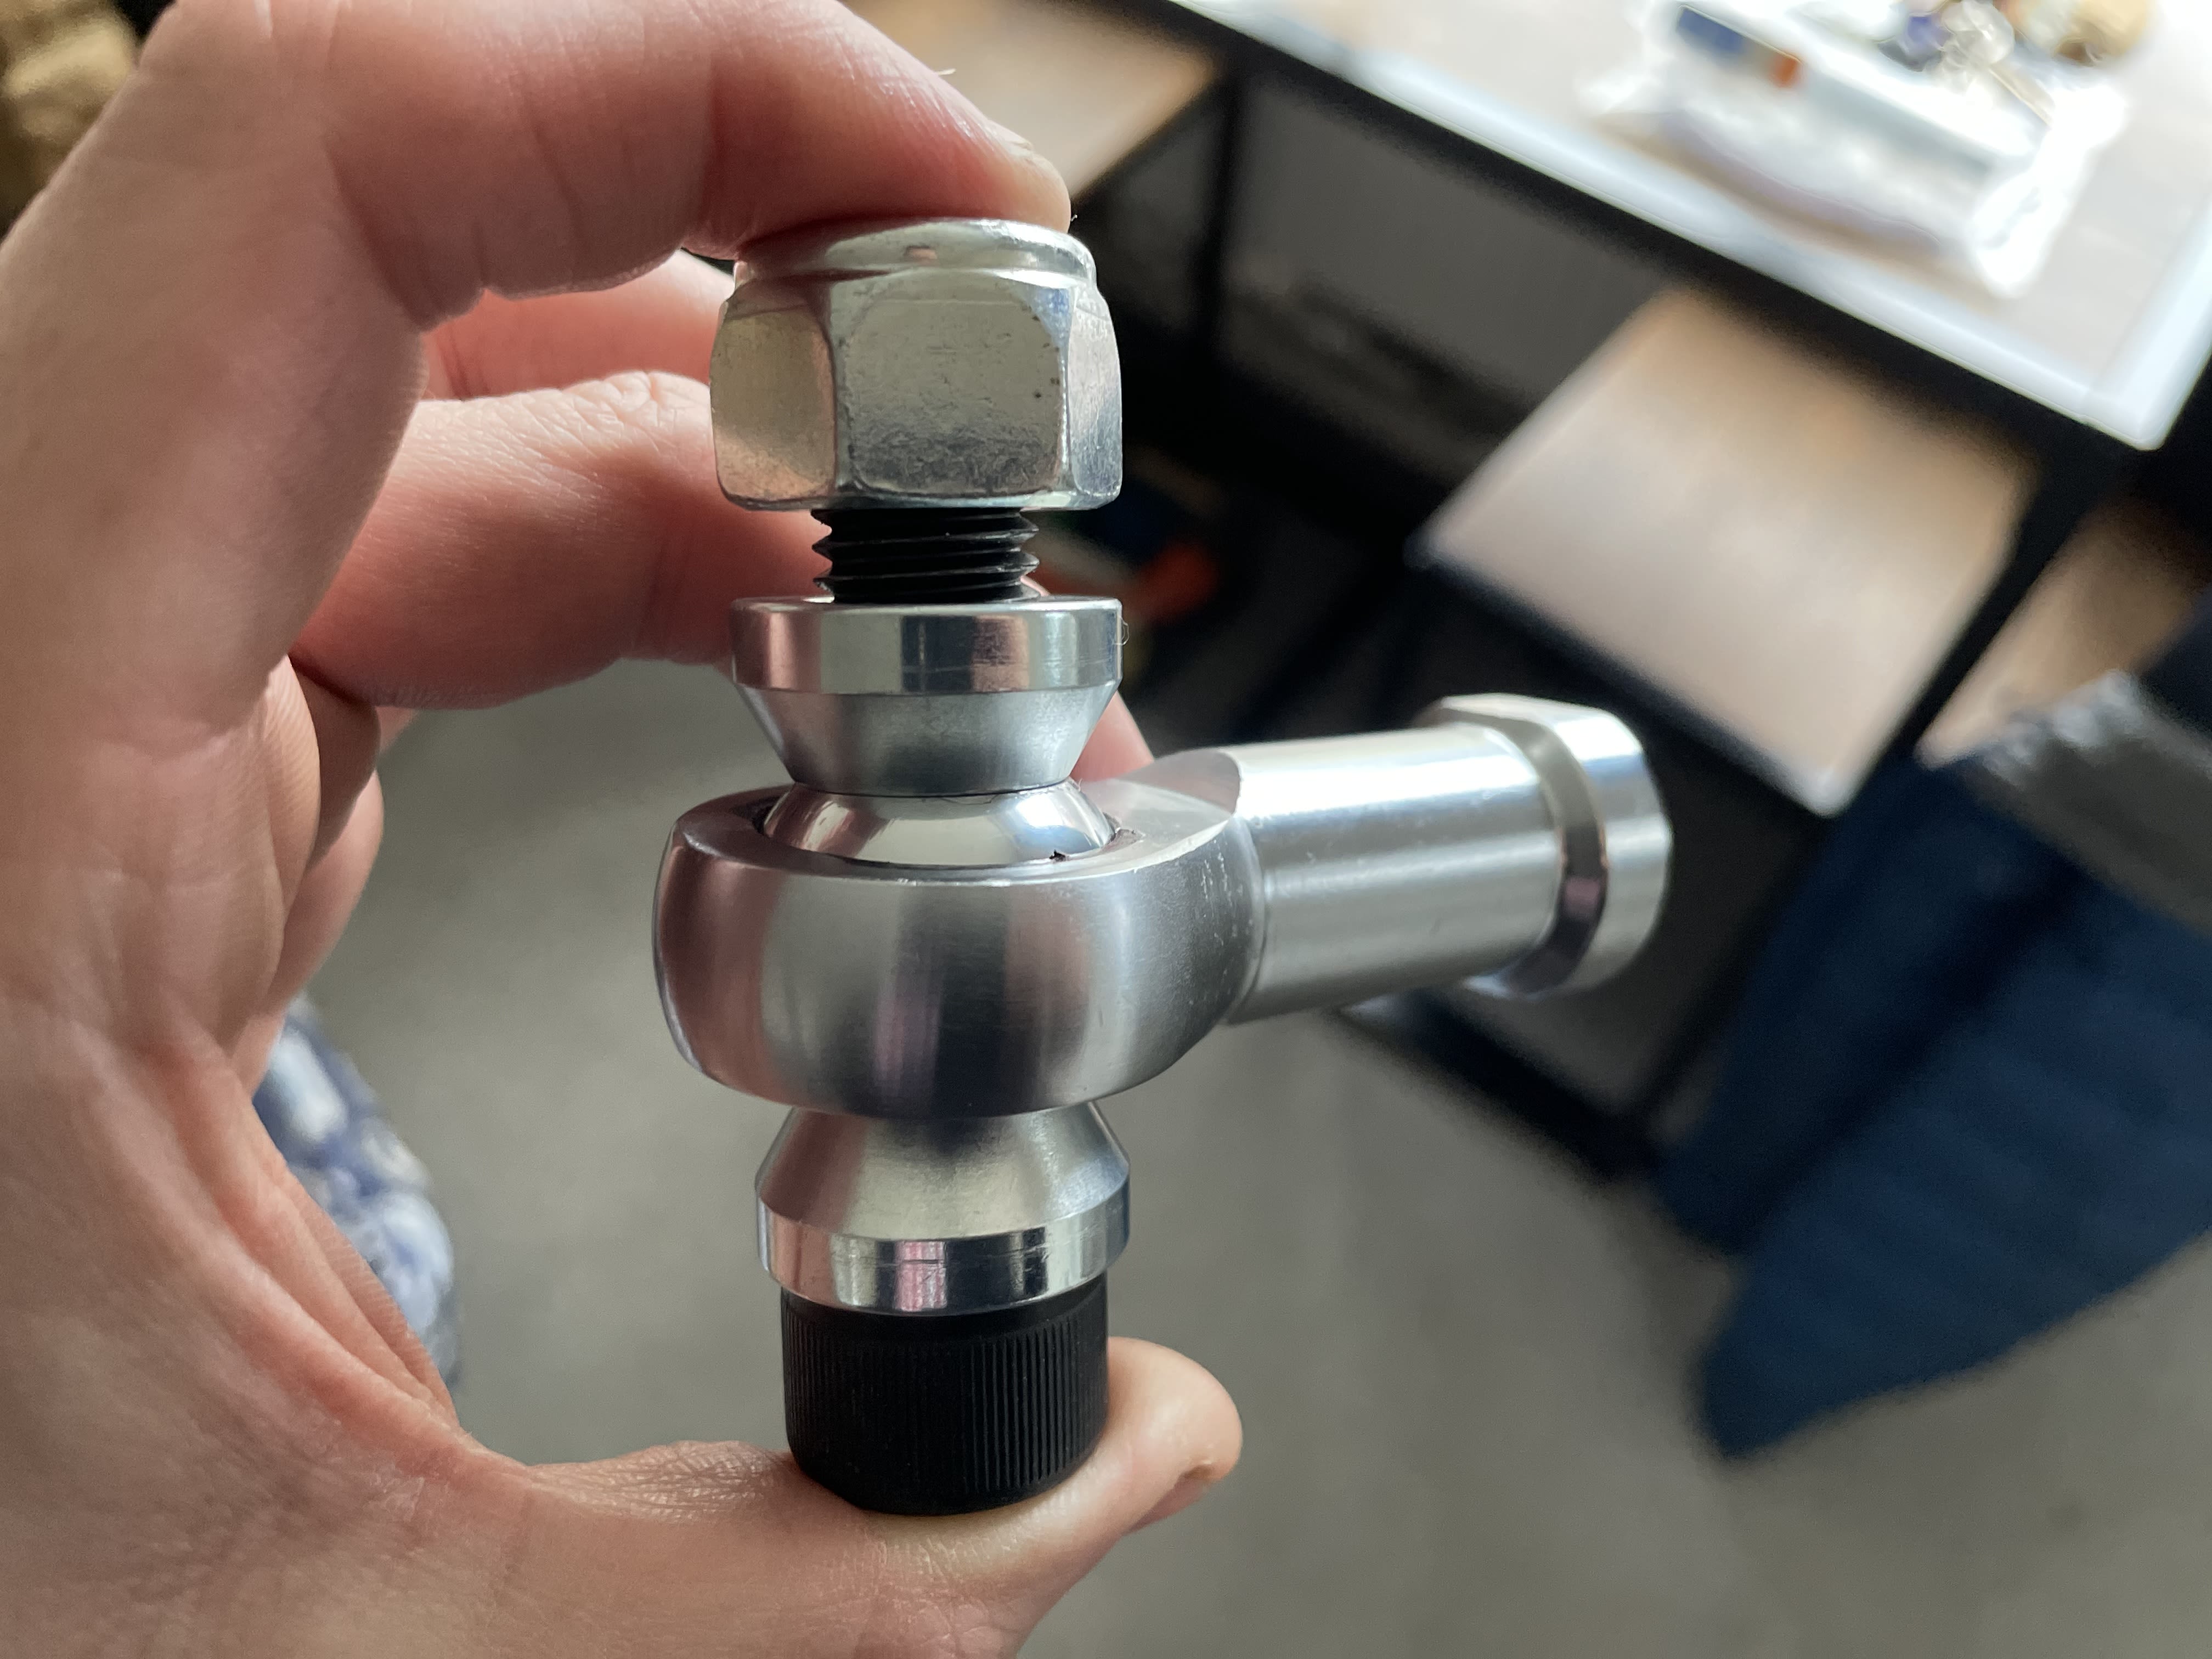
These were from McGill Motorsport, ordered on Friday afternoon, arrived Saturday!
I ordered their highest quality joints, misalignment spacers and rubber boots, costing £45.


With the hub drilled out, I took 6mm off the hubs. The material I’ve taken off the bottom I’ll add back on the top to retain the strength in the arm, I’m just waiting for the steel to arrive.


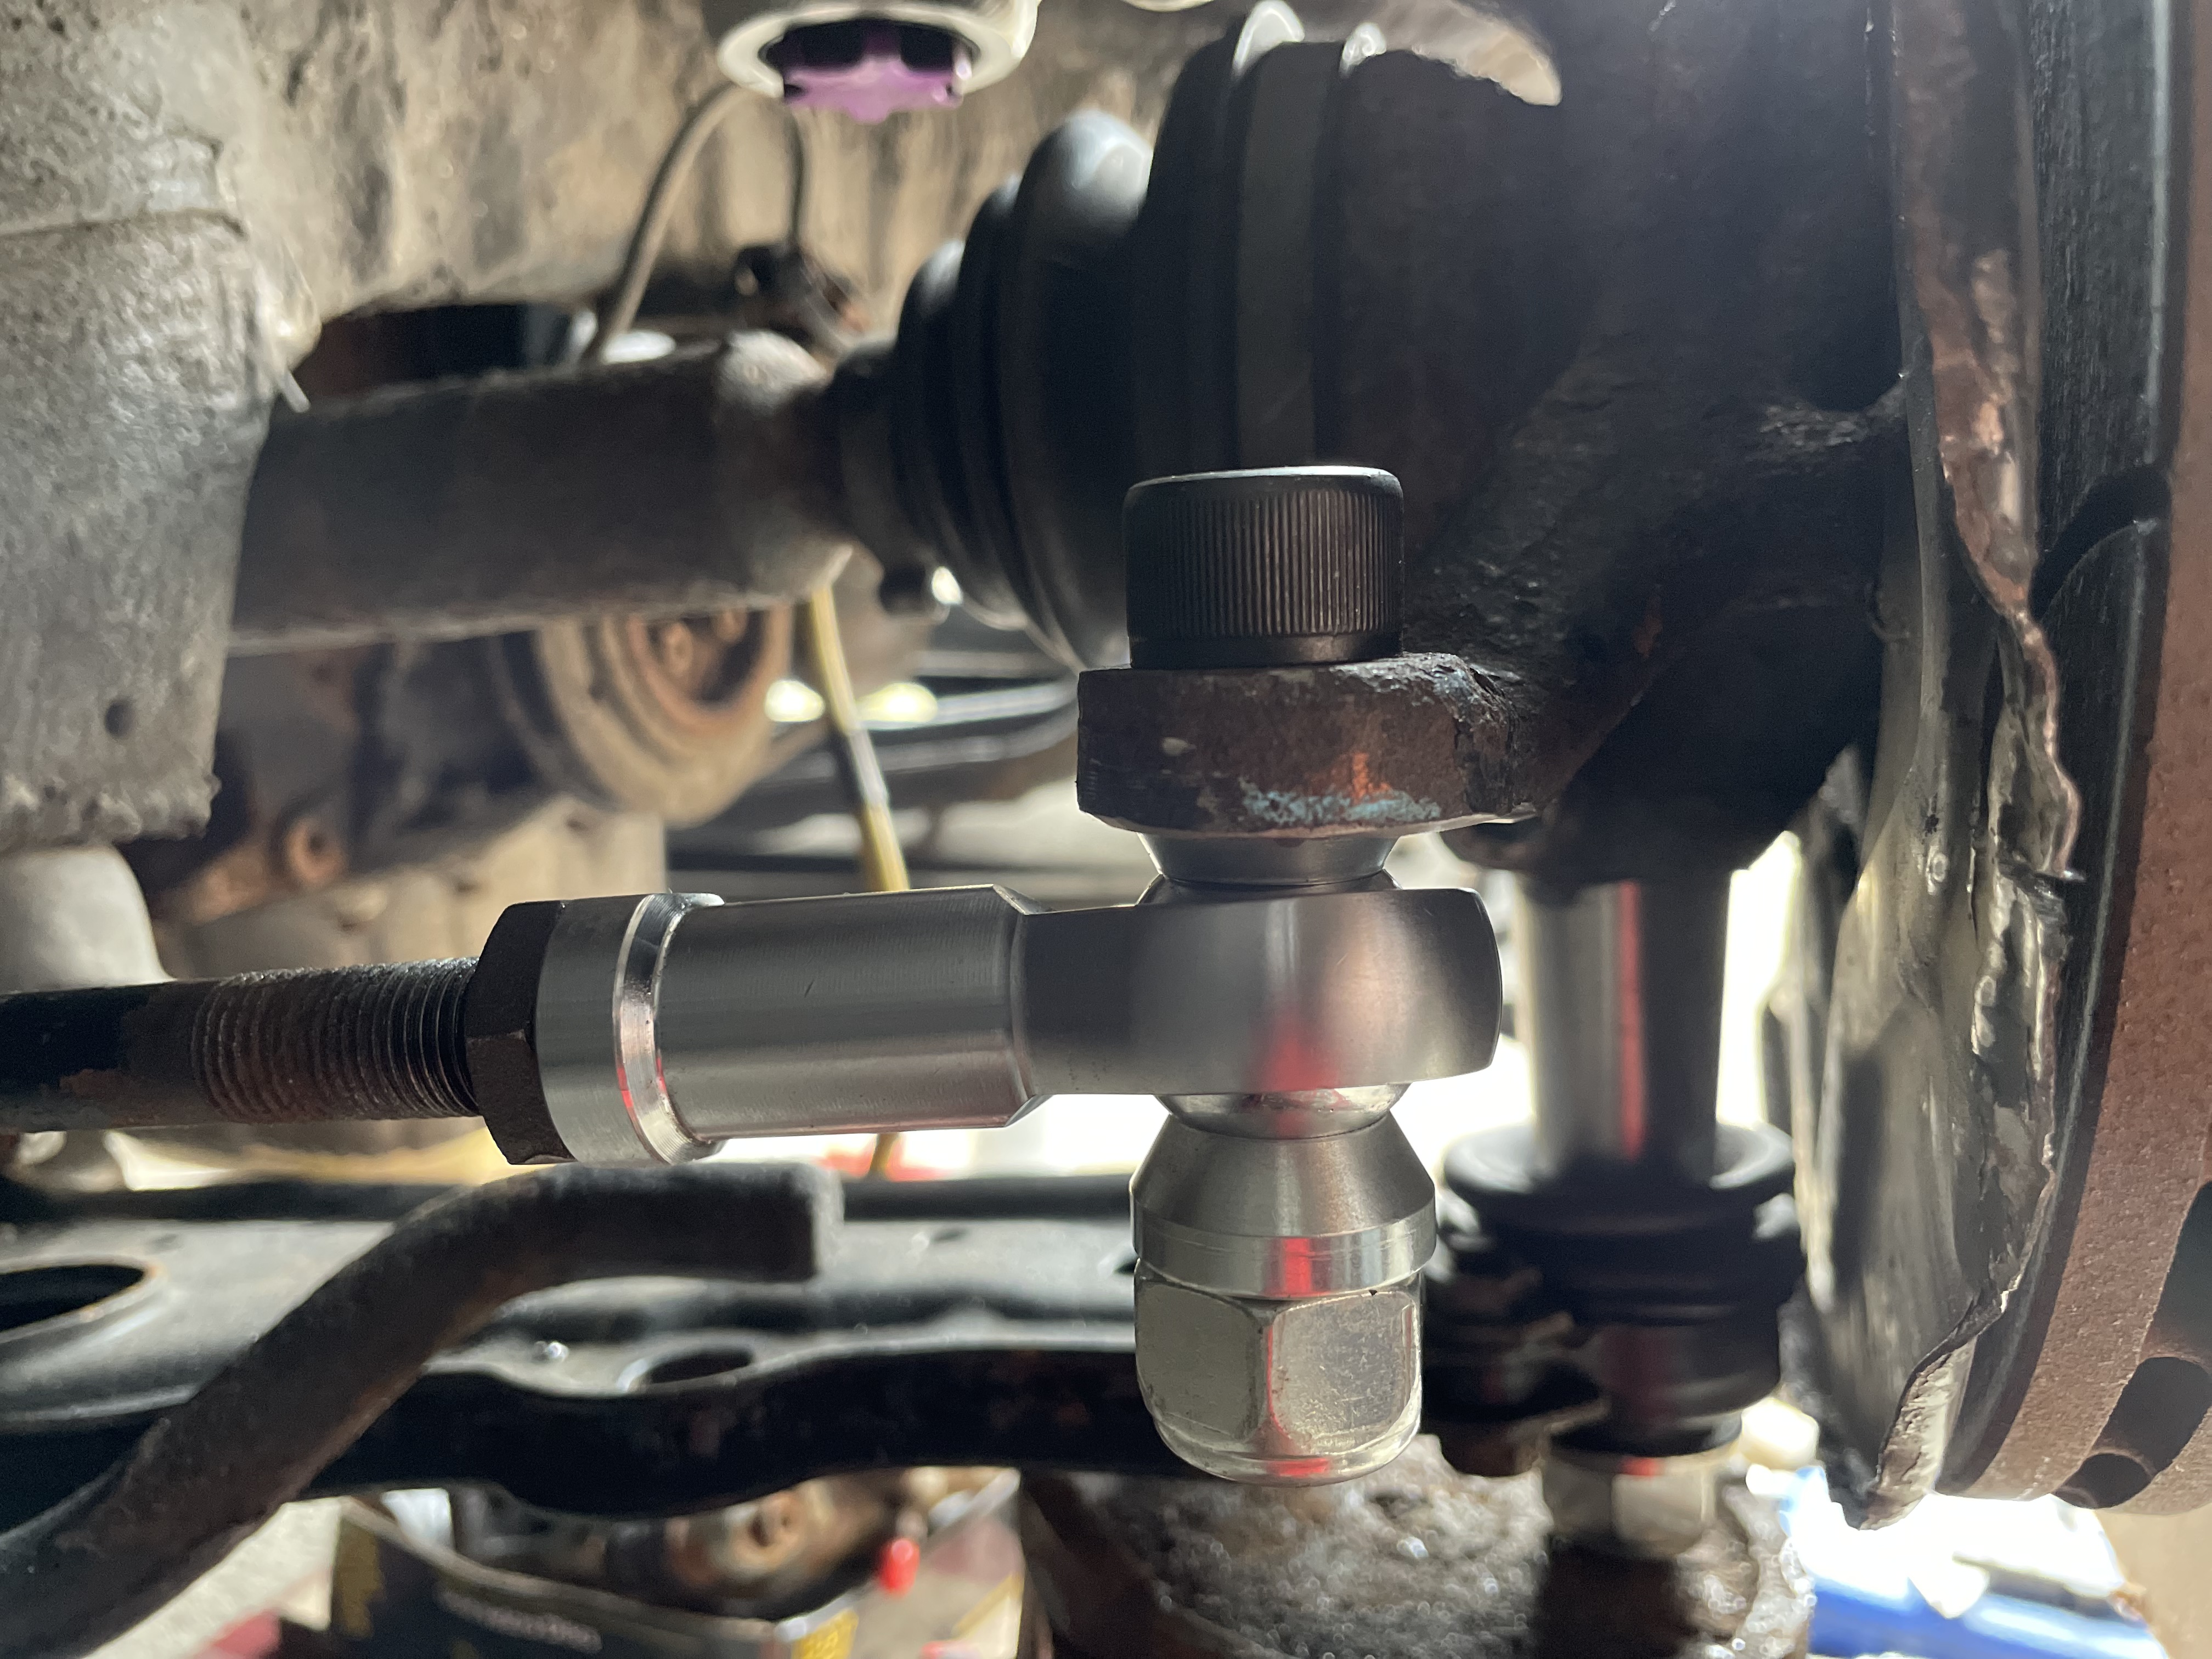
After the material was taken off and cleaned up, I cut one of the misalignment spacers down to 4mm and assembled.

I checked the articulation of the joint and there was still plenty of room and no binding in the joint.
I then plotted another graph:


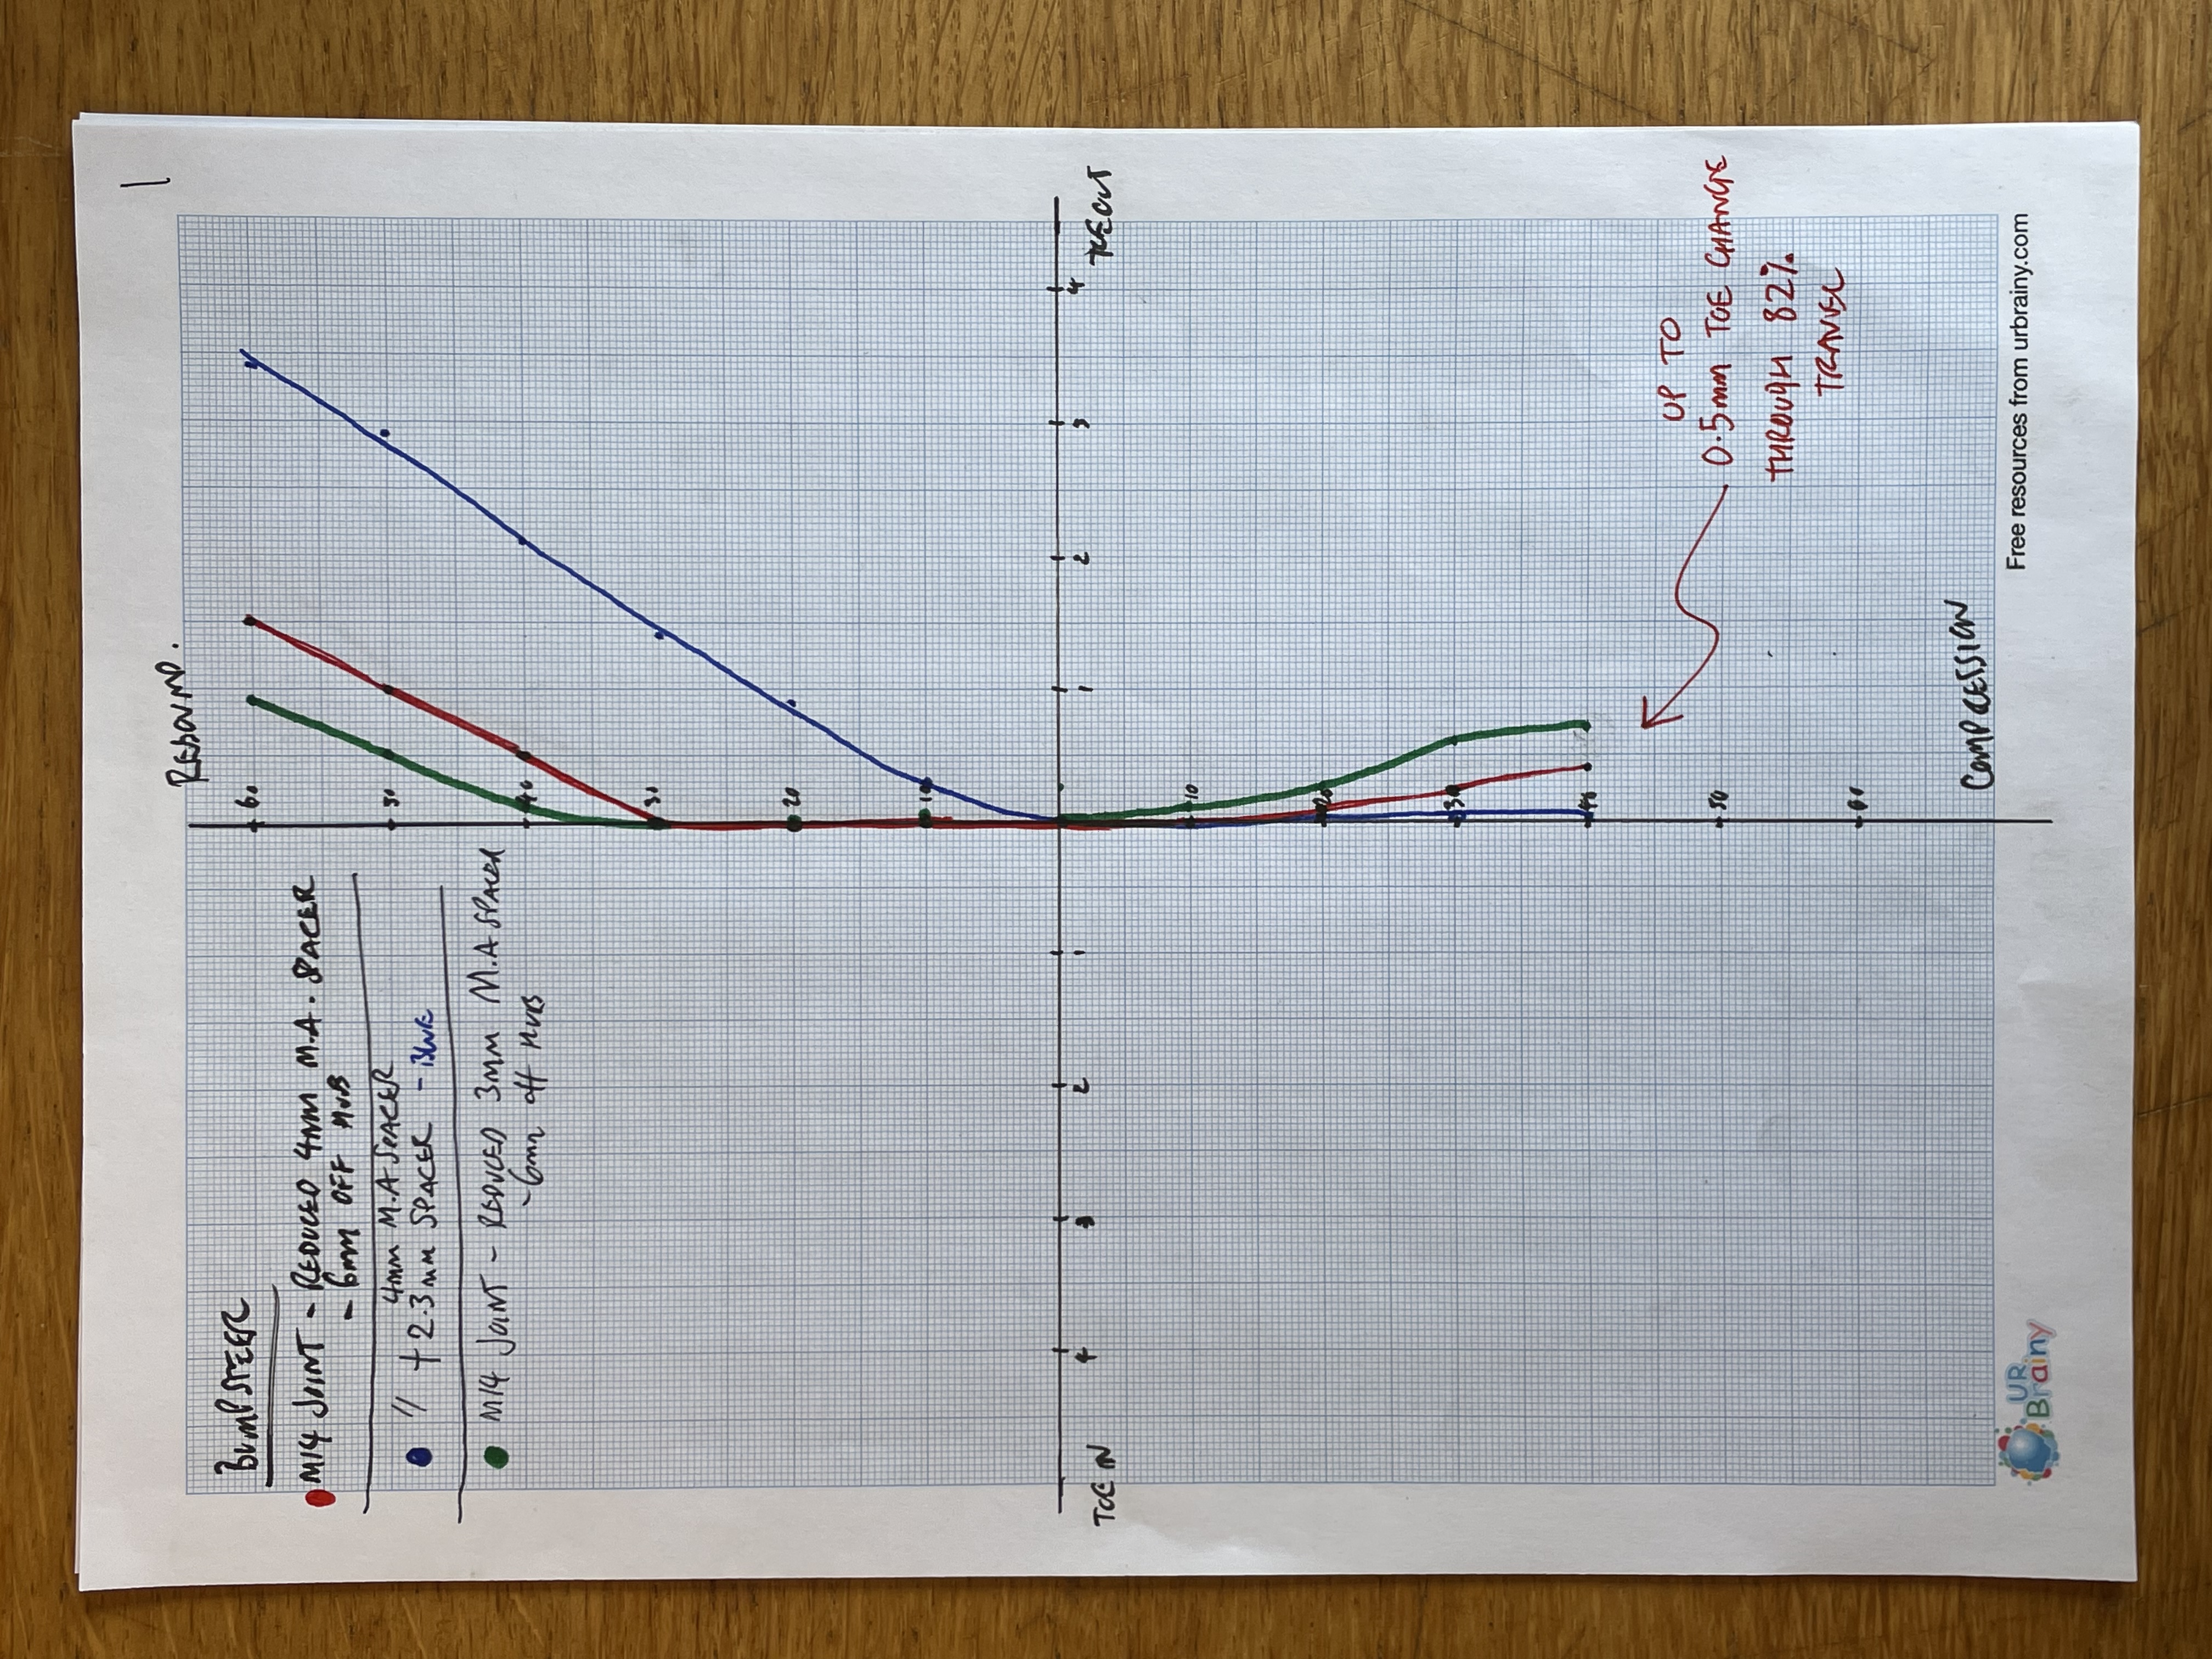
The above results I was absolutely chuffed with!
Red line is: Modified hub with M14 Joint, 4mm misalignment spacer
Blue line is: Modified hub with M14 Joint, 4mm misalignment spacer and 2.3mm washer
Green line is: Modified hub with M14 Joint, 3mm misalignment spacer

Looking at the data, the red line seems best for me, although green looks best on rebound, Red has the most usable area in zero bump, with up to 0.5mm of toe change over 82% of suspension travel.

The reason the graph arcs to toe out at the extreme ends of travel is because the track rod is effectively too long, the solution is either a wider rack, or fit rack spacers.

That will be version 2 of this project and for now I couldn’t be happier!


For those wondering I did some back to back test, and each data point was accurate to within 0.1-0.2mm,
I’ll settle for that with a DIY setup at a fraction of the cost!

Now I've just got to repeat on the other side.
2
Members' Cars / Cope's GTI
Hi guys, I thought it was about time to start keeping my build thread up to date on here.

The car: A 1989 Golf GTI 8v.


Specs:
Chassis - KW V3 Coilovers, Solid camber adjust topmounts, standard oem bushes and roll bars.
Interior: full 6 point MSA roll cage, fixed bucket seats, 6 point Schroth harnesses. Full carpets, front sound deadening and doorcards remain,
Engine: 1.8 8v GTI engine, full Milltek stainless exhaust (4-1), Newman 268 Cam. (approx 125-130bhp)
Weight: Approx 950-980kg
Tyres: Nankang NS-2R

Please see my old 82 page build thread here:
https://clubgti.com/forums/index.php?threads/copes-gti.169739/


2007


2020


A very brief background:

I got the Golf back in 2007, when I was 16. It had been sat in my dads mates garage for over 7 years. It's safe to say the car was in a sorry state! Back then I was still at school  :o working weekends in my local pub, earning £36 a week. I'd bought myself a 3/8 socket set, and set to repairing the car... well probably breaking more than I repaired, but it was all a learning curve.

Fast forward 13 years, and nothing much has changed, the Golf is still my pride and joy, and I still get out in the garage tinkering whenever i can.

Looking back, its been such a journey! Countless hours, sleepless nights, blood, sweat and tears. Breakdowns, road trips, laughs, squeaky bum moments, Nurburgring trips etc etc. It's all been worth it.
I've taught myself how to weld, how to paint and I'm pretty comfortable with any mechanical issues that needs fixing.

The car has certainly evolved over the years, from being my daily for 5 or 6 years, then taking it to a few shows at the weekends, to now where its mostly used on track and sunny weekends. I've always had the same vision, which is to create a car that functions as well as it forms!


------------------------------------------------------------------------------------------------------------------

I will continue on from around 2018 with a Nurburgring trip, and if you are interested, you can read the full progress at the link above.

Nurburgring 2018


Another year and another fantastic trip! It didnt go without its mishaps which I'll touch on later...


We set off to Hull for the usual 8pm crossing to Rotterdam.


We had a nice steady trip over and arrived over the other side for 8am.

We had the usual bunch of lads - Ford in his 3.2 TT and Beardy in his Teg.
This year, the same as usual, we rented a house for the 9 days we were there and I think this is one of the best we've stayed in. It was a 10 min drive to the Nordschelife entrance in Virneburg and cost us £130 each for the 9 days, so great value.


The owners were amazing, super friendly and spoke great English.

After unpacking I gave the golf a final check over of fluids and pressures before making our way to the track.
First port of call after unpacking was to top up with some racey 102 fuel [}:)]


Arrived at the track and went straight out for a lap. Straight away the car felt amazing! by the time I got to Flugplatz I could really feel how much stiffness the cage had added and how much more grip was on offer with the new AR1's.

Unfortunately here is where this report goes downhill for a little while..

Just before Wipperman I went to grab 4th gear. The gearstick was stuck solid. A few more wiggles (yanks) and still nothing. My initial thought was the box has got too hot for what ever reason and it needed to cool. Never the less I kept positive and enjoyed the rest of the lap in 3rd gear -pretty much at full pace :lol:

Just before the mini karusell it suddenly dawned on me that Id have to get out the carpark and up a HUGE single track road with tight hairpins in 3rd gear... this was going to the interesting.

Parked up in the carpark and left the car for 20 mins to cool. Still nothing! stuck solid. I inspected the linkages and everything seemed in order.


Popped the linkages back on and got Ford in the driver seat to give the gearstick a wiggle while I check the movement of the linkages. Next news I let out a little giggle, Ford replies "What?" as we both watch the ball that should have been attached to my relay shaft go rolling down the carpark..:lol: GREAT!

Ford felt absolutely terrible, but I told him not to worry and I must have cracked it on track trying to get it out of gear.

So the inevitable was coming, how to get back to the house. With a quick push in the carpark to get going, the mighty 8v pulled away (alot easier than I was expecting) Next challenge was the 1:3 hillclimb back to the house. The turning up to the hillclimb was a very acute left hand junction in a village. With Beardy's word ringing in my head "theres no way your getting up there in 3rd" I had no choice but to get 2 wheels on the right hand kerb at 25mph, quickly flick the car left with about a turn of lock and stamp on the throttle. Poor Dorris was out gardening and I bet she thought I was a right yob [:-B]

Ford was behind and said the inside rear lifted about half a foot:lol:

I managed to negotiate the hairpin and got back to the house feeling quite proud [:D] That was the first hurdle. Now onto the actual problem.


At this point it was obvious there was a serious issue, this was made more obvious after we attached the bar off my jack on the end of the selector shaft and gave it a nudge and it still wouldn't budge...

Time for a brew.

I came to the ring this year on a very tight budget. At the time I was moving to the other side of the country and was in between jobs so any extra expense was a push! I have Euro breakdown and seriously considered giving them a ring and getting him put on a flatbed and sent back to the UK.

But wheres the fun in that!?

After finishing my brew I'd made my mind up that I was going to fix it. After all I had 9 days off, and 2 mates with me to help...

A quick google German translator and some German ebay later I had a possible gearbox located only 30mins drive away from Virneburg. Only issue was the box code was ATH - a 1993 diesel Passat, so the ratios would be interesting.

I'd been told there was a scrapyard near the ring, just by the GP tack. By this time it was 8pm so we had a look over the fence and spotted a promising looking MK2


Feeling knackered but determined we made our way to Adenau for some food.

That night I found out a stuck 3rd gear in an 020 box is fairly common, and is down to "overshifting" whatever that means! I've watched the footage back and I heel and toed every gear on that lap and didnt do anything untoward... Perhaps a 30 year old gearbox just needs a rest sometimes!

The next morning I was up bright and early and we went straight off to the scrapyard. Using my best german I asked the owner if he had any vw gearboxes, he gave me a funny look and just shook his head. On reflection I hope it was a gearbox I asked for!

Luckily his son spoke perfect english and we went for a tour around the carpark. The mk2 we spotted the night before was for sale as a complete car. There were a few mk3's and other bits and bobs. Managed to find one mk2 but it was a 4 speed so knocked that idea on the head.

Heading back to the car I emailed the bloke on German Ebay and told him we would be popping over to his unit - hoping that he was in.

Most roads around the 'Ring are just like this one!


After trying to get the bloke to crack a smile we made a deal on 100euro for the box and a relay shaft. Not too bad in my time of need!


Did I mention I'd be changing the box on the guesthouse driveway!? Very glad I packed all my tool and even spare driveshaft bolts! ... but wheres that damn spline tool... yep, I'd left it at home!

We were staying next door to the English lads who own the Crown Pub in Adenau, they saw the box on the driveway and came straight round with a big set of ramps and asking if we needed any help. I explained we had everything apart from a spline tool. They made a quick ring to Stu at Ring Garage, who I spoke to on the phone. He said he had a tool we could borrow and if we needed anything else he was more than happy to drive round the area and pick up supplies! - These lads are true gents and I cant thanks them enough for their gratitude!! Even though you're thousands of miles from home in a foreign country, at the Nurburgring you really aren't too far from home at all.

So, onto the task in hand. To put the difference in ratios into context, check the tables below.

The left hand side is my standard ACD 020 close ratio box, on the right is the diesel passat ATH 020 box.


My main priority in doing this job was to not spill a drop of box fluid on the driveway! The last thing I wanted to do was annoy the German couple who owned the house.

Just as I got the car on stands the owner came out and said "problems!?" I said yes... thats when he saw the gearbox. "you are going to replace that!?" ... "erm, yes, if thats okay with you!" ... "of course! you have the garage there, please rearrange it how you want" - 2 mins later he came out with some massive dust sheets, obviously he was concerned about his driveway too!:lol: Again cannot thanks the owners enough for being so kind and accommodating!

First job


Removal of the box went fairly well.


Until I tried to remove the dreaded driveshaft spline bolts. I got them all out bar 3 bolts, which had completely rounded - No problem I thought, I'll get my Urwin bolt gripers on the job... nope, I'd left those at home too!:lol: Strangely, just before locking up my garage in the UK, I grabbed my angle grinder! Unfortunately it wouldn't fit in the gap between the box and driveshaft, that resulted in me having to take the guard off the grinder to gain access, not something I was comfortable with but it had to be done.


After this hurdle it was the end of the day, yes it really had taken that long to get 3 rounded bolts out!
Next morning the lads helped man handle the box out!


I had checked online before buying the box at 020 specs and this new box was listed as exactly the same apart from the ratios. I spent til lunch time getting the new box in and bolted up - all going well so far!

Trying to bolt the driveshafts up I suddenly noticed they were 90mm flanges and not the 100mm I needed for my driveshafts... balls! At this point we were all knackered and I thought that would be end of the trip.

A quick google and some encouragement from Nige, I was back out swapping the flanges from one box to another. This again proved to be a complete pain, 2 hours later all the cups were swapped over and I was able to bolt the driveshafts back up!


Marked up all the bolts so I could see if anything came loose


Got the car back on the ground, topped the box fluid up with the cheapest stuff I could find and went for a test drive!


HUGE RELIEF! the box is lovely, smooth as silk and everything aligns and slots in as it should.
The ratios are completely laughable though! I knew the track would be interesting, now I'd be using 2nd, 3rd with occasional 4th.

Got back to the house and checked everything over, everything looked spot on! We'd done it!!! [:D]

By this time it was getting late so I jumped in the shower, and we all headed straight for the evening tourist session.

As you can imagine I was a little apprehensive about going out. But i needn't have worried! after a couple of miles my confidence in the car grew and we were back on form, albeit alot slower due to the box.

Smiles all round!


saw Dale from Bridge to Gantry in the carpark and he was very exited and seemed to love the golf, before I knew it he'd jumped in and started it up going "wooow" :lol:


Ended up doing 2 laps and felt so pleased we'd managed to sort it! Only issue I could find was I was boiling my cheap box fluid, so replaced that with some decent stuff and had a leak from the speedo cable hole, which i fixed with about an inch of high temp sealant :thumbup:[:D] After all the box needed to last me a week and get me home!

Drove home with a huge grin and sat down to a very well deserved cold one!


For the res of the week we lapped hard and had a fantastic time!!!


This year the golf got alot of love! everywhere we stopped and even on the motorway people we taking photos and asking questions about the car [8D]:thumbup:

We stopped a few times to grab photos ourselves. It really is a stunning place!


:hug:


Got some lovely photos on track!


I'm claiming all 4 wheels off!

https://www.youtube.com/watch?v=NcuoyTHLsAg


The only issue I had through the week were the exhaust rubbers. No matter which ones I try they always melt!