Dubmuffin's How to - Waterproof your Doors!

A HUGE problem with MK2 Golfs is their ability and indeed tendancy to leak water in through their doors, leaving you with mouldy doorcards and soggy carpets.
This is in large due to the plastic sheet doorskins behind the doorcards either crumbling away with age or being missing entirely due to being removed in the past for possibly window repairs and never getting replaced.
Doors are made to let water pass through them (otherwise we wouldn't be abe to open and shut our windows)
Fortunately, this one's an easy fix! Anyone can give it a go.
Apologies there are not many pics to break up the info as I lost most of them! 
You will need:
- Large piece/pieces of plastic sheeting (I used an old mattress bag, but anything durable and waterproof can be used!)
- Silicone sealant
- Scissors
- Crosshead screwdriver
- Small flathead screwdriver or trim removal tool
- An indoor location or a non-windy day!
Start firstly by removing the doorcards. This is a relatively simple process.
You need to take the flathead or trim tool and remove the middle section of the door handle (NOT the one you use to open and shut the door catch, but the grab handle you use to close the door from the inside) then remove the two screws holding it on at either end with the crosshead.
Secondly, with the flathead remove the teardrop shaped cover from the window winding handle (if you have keep fit windows!) and undo the screw with the crosshead to remove the handle from its spindle.
Now remove the surround for the pull handle (the one which operates the door catch) by sliding it towards the front of the car. It is quite stiff and tricky but you will get there!
Your door pins should simply unscrew, and finally, the mirror adjuster should just pull right off.
Now you are ready to undo the screws holding your doorcard on. There are 3 or 4 on either side of the card. After this, it should slide off! Remember if you have electric windows or speakers in your doorcard to disconnect the wires from the back of these 
You should be presented with either a bare door, or a doorskin in a poor condition!
Remove the old skin, or what is left of it.
At this point it is also important to check the drainage holes inside the bottom of your door - of which there are 3 - and clean any gunk out of the bottom of your doors which could block them.
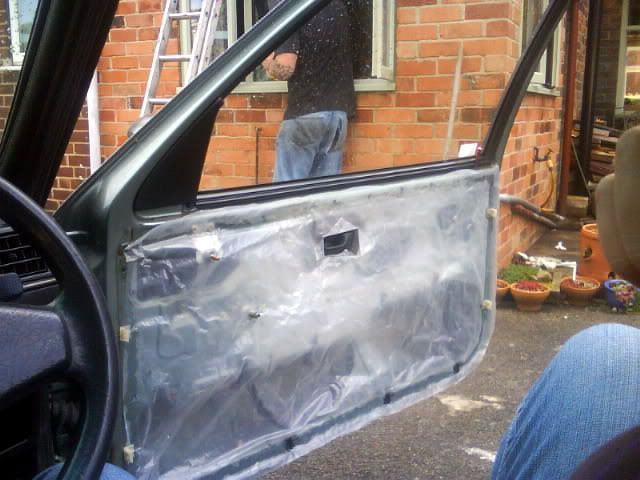
Now get your piece of plastic sheeting and cut roughly the shape of your door out.
REMEMBER at this point to leave room around the edge to make sure that you have enough, and also to create a 'baggy' centre so that your doorcards wil fit back on correctly - too tight and the door pockets will not be able to sit slightly inside the doors.
Run a line of silicone sealant neatly along the top edge of the door, making sure it is on part of the door hidden by the doorcard so it won't look unsightly.
Now you are ready to put the top edge of the plastic in place. Once you are happy with its location, allow it to dry before attempting to stick on the rest, as it is likely to move whilst the sealant is still wet and make a sticky mess! :lol:
Now push the mirror adjuster through the plastic and repeat the silicone process for the bottom half of the door (remembering what I said about leaving some slack in the centre to allow the doorcard to sit back flush)
A good tip is to remove the plastic brackets into which the screws at the sides of the doorcards go, and the black clips along the bottom of the door which the doorcard 'should' rest on. To do this get some longnose plyers and remove the long plastic pin from the middle of them CAREFULLY from the inside of the door.
(I apologise for the lack of pictures again at this point but it should be clear to see what I mean when you do this for yourself! )
Once the plastic is glued in place, cut a small hole then push the clips back through, then put the long plastic pin back in through the front, pushing it in until it is flush as it was before.
Cut around the door latch handle as close as you can possibly get - water shoudn't leak from here but better to be safe than sorry and if you wish to make some small holes where any screws must pass through the new doorskin, but generally they will screw themselves through it when you put them back in!
Trim off any excess plastic from around the edge once the sealant is fully dry using scissors (a stanley blade may scratch your paint)
You then need to be sure to go around the edge of the glue and at any point you think there is a possibility water could get through, just top it up with some more sealant!
And you should end up with something a bit like this!:
Now reverse doorcard removal process, and fingers crossed, your doors should not leak again, at least not for a very long time!
Becca
 Topic: Dubmuffin's How to - Waterproof your Doors! (Read 1177 times)
previous topic - next topic
Topic: Dubmuffin's How to - Waterproof your Doors! (Read 1177 times)
previous topic - next topic